Stream your passion in minutes with Wowza and Postman
 This is a guest post written by Barry Owen, chief solutions architect at Wowza.
What do you get when you combine Wowza, Postman, and a 3D printer? You get a step-by-step demonstration of how easy it is to start streaming with Wowza Video within minutes of gaining access to our platform. Well, that and about a dozen Postman figurines. But more on that later as we dive a little deeper into how to get started with Wowza in Postman. In this blog post, we’ll talk you through how to access the Wowza Video platform, fork the Wowza API collection in Postman, and start streaming.
Introducing a streaming platform by developers for developers
Wowza Video is an API-focused solution built explicitly for builders and developers at a variety of levels. We make it easy to get started. In fact, a free trial can have you up and streaming in as little as 15 minutes. But our SaaS video offering also has incredible depth behind it, providing tons of customization options and ways to manage your video assets. In short, this complete end-to-end platform can be as simple or as complicated as you need it to be.
Wowza Video’s interface is built entirely on the Wowza Video API, meaning we don’t use any APIs that aren’t available to you as a developer. This API, now available as a Postman Collection, makes it easy for developers to make the most of our Wowza Video Free Trial by fully leveraging all of the tools therein.
Getting started with a Wowza Video free trial
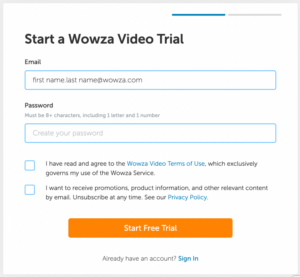
Before using the Wowza Video API in Postman, you need a JSON Web Token (JWT), which can be obtained through a Wowza Video Free Trial. So, your first stop should be our Wowza Video Free Trial page.
It’s easy to access our free trial: you just need an email address to sign up (no credit card required) and you will enjoy full access to Wowza Video’s tools and platform. Your only limit is time. Your live streams will be limited to 20-minute increments (although it’s easy to just start a stream again as soon as it cuts off) and your trial itself is limited to 30 days.
So, let’s begin.
- Go to the Free Trial page.
- Input your email address.
- Verify your email address.
- Create a password.
Now you are automatically signed in and can access the Wowza Video Dashboard.
- Click on the little person icon in the upper right corner of the page.
- Select Wowza Video.
If you don’t see Wowza Video, go instead to My Account > Info and select Wowza Video under Products. Now you are in the Wowza Video Dashboard.
Accessing your JSON web token
Access to the Wowza Video API is secured by JSON Web Tokens (JWT). Here’s how to get your own for use in the Postman Collection.
Access the Token Management portal:
- Click on Wowza User in the upper right-hand corner of the Wowza Video Dashboard
- Select Account Settings from the dropdown.
- Click on the Token Management portal link in the text box.

Use this Token Management portal to create and manage your tokens. For example, if you have a group of people on your free trial account, you can create and assign tokens for production, staging, individual develops, and so forth.
Create a JSON Web Token:
- Click Create a Token.
- Give your token a name.
- Copy the token for use in Postman.
Now you are set up for streaming with Wowza Video. It’s time to go back to Postman and get access to the Wowza API.
Finding and forking the Wowza API in Postman
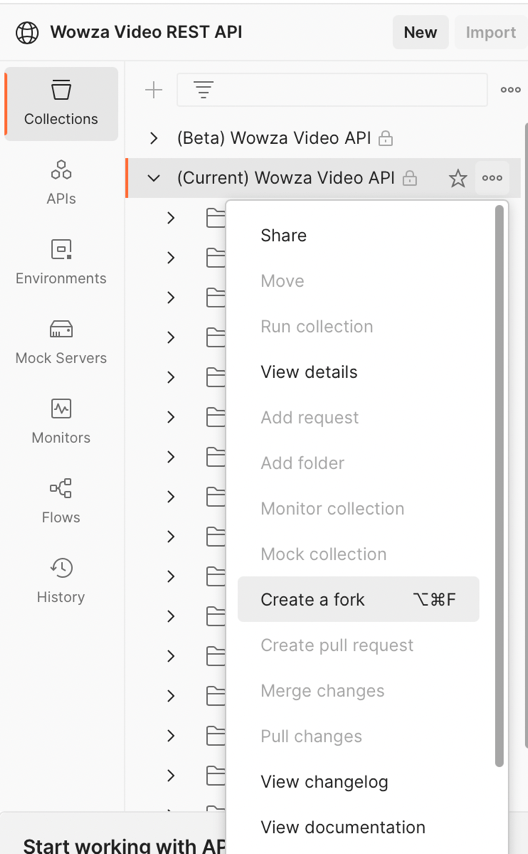
Let’s assume you’re starting in your Postman workspace. Step one is to then find the Wowza workspace so you can access the Wowza Video API collection. When you search for Wowza, the first result that pops up is the Wowza Video REST API. This is what you want.
In here, you’ll find a few different options. Wowza supports three different versions of the Wowza Video API at a time, including a Beta for trying out new features and a Current for a more reliable and well-tested solution. Let’s assume you are looking for something straight-forward and opt for the (Current) Wowza Video API.
- Click on the three dots to the right of (Current) Wowza Video API.
- Select View More Actions.
- Select Create a Fork from the dropdown.
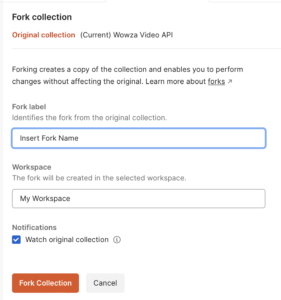
Now you should see some new fields in the space to the right. This is where you can create the fork to port into your own workspace.
- Label your fork.
- Choose which workspace you’ll be moving the forked collection to.
- Check watch original content under notifications to receive a notification whenever an update is made to the API.
- Click Fork Collection.
You’ll be automatically brought back to your own workspace, now with access to the Wowza Video API. However, you’re still not quite ready to start live streaming. You’ll need to let the Wowza Video API know that you’re set up with a free trial.
Authenticate Wowza with your JWT
Here is where that token we created in the Wowza Video dashboard comes in. Right now, if you click on the forked collection and look to the right under Authorization, you’ll see no auth. In other words, you can’t use the API. It’s time to copy over the token, starting with finding somewhere to store it.
One highly recommended option is to make an environment for your web token.
- Click on Environments in the left-hand column.
- Click New at the top.
- Click Environment in the pop up
- Name your environment.
- Create a variable for your token.
- Choose secret or default for your variable. Choosing secret will make it so you can’t see the key characters when you paste it in.
- Paste your key into the Current Value field.

Technically, you could paste your key into the Current Value or Initial Value fields. Current Value means your key will be stored locally. Initial Value means your key will be backed up and stored in Postman.
Now that you’ve created an environment and saved your JWT in it, it’s time to give the Wowza API fork access to it. Start by going to (Current) Wowza API (or whichever API collection you chose to fork over). Adding the JWT here will guarantee it filters down into the various API subfolders, each of which typically has inherit auth from parent specified in their own authorization fields. In other words, each folder is looking to the one above it for authorization, so starting at the top will cover all your bases.
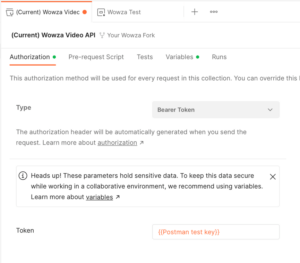
- Click on Authorization on the right-hand bar.
- Open the dropdown under Type.
- Select Bearer Token.
This is where having set up an environment for the web token comes in handy. You can set your environment in the upper right. If you have none selected, it will read No Environment. Click on it to select the environment you created. Once you’ve done that, type {{token variable}} in the token name field, bringing up your saved token. Note this should be the variable you chose, not the literal words “token variable.”
Starting a Wowza live stream through Postman
Starting a live stream is the easiest and fastest way to test out the Wowza Video API. In fact, you could consider a live stream the basic building block of the Wowza Video platform. That said, you are not limited to live streaming, but we’ll address that in more detail later.
For now, let’s start streaming.
- Make sure you’re under (Current) Wowza API.
- Select live_stream.
- Select Post – Create a Live Stream in the list to the left.
- Look to the right-hand column and select Body.
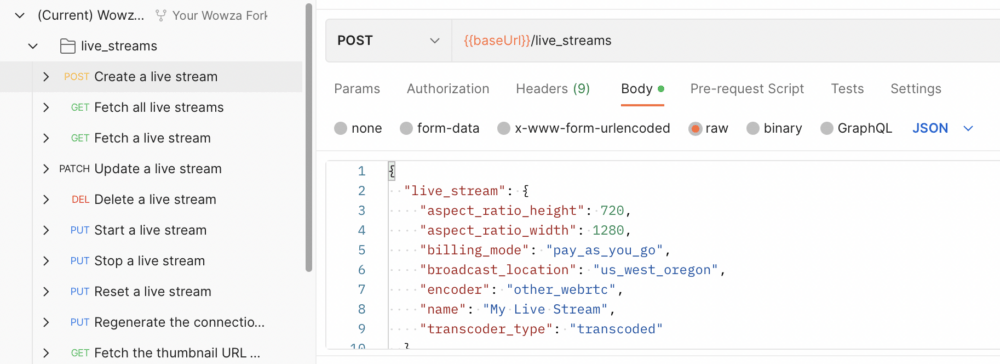
Here you can indicate the size of your video, encoder, broadcast location, and more. Adjust the values on the right according to your specifications. We recommend matching your transcoder to your encoder output.
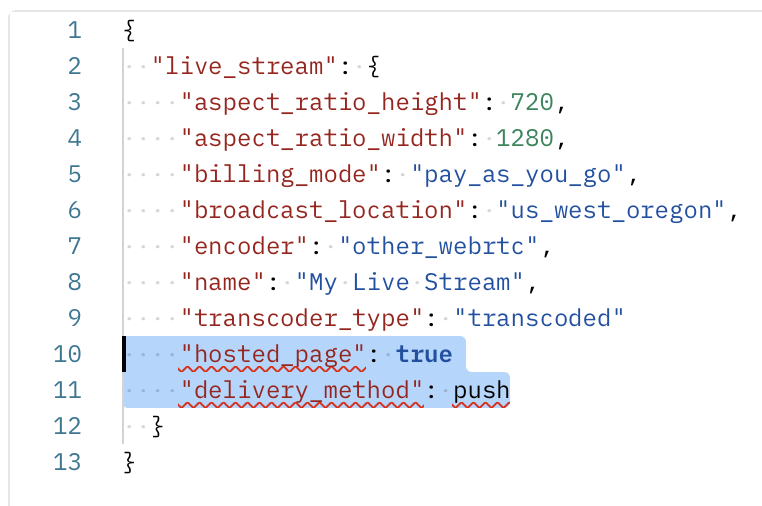
For the purposes of testing our API in Postman with a live stream, we recommend creating a hosted player page so you have an easy way to view your stream. To do this, add a new field at the bottom of those shown and type “hosted_page”: true.
Additionally, if you, like Postman in our 3D printing video, are pushing video directly, add another field on a new line: “deliver_method”: push. This will send the stream directly to the transcoder and require us to start the transcoder manually. Of course, if your workflow is such that you don’t want to have that extra step, you can always set the deliver method to CDN, allowing the encoder to send the stream immediately whether or not the transcoder is running. Basically, you can choose whether to set your live stream to start automatically or manually.
Once the input information is to your liking, hit Send in the upper right. Some data will be returned. At this point, you might have other steps involved in your live streaming process. For example, if you are using OBS Studio with RTMP, you may need to grab the URL data next “Primary_Server” and the stream key next to “Stream_Name”.
When you’re ready to officially start the live stream, grab the ID info next to “id” under live stream; then look to the left-hand column again.
- Select Put – Start a Live Stream.
- Input live stream ID in the indicated field.
- Hit Send to start the stream.
How can you see the status of your stream? Wowza Video can call webhooks for a variety of events, including starting, stopping, video connect, and video disconnect. We find this to be a powerful way to monitor the platform. You can learn more about our webhooks feature on our site.
Managing and analyzing your livestream
You are now livestreaming, but what does that really mean? How can you observe your stream and make it available to others for viewing?
For starters, you have a few options when it comes to letting others view your stream.
- Use an embed code to embed our player on your own page.
- Provide viewers with a direct playback URL.
- Use the very simple playback page created for you by Wowza Video.
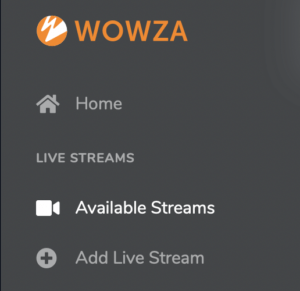
However your viewers access the stream, you can see it in action on the Wowza Video dashboard. Simply go to the dashboard and click on Available Streams in the upper left. If you don’t see Available Streams, try refreshing the page. Here you can view the stream itself, as well as certain stream metrics.
You can also view stream metrics from the API in Postman. Click Get – Fetch Metrics for Active Live Stream in the left-hand column. Make sure you have the live stream ID from before handy.
Typically, Wowza Video makes both streaming and viewership metrics available to streamers. However, the free trial is somewhat more limited. With a Wowza Video free trial, you can still see stream data, such as bitrate. However, free trial streams are routed through a transcoder and not Wowza’s content delivery network (CDN). As such, it can’t measure data like number of viewers as that information is tracked through the CDN. Keep this in mind if you’re watching your streaming analytics and wondering why it says you have no viewers.
What does this have to do with 3D printing?
Now you know how to start streaming with the Wowza Video API collection and Postman, but what are you going to stream? In the embedded video demonstration, I team up with Ian from Postman to go through the above steps to live stream a 3D printer. Check it out for a fun use case and handy visual demonstration of the steps outlined above.
In this video, we also talk a little more about other options for your video assets, including VOD libraries, streaming pre-recorded assets as though they were live, and simulcasting live video across a variety of social platforms. Whatever the contents of your stream, there’s no better place to start than the Wowza Video API collection in Postman.
Watch and learn


What do you think about this topic? Tell us in a comment below.