How to access Google APIs using OAuth 2.0 in Postman
Authorization is a fundamental part of working with an API. There are many standards that define how it is done, but the Open Authorization 2.0 standard—referred to as OAuth 2.0 for short—is the most popular and widely used.
OAuth 2.0 plays an important role in API data security. It provides a standardized and secure protocol for authorization between APIs and third-party applications that doesn’t require users to share credentials. It also allows an application to get user-consented access to specific data without requesting any confidential data (such as passwords) from the user. Large-scale and enterprise organizations use OAuth 2.0 as a primary method for authorizing access to their users’ data, and it has grown over the years to become an industry standard.
In this post, we’ll show how you can use Postman to access a Google API using OAuth 2.0. But first, we’ll review access and refresh tokens—and explain how OAuth 2.0 works.
Related: What is OAuth 2.0?
Access and refresh tokens
An access token is an authorization string that is issued to a third-party application. These tokens represent specific scopes that have been granted by the user or resource owner and are often short-lived. Access tokens can be stored in different formats, the most common being the JWT (JSON Web Tokens) format. This format ensures that the token can also contain some encrypted data, which can be securely retrieved before the token expires.
Because access tokens are often short-lived, there needs to be a way to generate a new token when the previous token is no longer valid or has expired. Refresh tokens are used to obtain new access tokens and often have a longer lifespan than access tokens. However, not all providers issue refresh tokens; the availability of a refresh token is determined by the API provider.
The following roles exist within the OAuth 2.0 specification:
- Resource owner: This is the user who is granting third-party access to their data.
- Resource server: This is the server that is hosting the protected resources. It is responsible for accepting and responding to requests to access protected resources using an access token.
- Client: The client is the third-party application that is requesting authorization from the resource owner. When the resource owner grants access, the client gets the access token that can be used to request the resources within the granted scope.
- Authorization server: The authorization server issues access tokens to the client after the resource owner successfully authorizes the request. This process involves two steps. First, the client is issued a code on authorization, which is then used to request the access token from an access token URL provided by the authorization server.
How does OAuth 2.0 work?
Let’s take a look at the step-by-step process involved in implementing the OAuth 2.0 authorization method:
- The client gets a client ID and a client secret from the authorization server, which it uses to identify itself when requesting an access token.
- The client requests authorization from the user (i.e., the resource owner) to access their resources on the resource server.
- The user grants authorization to the client through the authorization server by logging in with their credentials. These credentials are not shared with the client. Instead, an authorization code is generated and shared with the client.
- The client uses this authorization code to request the access token from an endpoint provided by the authorization server.
- The authorization server generates an access token, which the client can use to access the user’s resources on the resource server.
- The client sends the access token to the resource server to request access to the user’s resources.
- The resource server validates the access token with the authorization server and, if valid, grants the client access to the user’s resources.
This process ensures that the user’s credentials are not shared with the third-party application and that the user has control over which resources the application can access.
Using Postman to access a Google API
The Postman API client lets you work with different types of API authorization methods, including OAuth 2.0. It makes it easy to generate and exchange an authorization code for an access token—and it even provides an option that automatically refreshes your authorization tokens when they expire, assuming a refresh token was returned from the authorization server.
In this section, we’ll show you how to use Postman to access a Google API with OAuth 2.0 as part of your API development and testing workflow. We’ll be using the Google Sheets API for our example, but you can use any other Google API (i.e., the Google Calendar API) and follow the same flow that’s documented here.
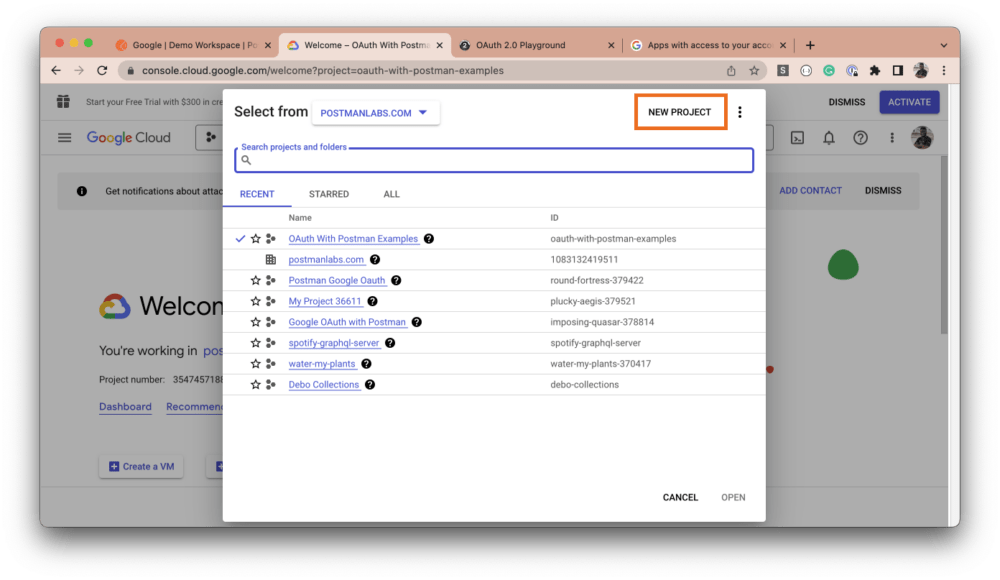
Step 1: Create and set up a new project
Note: If you already have a project set up in Google, you can skip this step.
Navigate to the Google Cloud Console and select the dropdown in the top navigation menu. Then, click on the New Project button:
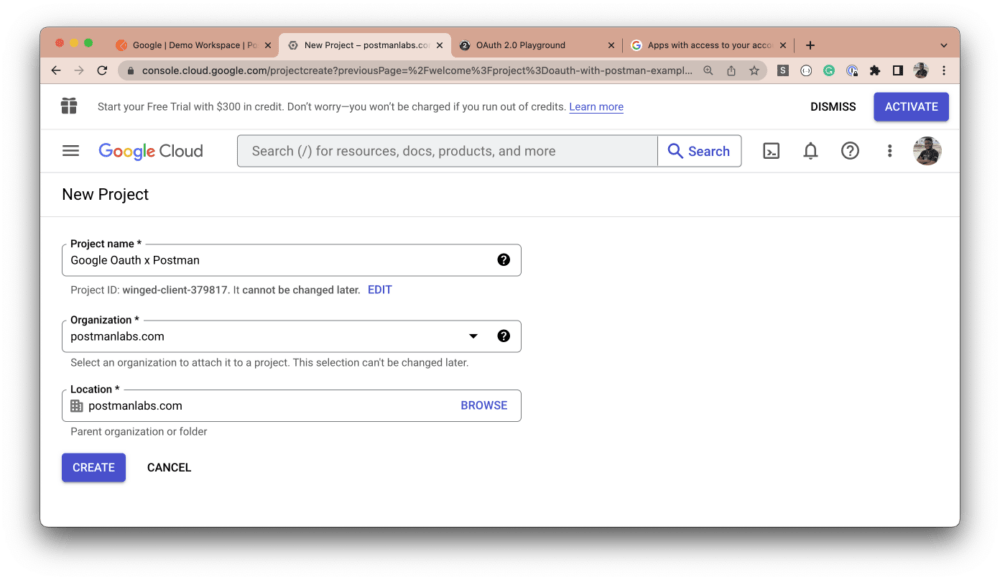
Give your project a name, and select a location and an organization:
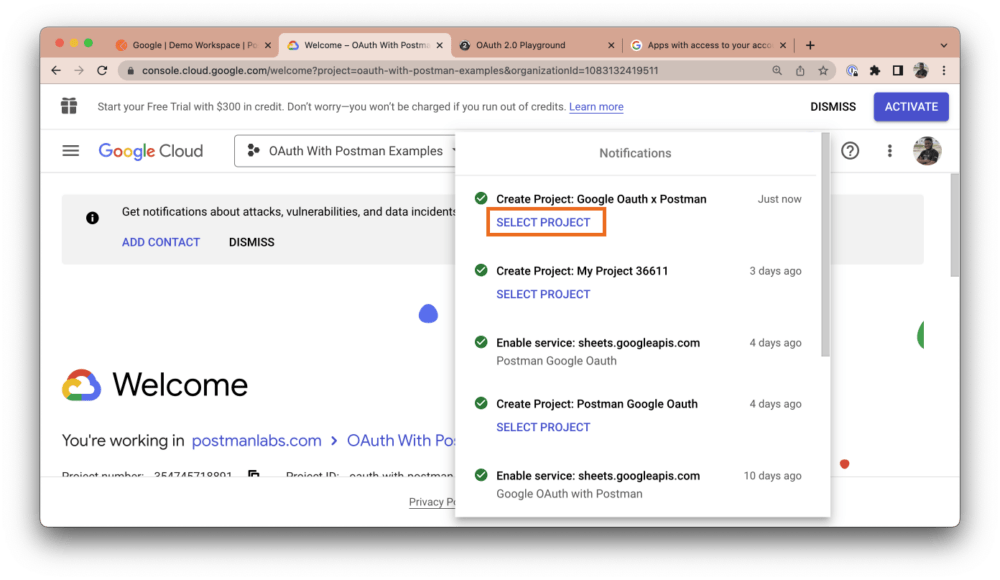
The notification modal will pop up. Click the Select Project button for the newly created project:
Next, in the side navigation menu, hover over APIs & Services and select Library:

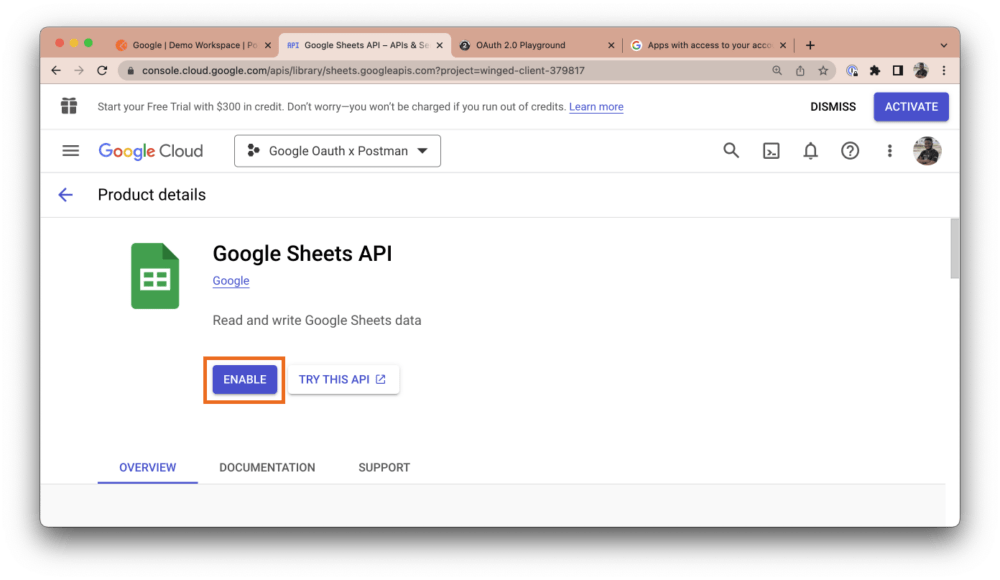
From the library, search for “Google Sheets API” and enable it:
Step 2: Get your credentials
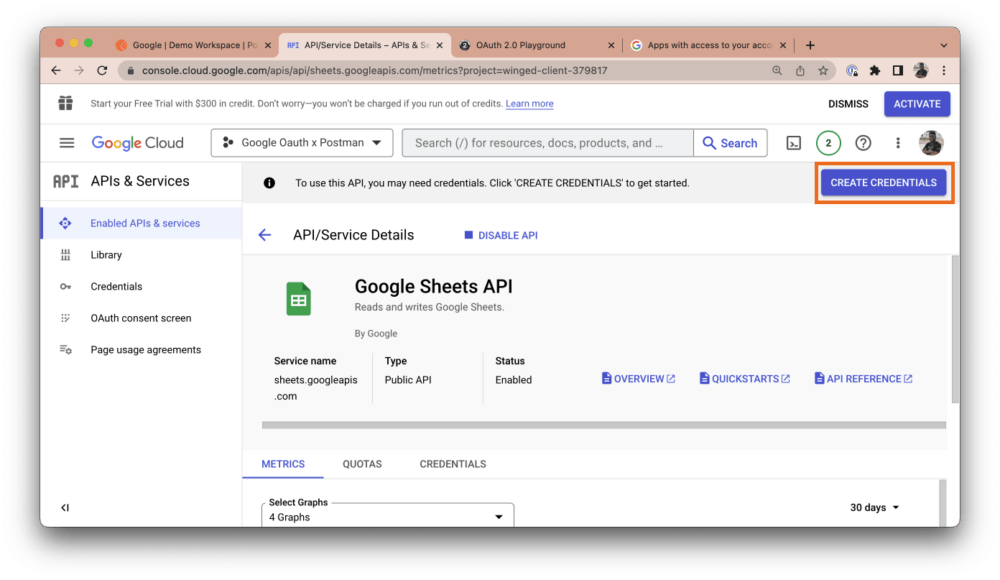
Once you’ve enabled the API you intend to work with, click the Create Credentials button at the top right of the API dashboard:
The Google Sheets API should be auto-selected under the Credentials Type section, but you can choose any other API you’d like to use. Select User data as the data you want to access and click Next:

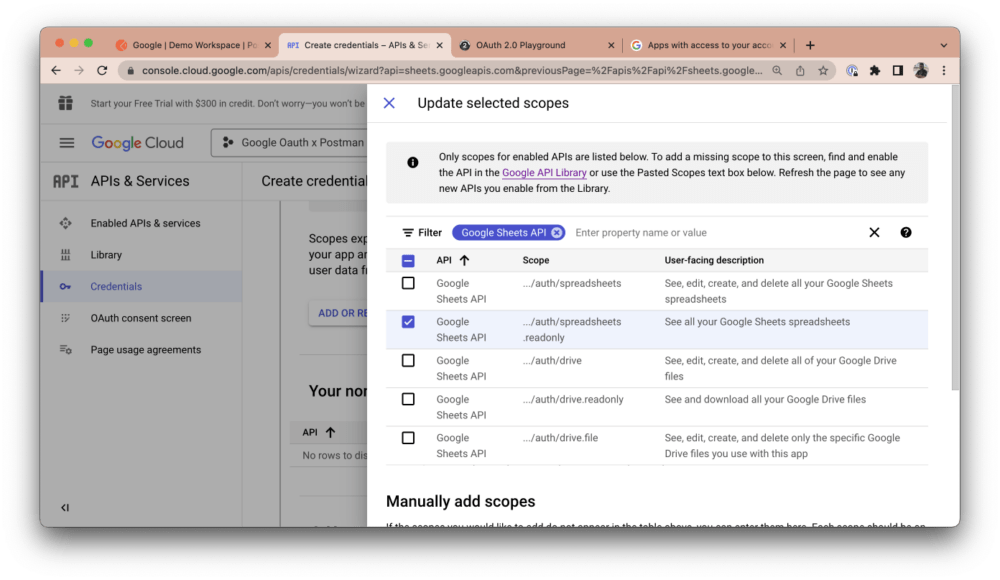
Now, give your app a name, select a support email address, and upload a logo for your app, if you have one. Click Save and continue. Then, click the Add or Remove Scopes button and search for “Sheets.” Select the read-only option and click Update:
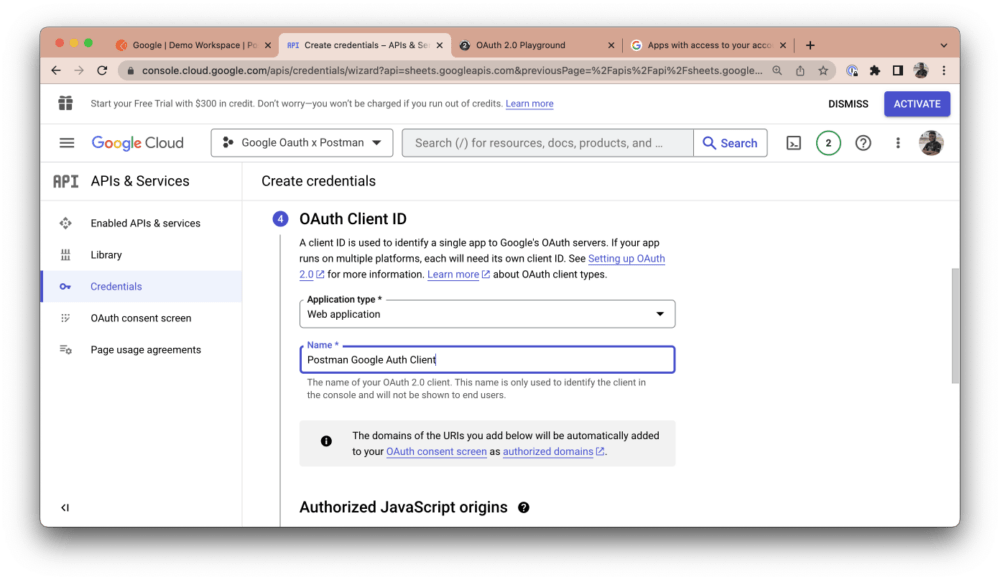
Click Save and continue. Next, under OAuth Client ID, select Web Application as your application type and give the client a name:
Under Authorized redirect URIs, click the Add URI button. The URI you add will depend on what Postman environment you’re testing from. If you’re testing from Postman’s web application, add the following redirect URI: https://oauth.pstmn.io/v1/browser-callback. If you’re testing from the Postman desktop application, add this URI: https://oauth.pstmn.io/v1/callback. If you switch between the web and desktop application during your development workflow, you should add both URIs:

Copy your client ID and click the Download button to download all of your credentials:
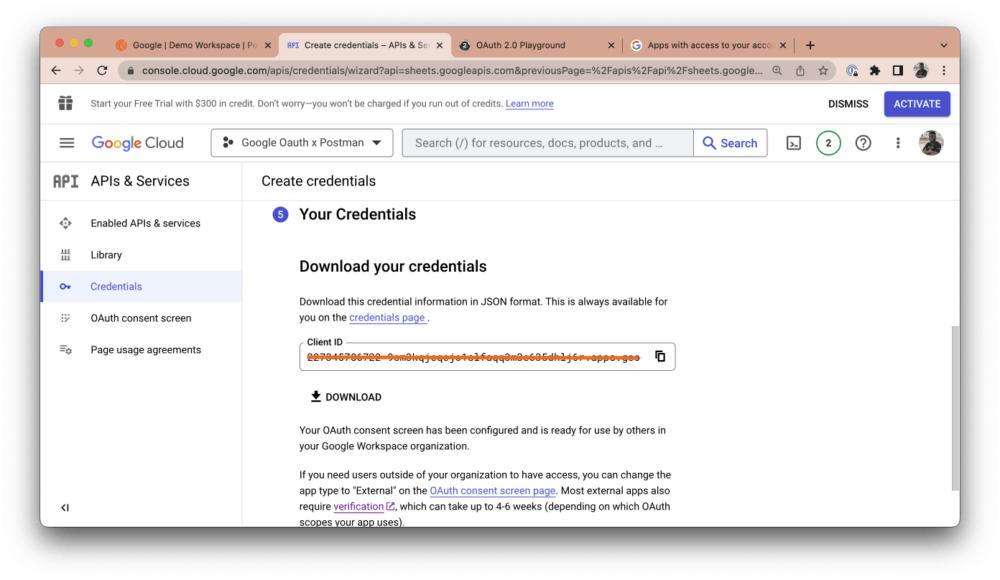
Once your download is complete, navigate to the Credentials tab and click on the newly added credential:

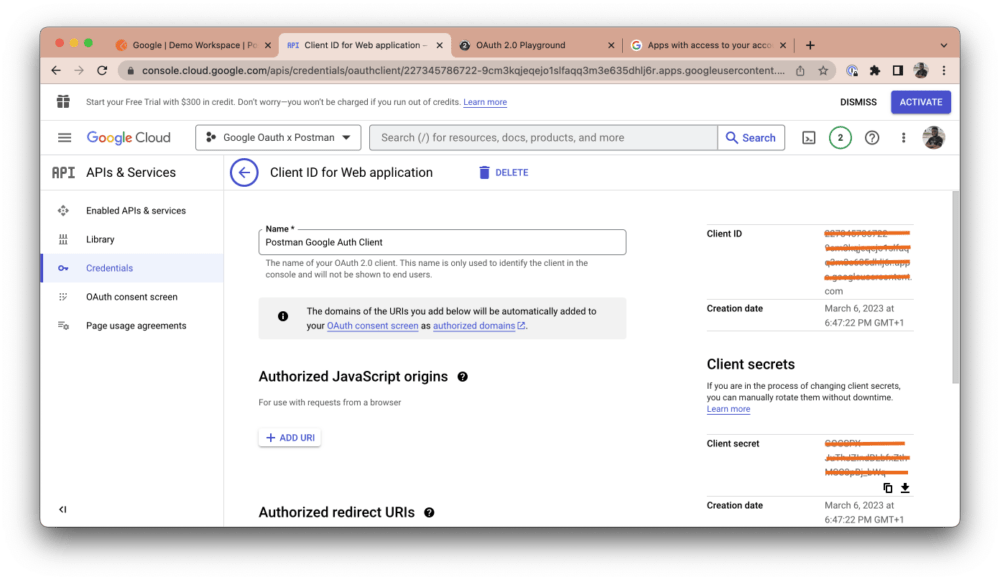
You will see your client credentials (i.e., your client ID and client secret) on the right-hand side of your dashboard:
Step 3: Authorize with Postman
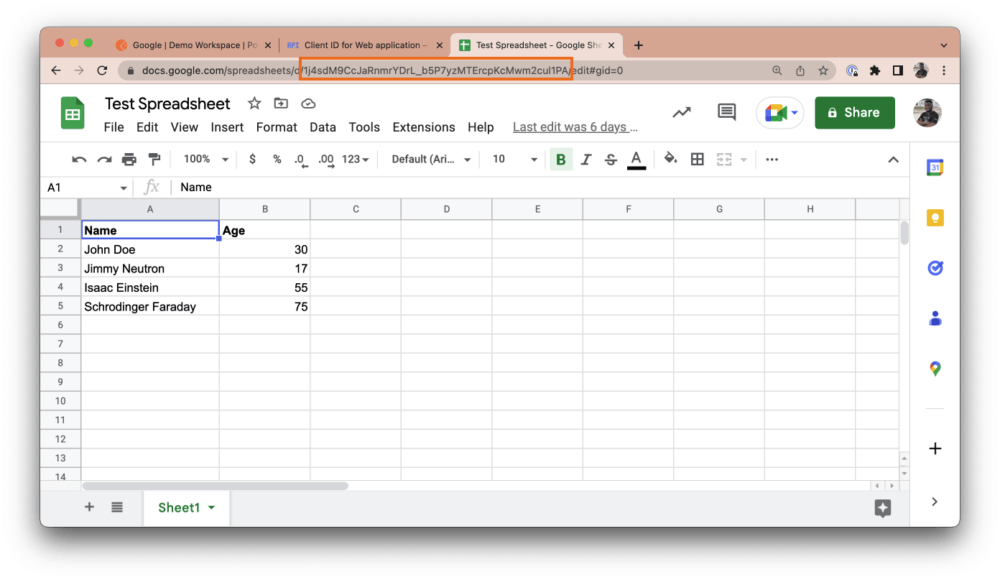
Now that you have your client ID and client secret, you can use Postman to authorize the Google Sheets API in your automated API testing or API development workflow. Create a Postman Collection and add a new request. Then, navigate to https://sheets.new to automatically create a new Google Sheet on your Google account. Populate this Sheet with random data and give it a name.
You can access the ID of this Sheet from the URL navigation bar. The ID typically appears after /spreadsheets/d/, as shown in the screenshot below. Copy this ID to your clipboard:
In Postman, add the base URL https://sheets.googleapis.com/v4/spreadsheets in the URL tab and include the Sheet ID as a path variable:
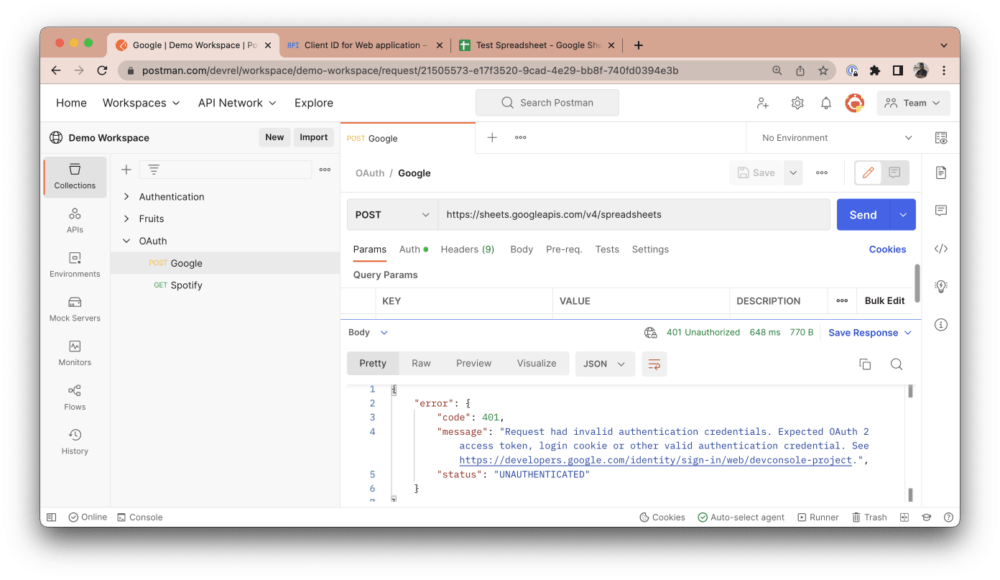
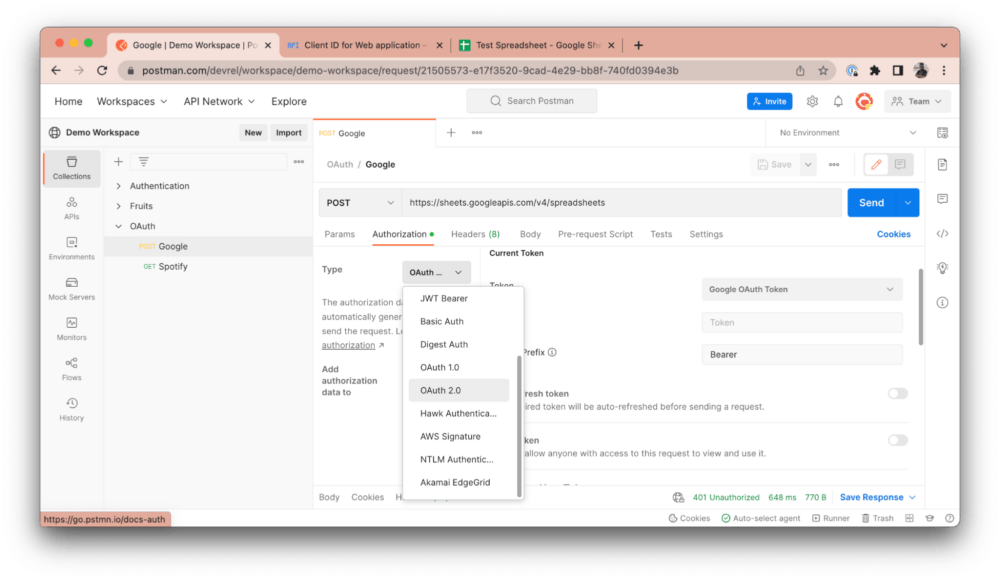
This request is intended to fetch the data of your Google Sheet in JSON. However, if you click Send, you will get a “401 Unauthorized” error response, as shown above. This happens because we have not provided the right authentication credentials to make this request. Postman is a third-party application (i.e., a client) trying to fetch Google Sheets data from your Google account (i.e., a resource server). As the resource owner, you need to first authorize Postman and grant it the necessary scopes to fetch this data. To do so, navigate to the Authorization tab in your Postman account and select OAuth 2.0 as your authorization type:
Scroll down to the Configure New Token section and fill in the following details:
- Grant Type: Select “Authorization Code” to let Postman know that the resource server will be providing an authorization code that it will use to get an access token.
- Callback URL: This is the redirect URL you specified in your Google Cloud Console. It is automatically set for you and will vary depending on whether you’re using the Postman desktop app or the web client.
- Auth URL: This is the authorization server endpoint. It presents the user with a UI to authorize the client (so far, the user is logged in). The requested scopes are displayed, and the user can choose to accept or decline access to their data. When the user accepts, it navigates to the callback URL with an authorization code included as a query parameter. This callback URL navigates back to Postman, and Postman will then use the authorization code to fetch the access token from the resource server. Set this field to https://accounts.google.com/o/oauth2/v2/auth.
- Access Token URL: This is the interface exposed by the resource server for exchanging an authorization code with an access token. Set this field to https://oauth2.googleapis.com/token.
- Client ID: This is the client ID that was generated in your Google Cloud Console. Store this ID in a variable to keep sensitive data secure.
- Client Secret: This is the client secret that was generated in your Google Cloud Console. Store the secret in a variable to keep sensitive data secure.
- Scope: These are the scopes to which you want to request access from the client. Multiple scopes are separated by a space. Set this field to https://spreadsheets.google.com/feeds/.
Note: Google does not return a refresh token by default. In order to receive a refresh token on authorization from a Google API, you need to add an extra query parameter to your auth URL. Modify your auth URL to https://accounts.google.com/o/oauth2/v2/auth?access_type=offline, which includes a query parameter of access_type set to offline. The default state is online, and you need to explicitly set it to offline.
Once you’ve entered this data, click the Get New Access Token button:

When you click the button, Postman will automatically open a new tab in your web browser:

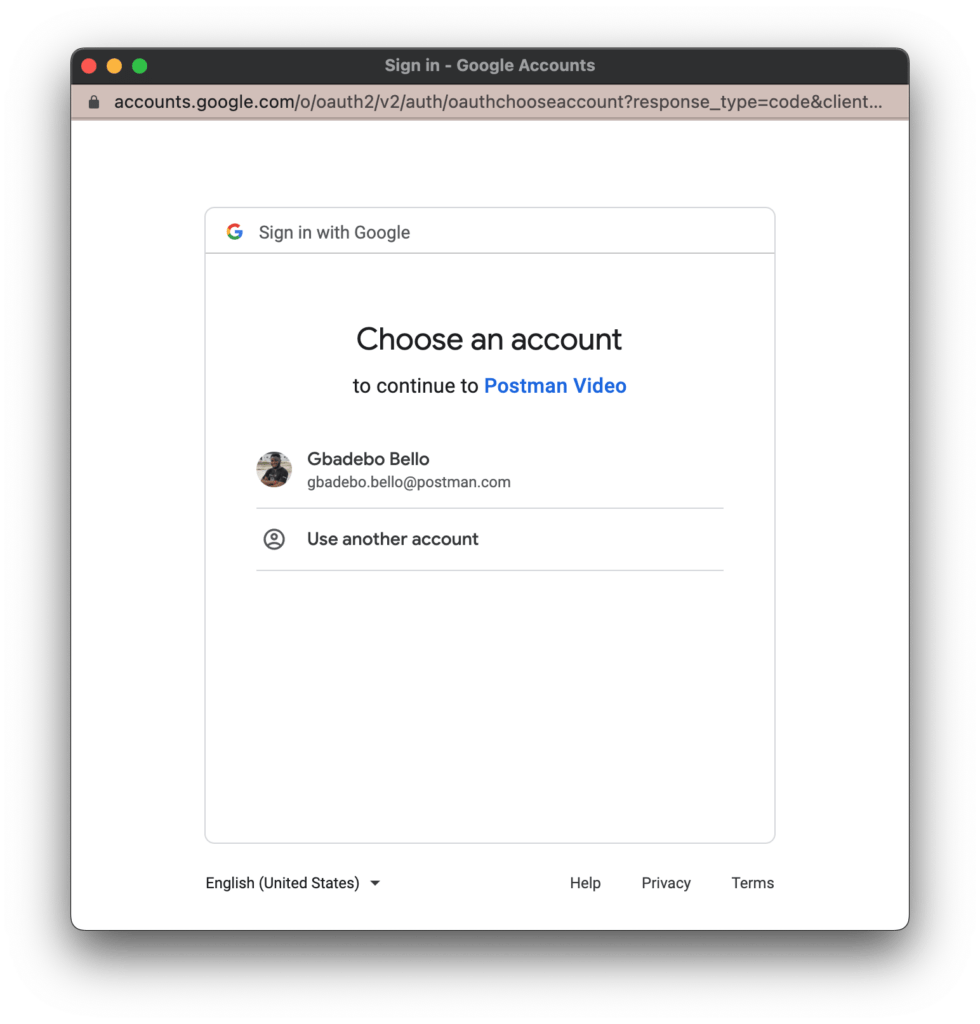
Google will then prompt you to select an account to authenticate with. Alternatively, you can sign in to another account that you would like to use:
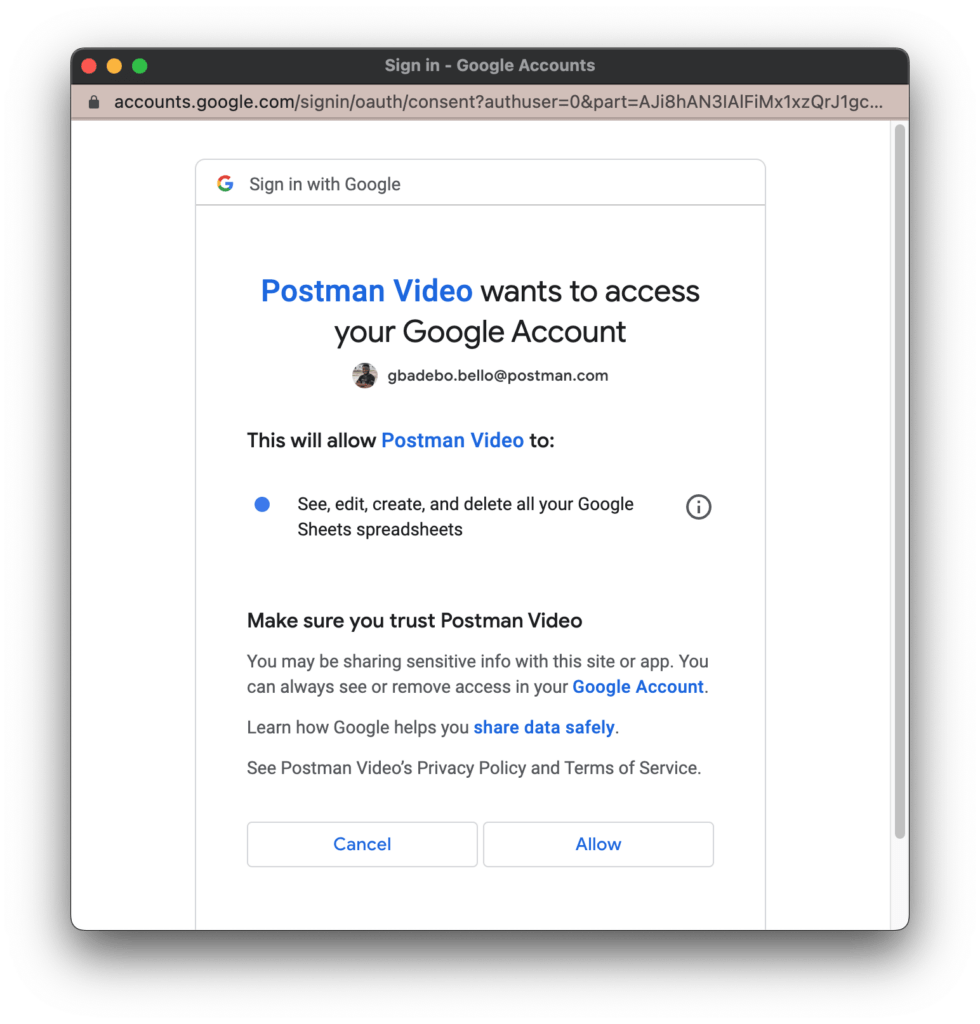
After you select an account, Google will display the scopes requested and prompt you to either allow or cancel this request:
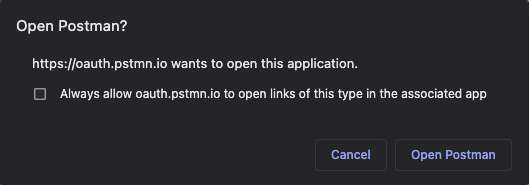
Selecting Allow will generate an authorization code and redirect you back to the callback URL with the authorization code included. The callback URL will prompt you to navigate back to Postman to either complete or cancel the authorization process:
Once you accept this prompt, you will see a success modal and be navigated back to Postman:
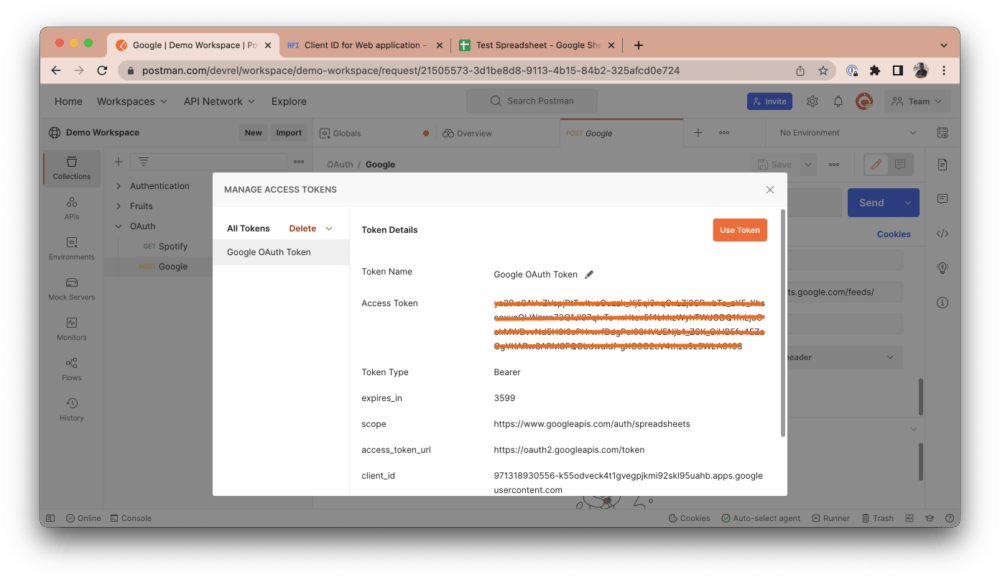
Once you’re back in Postman, you will see a modal that looks like the one in the screenshot below. This modal will include your newly generated access token and other relevant metadata. This access token was generated by providing your authorization code to the resource server. Click on the Use Token button to automatically include it in the Token field. Any token specified in the Token field will automatically be included in your request headers and will therefore authenticate you to make the necessary requests:
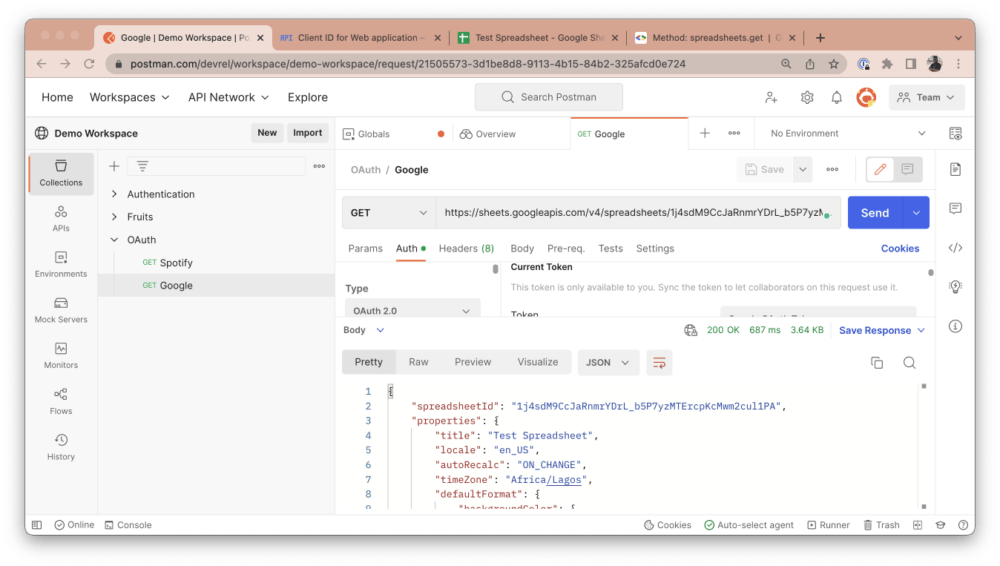
If you re-run the same request in Postman by clicking the Send button, you will notice that it now returns the Sheet’s data in JSON, indicating that you are now authorized to request this resource:
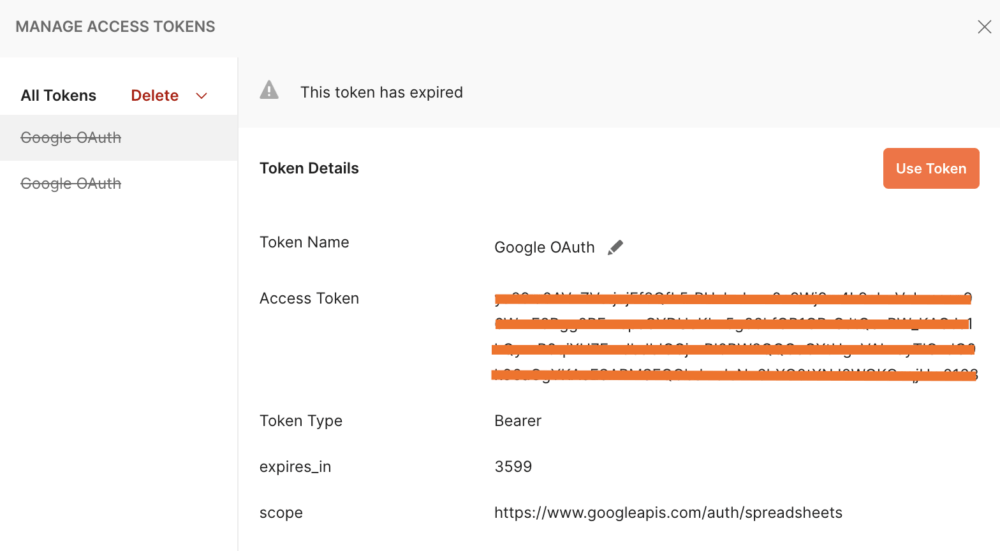
Step 4: Managing tokens
You can generate new tokens after expiration by following the same process we discussed above, but you won’t have to go through every step again. If you have a token added, you can manage all your tokens.
In the Authorization tab, click on the token list option and select Manage Tokens:
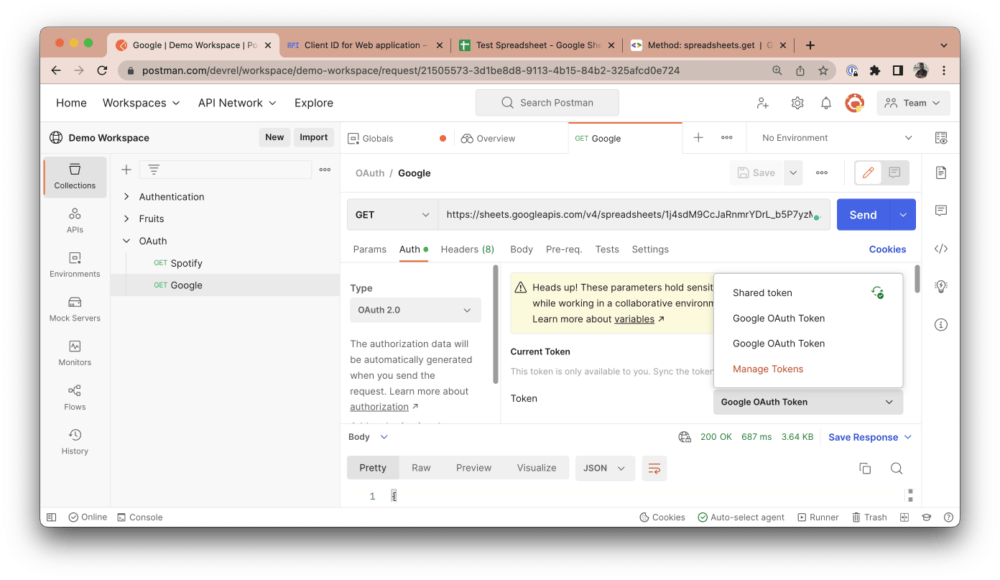
Here, you can see a list of added tokens, alongside their validity. You can choose to delete any tokens that you no longer need:
Step 5: Revoking access
You can navigate to https://myaccount.google.com/permissions to see a list of all third-party applications that have access to your account. You can then choose to revoke authorization access to any of these applications by clicking Remove access. In our case, the application to look for is called “Postman x Google.”

Additional resources
Related: Use the Authorization Methods Template
To follow along with this tutorial, watch the video and reference the documentation at Postman Quickstarts. The collection created in this tutorial can be found here.
Technical review by Arlemi Turpault


The Auto-refresh token is disabled, are you sure google returned the refresh token? I do not see it in the response. Just access token is present
Yes. Google does not return a refresh token by default. For you to get a refresh token on authorization from Google APIs, you need to add an extra query parameter to your auth URL. Modify your Auth URL to https://accounts.google.com/o/oauth2/v2/auth?access_type=offline, which includes a query parameter of access_type set to offline. The default state is online, and you need to explicitly set it to offline. I’ll update the article to include this. Thank you for pointing it out.
It’s great that you can use OAuth with a second tier provider. How about fixing OAuth PKCE support for Azure? The request to add a simple referrer header is now 2 years old. https://github.com/postmanlabs/postman-app-support/issues/9998
Hi Josh. Thank you for your feedback. This issue has been fixed in the recent release of the Postman app(v10.13).
In this tutorial you forgot to mention that a test user must first be added via “Oauth consent screen” in the security configuration of the project. Otherwise you will get a 403 error code after logging in
I followed your instructions till “Once you’ve entered this data, click the Get New Access Token button:”.
Then I get:
Access blocked: authorisation error
[email protected]
The OAuth client was not found.
If you are a developer of this app, see error details.
Error 401: invalid_client
(I have added [email protected] as test user to the OAUTH consent screen).
What am I doing wrong?
The 401 invalid_client error indicates that the client ID you’re making use of is an invalid client ID. The client ID should look something like 123456789.apps.googleusercontent.com. Can you double-check to be sure that the client ID you provided is valid?
My client idea is valid: 1034271250834-vlep0do1555tpfs5d2npbqjd0ote4ldn.apps.googleusercontent.com
Hi. Thanks!.
I used the auth url: https://accounts.google.com/o/oauth2/v2/auth?access_type=offline.
However, the refresh_token is not included in the response. Is the refresh_token only available for application type “Desktop” instead of “Web application”? Thanks!
I’m getting a “client_secret is missing” when I exclude the client secret. Why is the client secret required here? I thought the PKCE flow doesn’t require one.
If it is required, where is the best place to store it in the browser to keep it secure? I’m using a Chrome Extension as my client.
Do you get this error in Postman or on the console? Postman itself does not make the client’s secret required, you should check in with the provider to confirm. It is also not recommended to store the client secret on any other client-side storage as this might pose certain security risks.
I get this error in the console. Looks like Google requiring the client secret in their PKCE flow is a known issue: https://stackoverflow.com/questions/60724690/using-google-oidc-with-code-flow-and-pkce
Hi, thanks for your article, veri iluustrative. In this case you expose a client (Postman) calls Google APIs. What happen in the oppositte situation, what if Google is the client of a web API, how that could be set up. Thank you in advance
Worked for me, Thank you so much
Can we use client credentials instead of authorization code to get access token from google api, I want token for blogger api. Basically what I want is i should get access token without granting a permission or without redirecting to any other website. Can I achieve this?
OAuth 2.0 has the concept of “Authorization Grants “. This defines what form of authorization should be required before access tokens are issued. Google uses the “Authorization Code” grant, amongst three others(Implicit, Client Credentials, Resource Owner Password Credentials).
An authorization grant is always required to access users data by a third party application because the user has to consent to that request first, unless the data is already made public by the user.
How will be able to handle this in newman, especially the generating of token?
How will we be able to handle this in newman, especially the generating of token?
Newman is a command line tool for running collections. It does not provide a way to modify or generate tokens like you can within Postman. However, one way you could do it is by using environment variables .
Newman allows you to provide environment variables for your collections runs. This is a good place to store your already-generated authorization tokens for requests that require them.
Hi
I always have this message
oauth.pstmn.io n’a pas terminé la procédure de validation de Google. L’appli est en cours de test…
Means postman could not finish the auth procédure.
Because
my appli is in est mode, and impossible to connect
Thank you very much for your answer, but why the authorization code process is not shown, is it because it is hidden?
I followed your instructions carefully, and on the credentials screen I added the URI (https://oauth.pstmn.io) in the Authorized JavaScript origins field and also added the URIs (https://oauth.pstmn.io/ v1/callback and also https://oauth.pstmn.io/v1/browser-callback) in the Authorized redirect URIs fields
But when I click in the button “Get New Access Token” I am receiving this error message : Erro 400: invalid_request
You can’t sign in to this app because it doesn’t comply with Google’s OAuth 2.0 policy for keeping apps secure.
You can let the app developer know that this app doesn’t comply with one or more Google validation rules.
If I ask for more information it give me this :
Use secure JavaScript origins and redirect URIs
OAuth 2.0 clients for web apps must use redirect URIs and JavaScript origins that are compliant with Google’s validation rules, including using the HTTPS scheme. Google may reject OAuth requests that don’t originate from or resolve to a secure context.
Can you help me in identify what I am doing wrong..?
Thank you.
Hi Team
I followed the above procedure and getting this error.
{
“error”: {
“code”: 400,
“message”: “Request contains an invalid argument.”,
“status”: “INVALID_ARGUMENT”
}
}
Please contact our support team at http://www.postman.com/support, and they’ll be able to help you.
I really appreciate your blog !
Hello Mates ! Great and clear post we have here. I am struggling at the “Get New Access button”. I got a 403 response telling me “The developper didn’t got the google approval and it’s tester only use”. Is there something I am doing wrong ?
Please contact our support team at http://www.postman.com/support and they’ll be able to help you.
I tried to follow your steps but I think that this tuto is no more up to date.
https://www.google.com/interests/saved
Is there a way to use OAuth2.0 to access sites such as the above via Postman API using the method suggested? I have tried generating the access token before hitting the API via postman. But, it it is returning me the HTML page with “Sign in to view saves and collections
You need to sign in to see the products, pages, images and other items you’ve saved on Search”
Please contact our support team at http://www.postman.com/support and they’ll be able to help you.