Build your own weather app with one call
Tomorrow.io is on a really cool mission to give you the most accurate real-time weather data, even going so far as launching their own satellite constellation to do so. Recently, they teamed up with Postman to present the Harness the Weather Hackathon that’s currently running through August 1, 2023 and features a top prize of US$1,000. The hack focuses on their versatile Weather API, which “offers a comprehensive collection of ultra-accurate data organized into endpoints for the utmost ease-of-use and efficiency.”
Some of the things you can do with the Weather API include:
- Ensuring employee safety through weather alerts
- Predicting future weather events
- Incorporating more reliable weather data in your own software application
Tomorrow.io offers up some helpful instructions showcasing their API use cases and developer possibilities; they call these walkthroughs “recipes.” In this blog post, let’s dig into their “Build Your Own Weather App With One Call” recipe. While a code example is displayed in the recipe, a single view in a Postman request can show the exact call and details.
Let’s first break down the Timelines endpoint call using Postman. The Timelines endpoint can query data points to your locations with a single call.
Be sure to fork the collection to play around with the endpoint as well.
We’re going to walk through the steps to make a query for a Point location defined by a simple latitude/longitude pair of one of our favorite places, Times Square in New York City, using the GET call.
Below is a screenshot of the call in Postman. In this call, there is already some code provided in the pre-request scripts to fill in the required data:
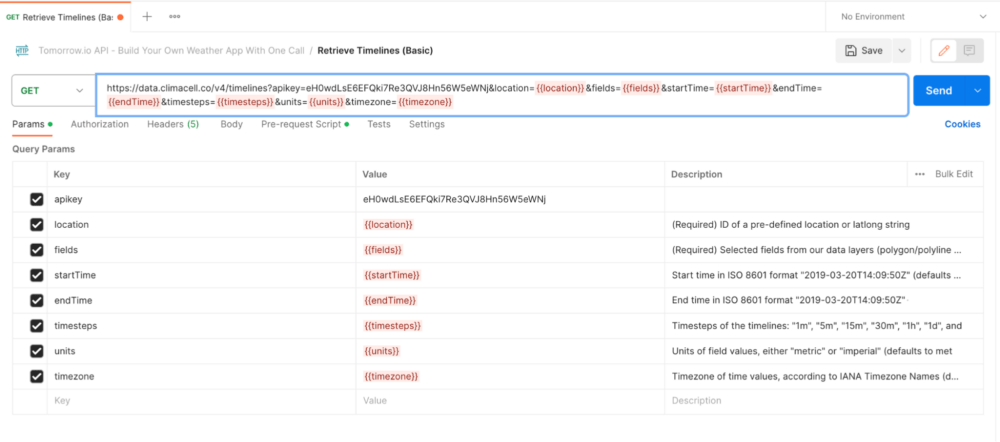
Let’s step through this call now!
1. Grab an API key
Before we begin, make sure to sign up to Tomorrow.io’s platform and, once logged in, grab your key.
If you register for the Harness the Weather Hackathon, you can get special API access here.
Once you have your API key, you can fork or pull their endpoint from the Tomorrow.io collection. Here, you can see in a single call that we can grab the climate data of any location we please.
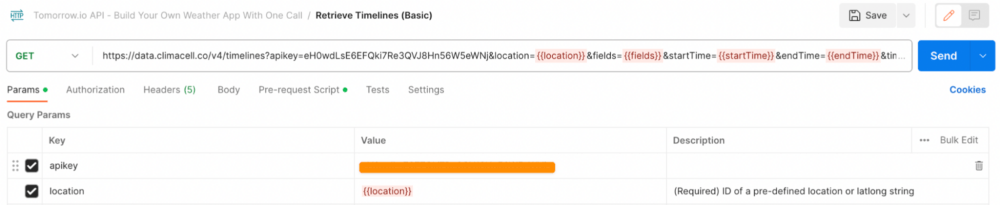
Simply add your API key to the query parameters to be able to send the request:
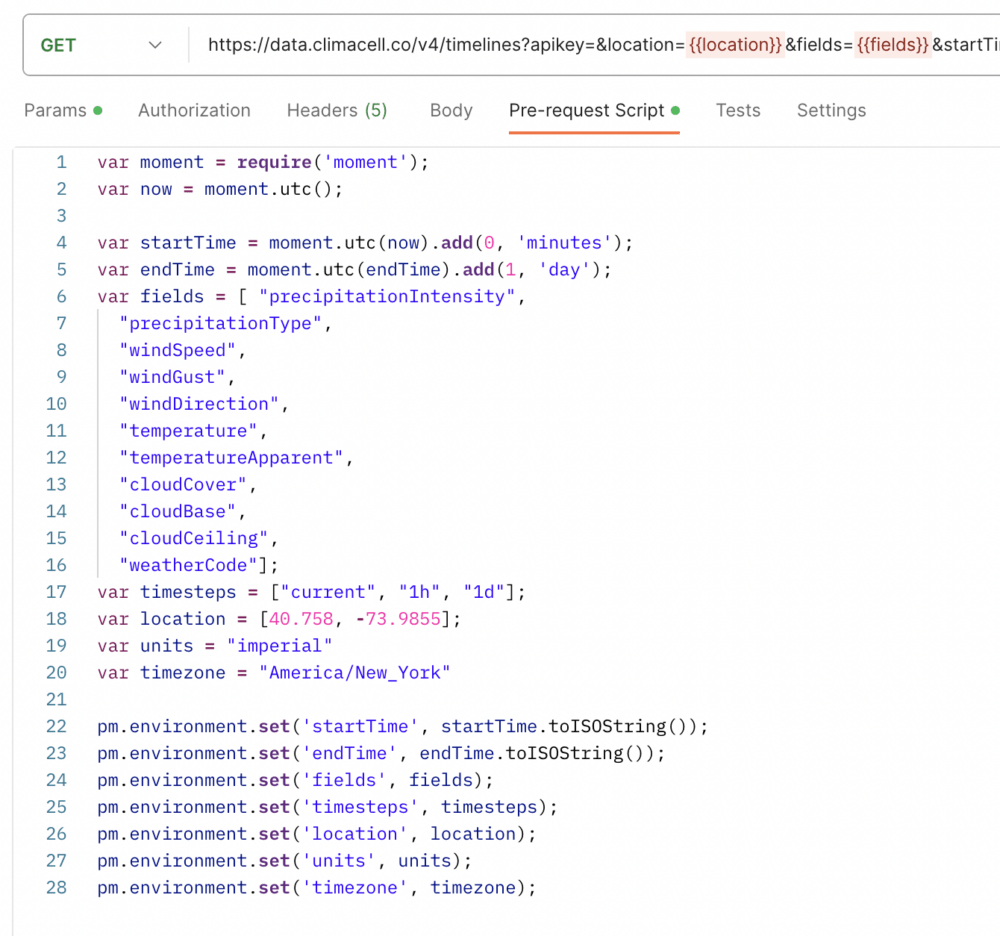
Let’s break down the pre-request script. This script runs before the call is sent and stores all the data in the environment variables so it is available for the call to use:
2. Pick the location
var location = [40.758, -73.9855];
In this type of call, only two types of location values are supported—either a latlong pair (separated by a comma) or a locationId of a predefined location in the system (see the /locations endpoints).
In your app, you can change these per query dynamically, but we chose to only get the weather data for Times Square in New York City in this tutorial.
You can query using polygons and polylines, as part of their premium feature set.
3. List all the fields
var fields = [ "precipitationIntensity",
"precipitationType",
"windSpeed",
"windGust",
"windDirection",
"temperature",
"temperatureApparent",
"cloudCover",
"cloudBase",
"cloudCeiling",
"weatherCode"];
All accounts come with the Core data layer for free and with samples of the premium data layers, such as air quality and pollen.
The app we’re building requires only the basics, such as precipitation, wind, temperature, clouds, and weather code. But, if you’re interested in getting full access to premium data points like solar irradiance, soil moisture, or wave height, make sure to reach out to [email protected].
Note that some field values might be null when there isn’t a valid numerical value—like wind direction when there’s no wind.
4. Choose the unit system
var units = "imperial"
You can select either the imperial or metric unit system. This applies to all of the fields in the query. In the US, the common system is imperial, consisting of units such as the inch, the mile, and the pound—so that’s our choice.
The Timeline response payload is lean, flat, and language-agnostic by design, containing only the raw field values as numbers, enums, or ISO-8601 timestamps. This allows developers to use it on mobile devices and translate the field units’ representative strings to the language of their choice.
5. Set the timesteps
var timesteps = ["current", "1h"];
As mentioned, the Timelines endpoint allows you to request multiple timesteps with one call.
Any of the following values are supported to choose the interval for which the data is provided: 1m, 5m, 15m, 30m, 1h, 1d, and current (which provides realtime measurements).
For each field, you will find the applicable timestep for its time frame, whereas In any case of two different timesteps—like m (minutes), h (hours) or d (days)—the data is available for any timesteps options between them.
Given that we asked for the 1d timesteps, it’s important to highlight that whenever a Min/Max/Avg suffix is not added to the named field, the API will resolve the max value. You can always get more specific by adding Min/Max/Avg to get the values you want. Moreover, you can add MinTime and MaxTime if you want to know when at the earliest these values will be met in the day interval.
6. Configure the time frame
var startTime = moment.utc(now).add(0, 'minutes');
var endTime = moment.utc(endTime).add(1, 'day');
In this example, we’re only interested in getting the upcoming day, though most of our data points are supported up to six hours back and fifteen days out.
Check out the Frame annotation of each data point to learn more about its availability. Notice that we used UTC as the input time zone, but you can use whichever zone you want.
7. Specify the time zone
var timezone = "America/New_York"
Regardless of the input time zone, mentioned in the startTime and endTime timestamps, you can request the returned timestamps to be in a different zone. Just make sure to use the standard IANA Time Zone Database format.
Since we’re going to get the data for Times Square, we will want it in New York’s time zone.
8. Request the timelines
Clicking Send in Postman will run the pre-request script building values for all the variables.
Use the resulting JSON response to parse the intervals of the timelines, each for a single timestep, as defined in the request:
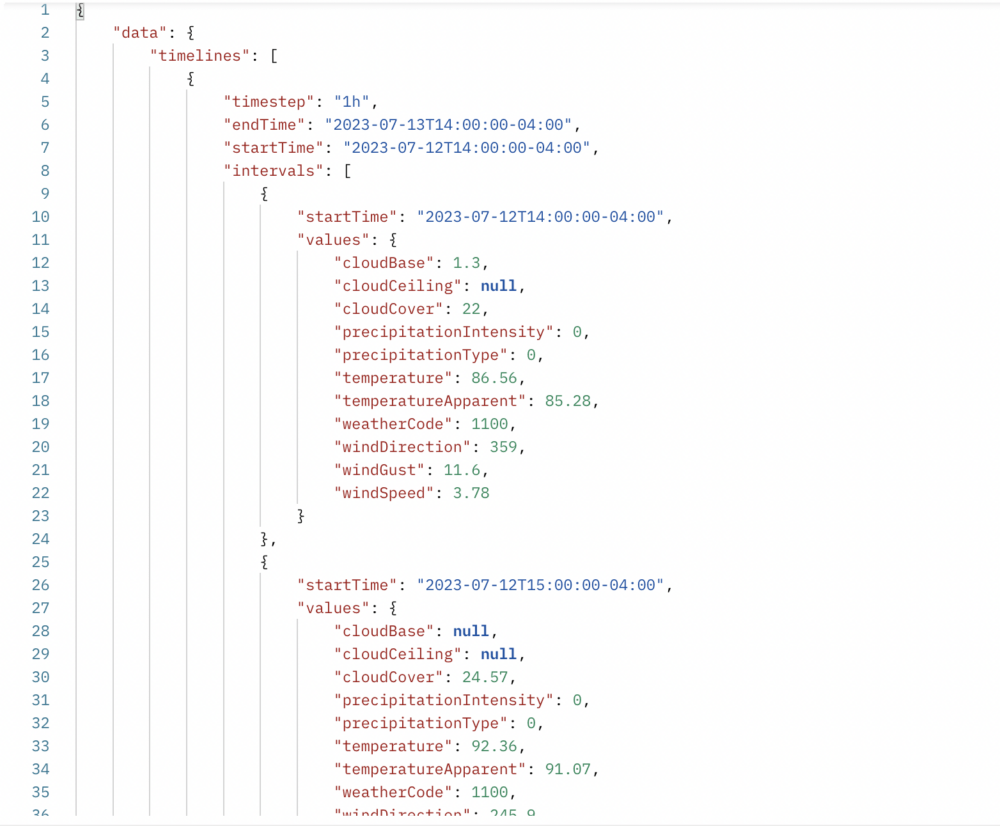
With just a single call, we are now able to get all the weather data we need to build a Postman Collection workflow powered by weather data.
Give this a fork and a try, then create something cool for the Harness the Weather Hackathon—you just might win the top prize of US$1,000 when winners are announced at ClimaCon!


What do you think about this topic? Tell us in a comment below.