How to build an API in Python

This is a guest blog post by Stefan Djokic, tech content creator and .NET senior software engineer.
An API, short for “application programming interface,” facilitates communication between two computer systems.
Let’s consider a mobile weather application that provides users with real-time weather updates. This app doesn’t have its own weather data but relies on external sources for accurate and up-to-date information.
When a user opens the app and requests the current weather for their location, the app uses an API to communicate with a remote weather service. This API could be provided by a meteorological organization or a weather data company. The app sends a request through the API, specifying the user’s location. The weather service API then responds with data such as temperature, humidity, wind speed, and forecast information.
This data is sent back to the user’s phone, where the app processes and displays it in an easy-to-read format. All of this happens seamlessly in the background, with the API serving as a bridge between the weather app and the external weather service.
An API like this could be created in almost any programming language, but today we will learn how to create an API in Python. This tutorial assumes you are already familiar with HTTP, as well as the basic components of an API.
Let’s dive in.
Getting started
There are many ways to create an API in the Python programming language. Today, I will show you a simple approach that is great for beginners. We will use FastAPI.
What is FastAPI?
FastAPI is a high-performance Python web framework that was developed by Sebastián Ramírez in 2018 and is renowned for its speed and efficiency. It leverages Python 3.6+ type hints to offer automatic data validation and documentation generation. It also excels in asynchronous programming, making it ideal for high-concurrency applications.
FastAPI simplifies security with built-in OAuth2 and JWT support, and its straightforward syntax, alongside auto-generated interactive documentation, makes it a favored choice for robust API development.
Prerequisites
- Python 3.6+ installed.
- Fastapi library installed.
- Uvicorn library installed.
Installing Python 3.6+
- Download Python:
- Visit the official Python website: python.org.
- Choose the version you need (3.6 or newer). It’s often recommended to use the latest stable version for better features and security.
- Download the installer for your operating system (Windows, macOS, Linux).
- Install Python:
- Run the downloaded installer.
- Make sure to check the box that says “Add Python to PATH” during installation. This step is crucial, as it allows you to run Python from the command line.
- Follow the installation prompts to complete the setup.
- Verify installation:
- Open your command line interface (Command Prompt on Windows, Terminal on macOS and Linux).
- Type
python --version(orpython3 --versionon some Linux distributions). This should display the installed Python version, confirming a successful installation.
Installing FastAPI and Uvicorn
After installing Python, you can install FastAPI and Uvicorn using Python’s package manager, pip. Uvicorn is an ASGI server commonly used to serve FastAPI applications.
- Open the same command line interface you used above.
- Download and install FastAPI by running
pip install fastapi. - Download and install Uvicorn by running
pip install uvicorn[standard]. This command will also install the standard dependencies that are recommended for most users.
Creating your first API endpoint
After we install the necessary packages, our next step is to establish a Python file dedicated to defining our API. This file will be the foundation for creating an application that encompasses our APIs, complete with their respective endpoints, parameters, and other relevant details.
Within this application, we will specify the critical elements required by the API, including the endpoint, the HTTP method, the required input arguments, and the functionality that the API will perform in the background.
Let’s walk through this code line by line:
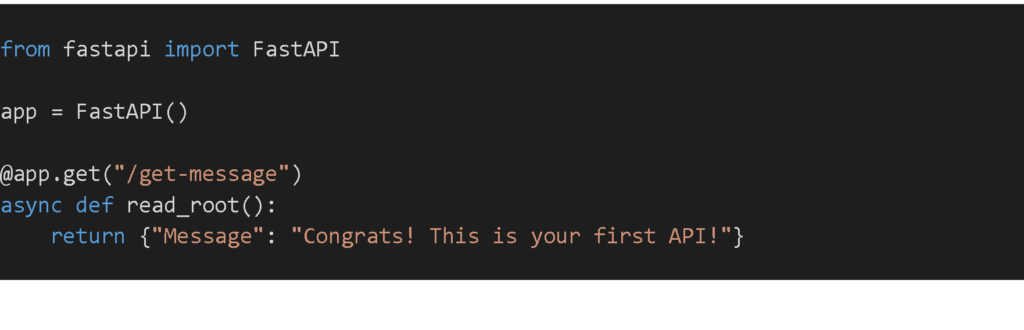
from fastapi import FastAPI
This line imports the FastAPI class from the fastapi module. FastAPI is a web framework that simplifies the creation of APIs and ensures that they follow the OpenAPI standards for REST APIs.
app = FastAPI()
Here, an instance of the FastAPI class is created and assigned to the variable app. This instance is the core of your web application, handling incoming requests and routing them to the appropriate endpoint functions.
@app.get("/get-message")
This line is a route decorator that tells FastAPI to create an endpoint for HTTP GET requests at the URL path /get-message.
The @app.get part specifies that this endpoint will respond to HTTP GET requests. FastAPI also supports other HTTP methods, such as POST, PUT, and DELETE, through similar decorators.
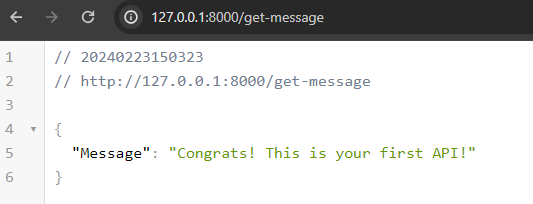
"/get-message" is the path at which this endpoint will be accessible. For example, if your server is running on localhost and port 8000, you would access this endpoint via http://localhost:8000/get-message:
async def read_root()
This line defines an asynchronous function named read_root. The async keyword indicates that the function is an asynchronous function, which can perform asynchronous operations and works well with asynchronous I/O operations. FastAPI is built to support asynchronous code, making it efficient for I/O-bound operations.
This function is linked to the above endpoint /get-message. Whenever a GET request is made to this endpoint, FastAPI will execute this function.
return {"Message": "Congrats! This is your first API!"}
The function read_root returns a Python dictionary: {"Message": "Congrats! This is your first API!"}.
In the context of FastAPI, the returned dictionary is automatically converted to a JSON response. So, when a client (like a web browser or a tool like curl or Postman) makes a GET request to the /get-message endpoint, it will receive a JSON response containing the message “Congrats! This is your first API!”.
Passing a parameter
In the last section, we established a straightforward API that simply returns a message. This was achieved with minimal code, demonstrating how we set up the HTTP method (GET), defined the root endpoint (“/”), and specified the function the API should execute.
Our API can also accept arguments in its functions. It’s crucial to specify the type of each argument (like a number or text) when passing them. This type of specification is a key feature.
Note: FastAPI rigorously verifies that the data types received in the API call match the defined types. This validation is pivotal for the API’s correct functioning. It’s an integral feature that distinguishes FastAPI from other API frameworks such as Flask, which may not inherently include this type of validation.
Let’s delve into this concept through an example:
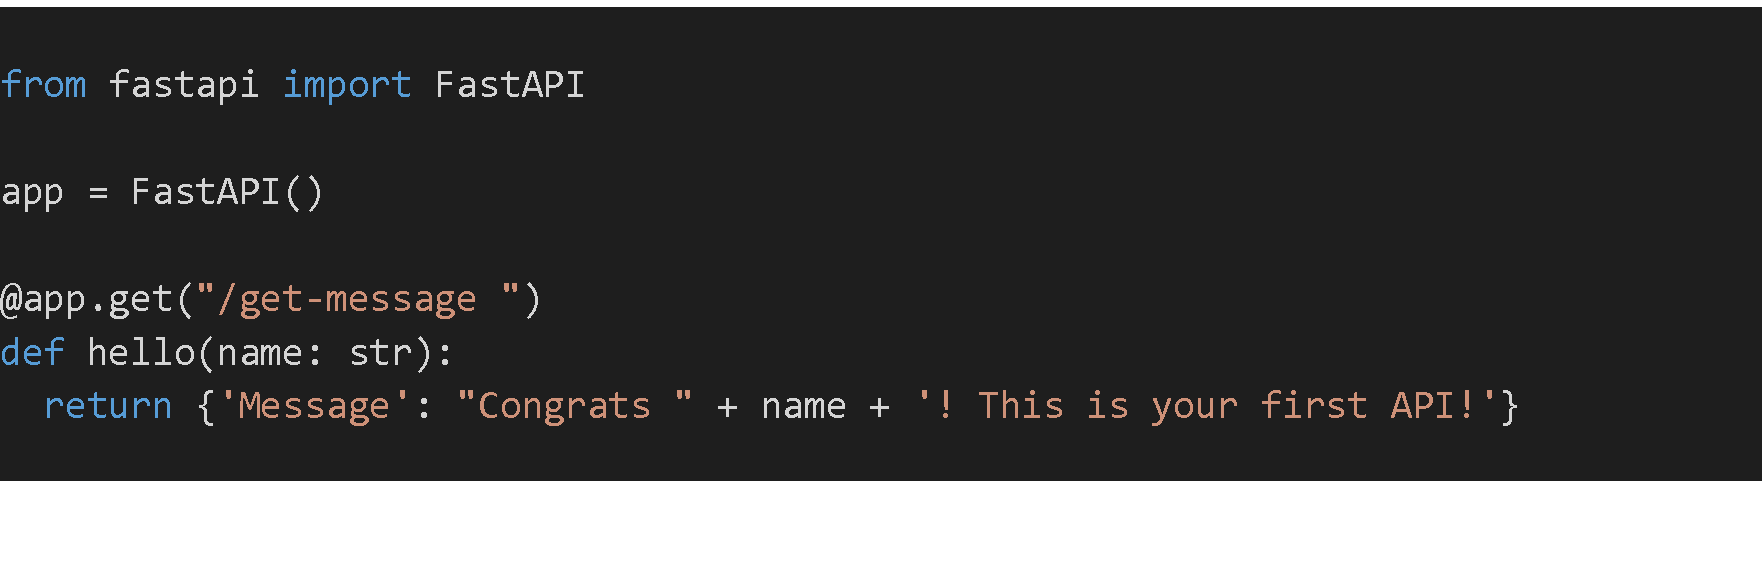
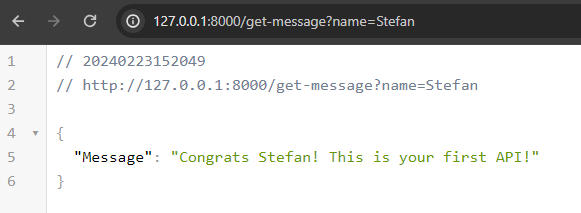
Now that we’ve modified our API to require a name parameter, this parameter must now be included in requests.
Earlier, simply navigating to http://127.0.0.1:8000/get-message was sufficient. However, with the introduction of the name parameter, the request URL changes to include this new requirement.
For instance, to use the parameter ‘Stefan’, the URL would be http://127.0.0.1:8000/get-message?name=Stefan.
Creating POST, PUT, and DELETE endpoints
Let’s assume we have a single static string, and we want to create API endpoints to add text to this string (POST), change the entire string (PUT), and remove the string (DELETE). We won’t be using a database or complex data structures—just a simple string variable.
Here’s the basic FastAPI application to demonstrate this:
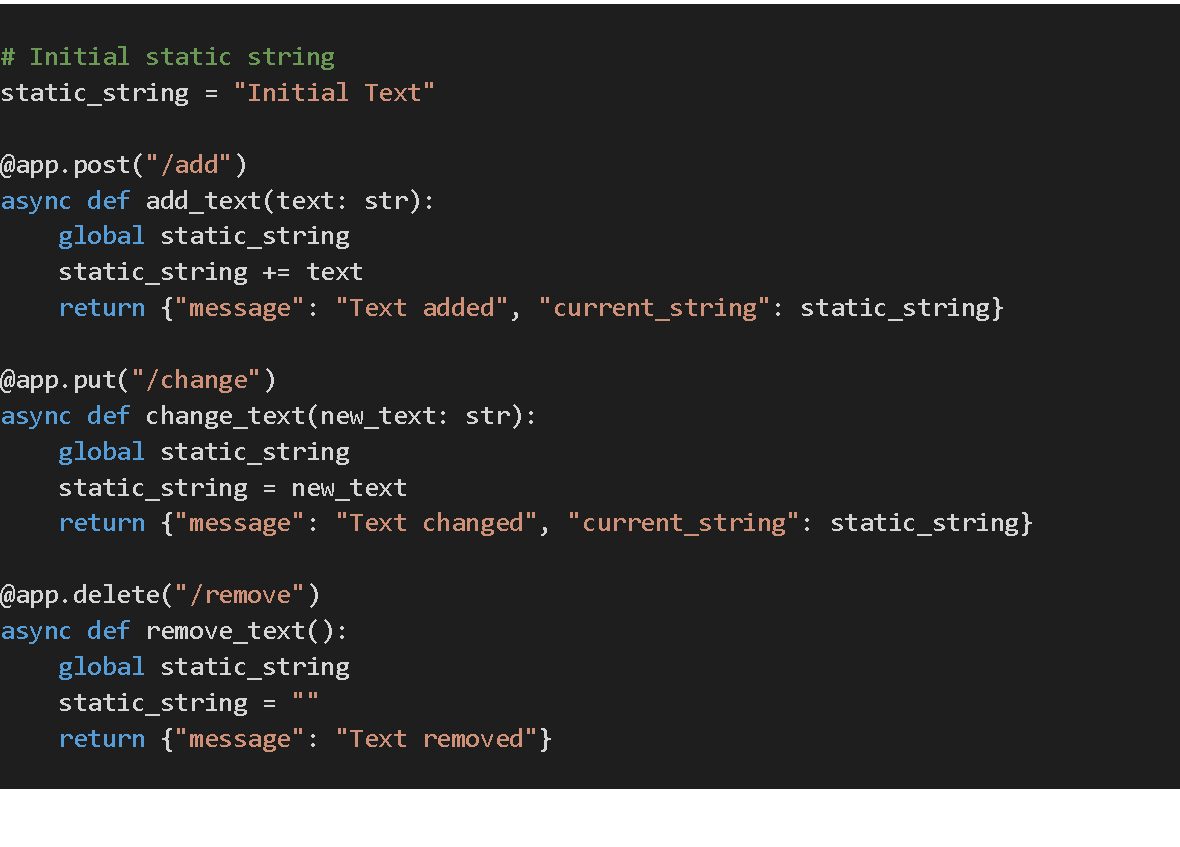
Let’s walk through this code:
- We start with a global variable
static_stringthat contains the initial text. - The
@app.post("/add")endpoint appends additional text tostatic_string. It expects a string input (text) and adds it tostatic_string. - The
@app.put("/change")endpoint replaces the entirestatic_stringwith a new string. It expects a new string (new_text) and setsstatic_stringto this new value. - The
@app.delete("/remove")endpoint clearsstatic_string, effectively removing all text.
This example demonstrates basic operations with a single string using different HTTP methods in FastAPI. In a real-world scenario, you would typically handle more complex data and include error handling, validation, and potentially interact with a database or other storage system.
Testing the API with Postman
There are a few ways to test our API, but my favorite is by using Postman. One of the reasons I prefer Postman is because it is the most efficient. It also gives me a lot of information about the API itself, the execution, the time it takes to return a response, the request and response headers, cookies, and other settings.
Here’s what a single API call looks like in Postman:
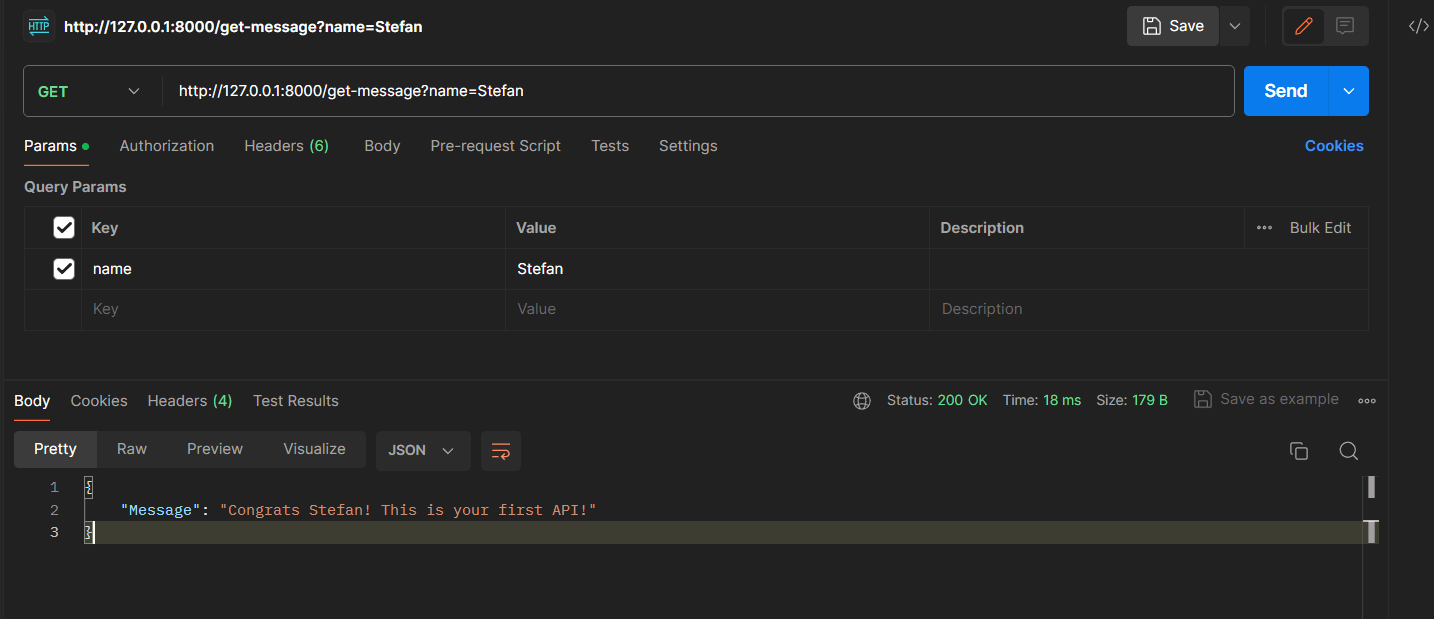
As you can see, we were easily able to confirm that our API is working as expected (and yes, very importantly, there is support for dark mode). For more advanced APIs, we could use Postman’s built-in code snippet library to create more specific test casts.
Conclusion
Creating APIs with Python and FastAPI offers a blend of simplicity, efficiency, and power. FastAPI, with its focus on speed and ease of use, complements Python’s straightforward syntax to enable developers to build robust and scalable APIs.
The framework’s support for automatic data validation, asynchronous programming, and interactive documentation makes it an ideal choice for both beginners and seasoned developers.
Once you’re comfortable with FastAPI, consider these next steps to deepen your expertise:
- Explore advanced features: Dive into FastAPI’s advanced functionalities like dependency injection, sophisticated security measures, and middleware usage.
- Integrate a database: Learn to integrate different types of databases for handling complex data operations.
- Master asynchronous programming: Enhance performance by delving deeper into asynchronous programming in Python.
- Focus on testing and deployment: Develop skills in testing your APIs and deploying them effectively in production environments.
These steps will not only solidify your FastAPI skills but also broaden your horizons in web development and API design.


Great work. Please give us more
Good work , I am student of python and our topic is FastAPI now a days .this article very helpful for me.
Excellent write up using python. Coding system and explanation also Excellent. App creation using library of python extraordinary.
Very nice article.
you missed the part of running the server to enable the API.
we installed uvicorn, but run it you should call:
“uvicorn app:app –reload”
only then you can send the request to your API.
Great post! Second Doron’s comment re: uvicorn app:app –reload
TnQ For your help but i have a huge problem with API! what problem? i have a url from a messenger application that call output messenger ! i have all code to get put delete post API rest to do all my code that i need to do! but i want get messege users and i and outputmessenger docs have not any endpoint to get this method! how i can create or get this endpoint! flask or django have their url that not related to my application (output) , if u can help me to do it pls tell me in email . Thank You .