
3 Ways to Build Workflows in Postman
Did you know that the possibilities are endless when it comes to building workflows with Postman? This incredibly powerful tool, often used for testing, can be used to extract data from multiple APIs to create entirely new applications.
In my last blog post, I showcased what you could build using the Postman Visualizer. However, the heart of that project was all about working with various APIs and building automated scripted workflows.
As the saying goes, there’s more than one way to skin a cat, especially when creating Postman workflows. With that in mind, I’d like to share with you three ways you can go about building workflows using my collection. Feel free to fork and follow along. Hopefully, this will help some of you as you think about how you can work with multiple APIs to build out your applications and Postman workflows.
Related: Use the API Templates for Workflow Optimization
1. Chaining individual requests
The first workflow I wanted to dive into involves chaining individual requests. The idea here is that you can extract values from the API response and save it as a variable inside an environment or a global variable to use in the next request.
In the first folder, Individual Postman Requests, the workflow shows how you can call each API—Twitter User by Username, Position Stack for location, and Open Weather for weather data—individually to capture data necessary for the next request. In this case, we have seven Twitter users on the developer relations team. That means there are individual requests for each member to get their location, position, and weather data.
The workflow currently goes like this:
1. For each Twitter user, send a request to get their name and location.
2. Save each user’s name and location data as an object in an environment variable.
3. Use location as a parameter for the Position Stack API to get each user’s position.
4. Save each user’s position as an object in an environment variable.
5. Use position as a parameter for the Open Weather API to get weather data for each user.
6. Visualize all users’ names, location, position, and weather data from each object.
As you can see from this flow, each request uses data from the previous request through environment variables. This basic flow is chained by using pm.environment.set() and pm.environment.get(). You can use the Collection Runner to run these individual requests instead of manually clicking through. The benefit of building this type of workflow is that it gives developers much more granularity when working with their APIs. However, as you can tell, this can involve many API requests. Let’s see how we can achieve the same results using the least number of API requests possible.
2. Sending asynchronous requests
Related: Use the Async Operations Template
The next workflow involves sending asynchronous requests. Asynchronous requests allow you to execute logic in the background, such as sending multiple requests at the same time without waiting for each to complete. The pm.sendRequest()method is the key ingredient that allows you to build this type of workflow.
In the second folder, Using pm.sendRequest shows how you can consolidate the individual Postman requests by sending APIs and building objects within test scripts for each Postman request.
My goal was to optimize the number of GET requests it would take to map each user’s location, position, and weather data to create a DRY (Don’t Repeat Yo’ Self) collection. I found that this can be done in three, two, or one Postman request(s) where you capture data from all the APIs as well as visualize data. The idea here is to consolidate as much as possible by sending requests from test scripts using the pm.sendRequest() method.
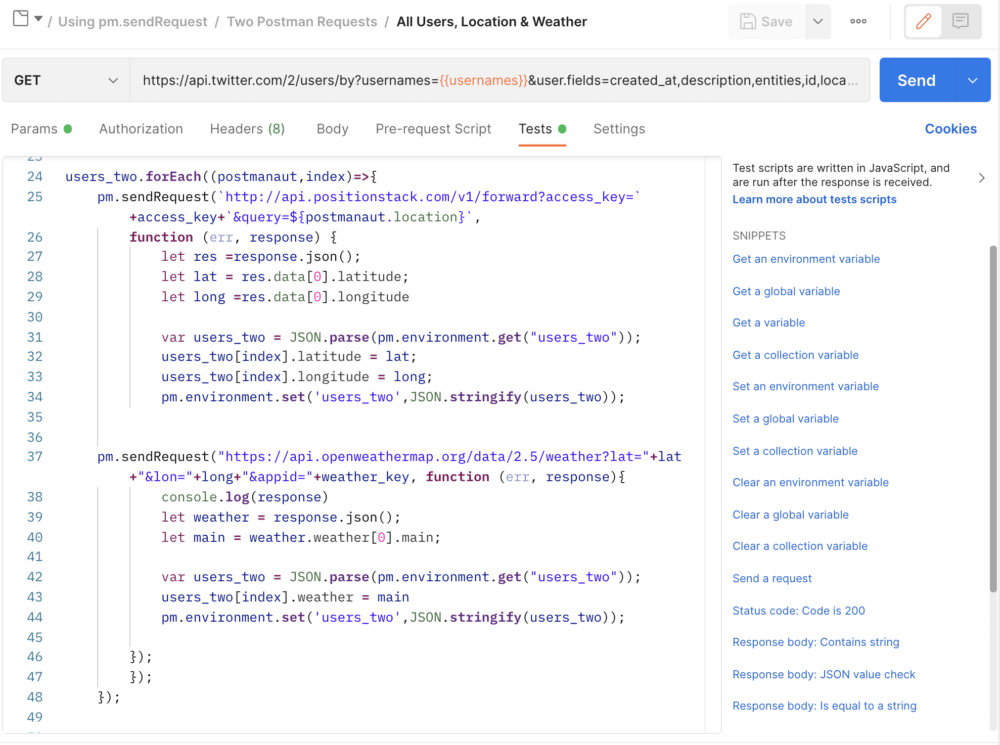
The example above is a request within the Two Postman Requests folder. In this single GET request, I can call the Twitter API to get each user’s location data as well as asynchronously call the PositionStack API and the OpenWeather API to get both position and weather data for each user. Within this single request, I am calling and retrieving data from 3 different APIs, which beats having to call and save data one by one. Take a look at the other folders within this workflow to see how you can get data from 3 APIs, as well as visualize the data in one single request workflow!
3. Looping over requests
The final workflow I wanted to share involves building request workflows by looping over requests. The key ingredient for this type of workflow is the postman.setNextRequest() function.
As the name suggests, postman.setNextRequest() enables you to specify which request Postman runs next, following the current request. Using this function, you can build custom workflows that chain requests, running them one after the other in a specific order, as well as build conditional requests where you can loop over requests by running a current request repeatedly until the outcome is received.
In the third folder, Using Request Workflows, you will see that the first Twitter GET request creates a list of users, and then the following requests for position and weather run until the index in the user’s list is complete.
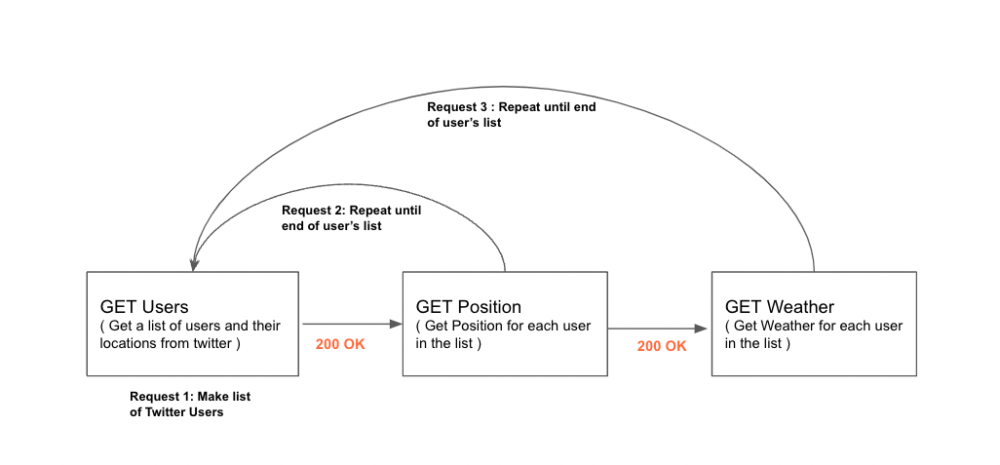
This workflow shows how you can loop over the same request while changing the parameters using the Collection Runner and the postman.setNextRequest() function. In this scenario, a template is built for each API request, which can be executed based on the index of each of the usernames in the environment variable usernames. The position API will run until all the position data is captured for each user in the list, and then the weather API will run. You can see this when you run this folder using the runner. This workflow is highly efficient when it comes to looping over large lists of data.
Want to contribute? Here’s a challenge
This blog post is all about the different ways you can achieve the same results using Postman. With that in mind, I have a challenge for you! If you found this interesting, go ahead and fork this collection and submit a pull request with your own workflow. Click Fork in the central menu bar to bring the collection into your own workspace. Make sure you use all three APIs, and feel free to add your own personal touch when it comes to optimizing, capturing data, and visualizing your results. I can’t wait to see what you come up with, so let us know how it goes in the comments below. Happy coding!
Technical review by Arlemi Turpault.


What do you think about this topic? Tell us in a comment below.