Visualizing a Globally Distributed Team Using Multiple APIs
If the 2020 pandemic has taught us anything, remote-first work culture is the way of the future. As a new developer advocate here at Postman, I’m excited to be working remotely for a globally distributed developer relations team supporting Postman’s community of more than 20 million users worldwide. With that said, I was inspired to build my first collection to highlight Postman’s global presence.
On Day 17 of 30 Days of Postman, I became intrigued with the Postman Visualizer feature. I knew it was going to be the heart of my project, so I set out to find a way to visualize my fantastic new Postman team members spanning the globe. In this blog post, I’ll show how I got started.
Working with an image in mind
There are Postmanauts living in all corners of the world, with my team comprising seven members that work across various time zones. A map was going to be the best kind of visualization to showcase our global diversity. After exploring the Postman API Network, I stumbled upon an Earthquake Map Visualization, which used D3.js libraries to map data against longitude and latitude coordinates.
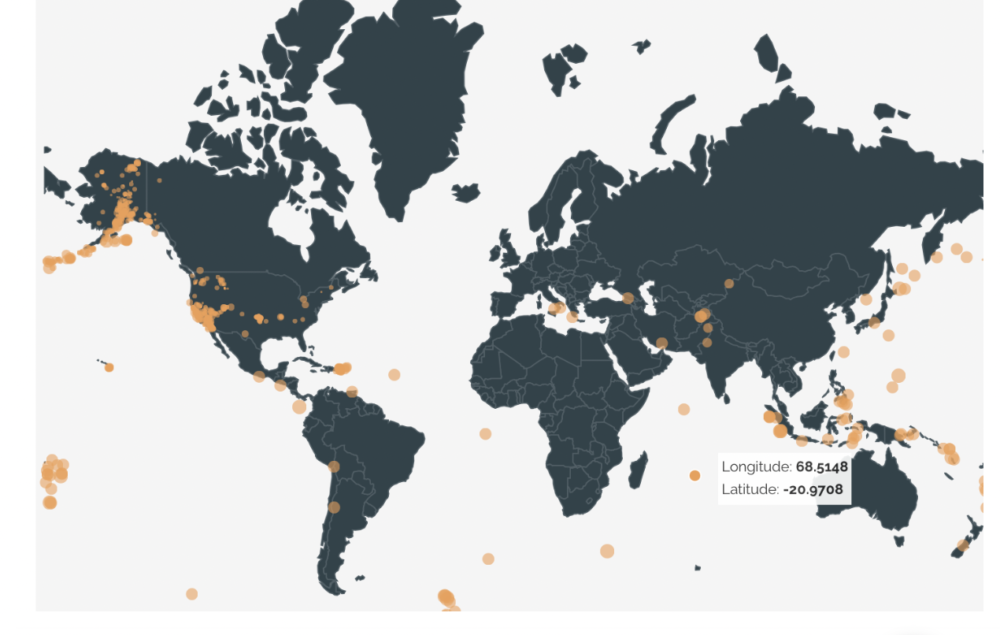
I realized that I could visualize just about anything on this map as long as I had access to some longitude and latitude data.
Time to put this theory to the test. I built a sample POST request called Random Users using the Postman Echo API. The idea behind this request was to echo back some sample dummy data for ten users with random names, longitudes, and latitudes using Postman’s faker library.
let users = [];

for (var i=0; i<10; i++){
    let tempUsers = {
        name: pm.variables.replaceIn("{{$randomFullName}}"),
        latitude: pm.variables.replaceIn("{{$randomLatitude}}"),
        longitude: pm.variables.replaceIn("{{$randomLongitude}}")

    }
    users.push(tempUsers);
}
pm.collectionVariables.set('req_body', JSON.stringify(users));
In this pre-request script, I used dynamic variables to create objects for ten users with random names, latitudes, and longitudes. These objects are then pushed into an array and set into the request body using a collection variable and JSON Serialization. Once this request is sent, I can get random users:
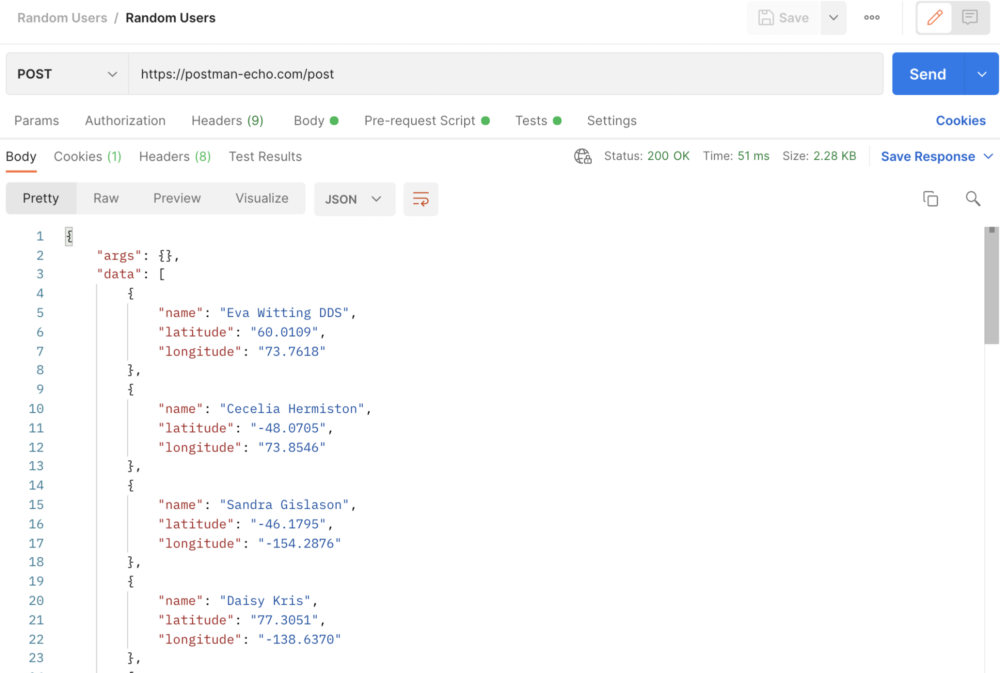
Now it’s time for the visualization. In the Test tab, I used the template from the Earthquake example and modified a couple of interesting points:
var response = pm.response.json().data;
let parsedData = [];

//data parsing
for (let users of response){
    let tempEntry = {};
    tempEntry.name = users.name;
    tempEntry.lat = users.latitude;
    tempEntry.long = users.longitude;
    tempEntry.circleSize = 6;
    tempEntry.color = "#F09D51";
    parsedData.push(tempEntry);
}
// visualize
pm.visualizer.set(template, {
    data: parsedData,
    title: "Map of Random Users"
} );
The Echo API’s response data is being parsed for each of the users, name, latitude, longitude, and circle size and color for each data point. The pm.visualizer.set() method is then used to visualize the parsed data, and the map’s title is returned from echo API. Here is what we get:
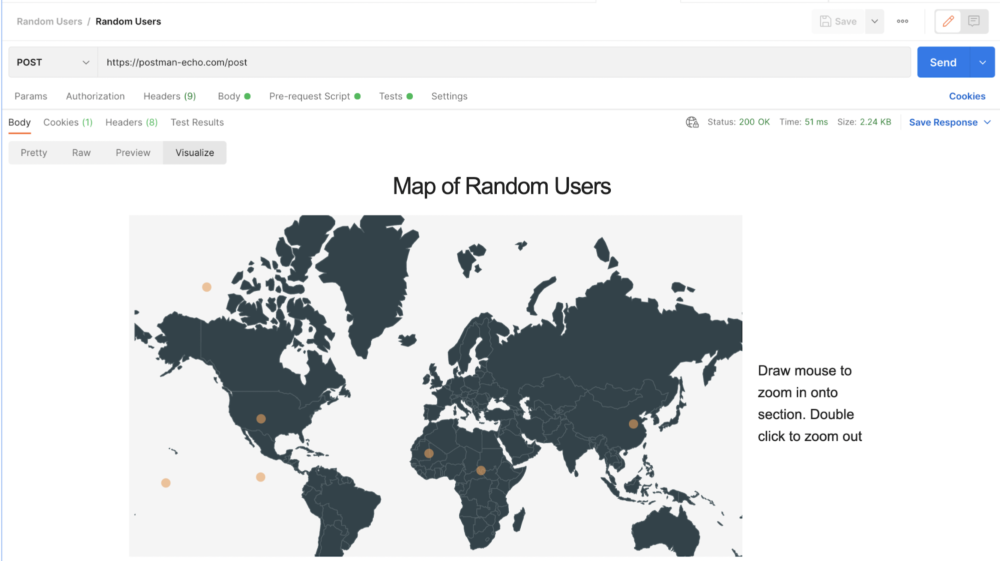
Voilà, the theory worked! This proved that with some longitude and latitude coordinates, I could use this visualizer to map random users. This was going to be my template to visualize, but now it was time to work with some real user data.
Choosing the APIs
Getting data for real users can be tricky. I needed to find longitude and latitude data for my entire team, so I thought to use their location data from their Twitter profiles as a starting point.
The Twitter API is a really powerful API. To get a user’s data from a username, I specifically used the Twitter API user by username endpoint to retrieve location data for an individual username and the Twitter API User by Usernames to retrieve location data from multiple usernames. In Postman, the query params for user.fields is used to get all sorts of data from Twitter, such as:
Created_at,description,entities,id,location,name,pinned_tweet_id,profile_image_url,protected,url,username,verified,withheld
This request is forked from the Twitter API v2 Postman Collection, which allows anyone to access the wide plethora of Twitter endpoints with the right authorization from Twitter’s Developer Dashboard.
In my case, I used my Twitter handle, @poojamakes, to get my location data, which is Washington, D.C.
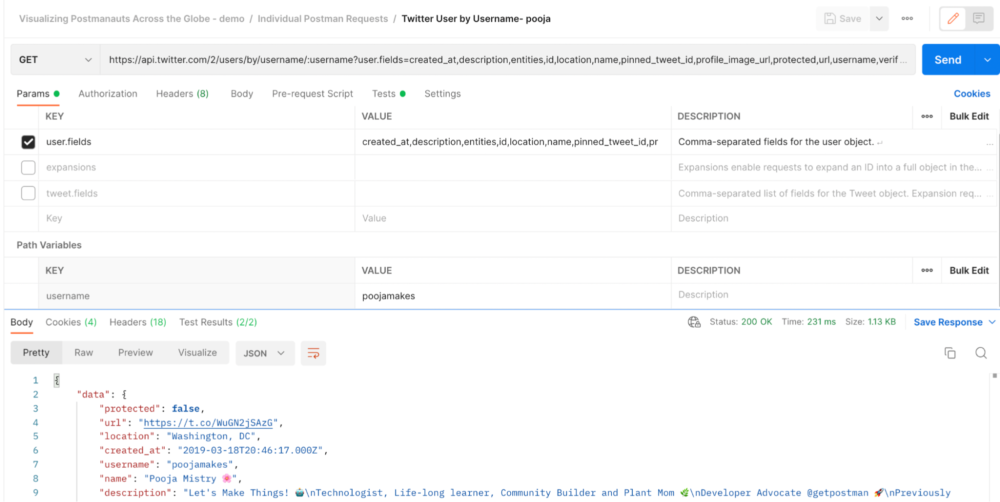
Once I could get a high-level location for each of my team members using their profiles, I needed a geocoding API that could give me their longitude and latitudes based on their location.
The PositionStack API was a perfect fit since it provided an accurate forward and reverse geocoding covering more than 2 billion places and addresses worldwide. To use this API, you will need to obtain an API key from PositionStack by clicking on Get Free API Key and selecting the free option for personal use.
In this scenario, I used the Forward Geocoding endpoint to make a forward geocoding request, using the API’s forward endpoint and specifying the query parameter with the location from Twitter.

API results:
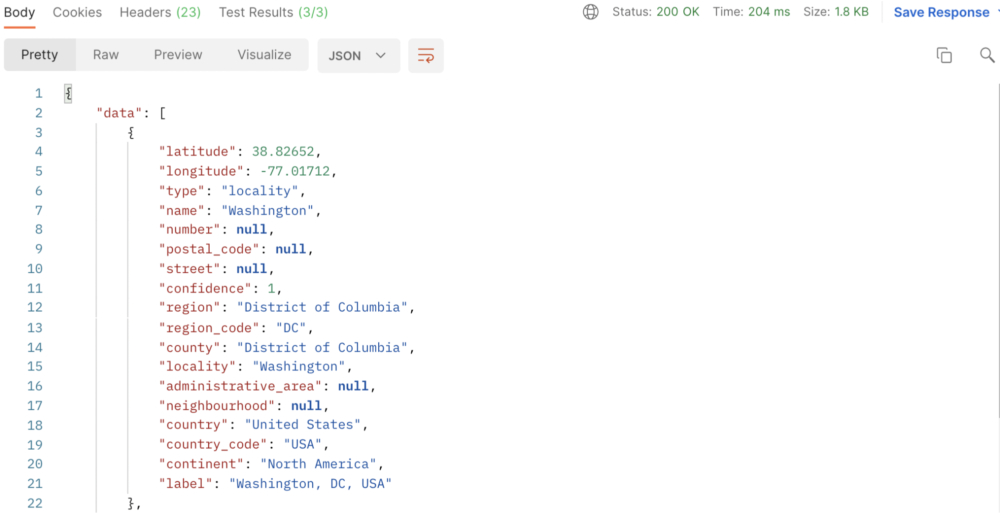
Now that I had the access to location using the Twitter API and was able to convert that location into longitude and latitude data using PositionStack API, I was well on my way to creating my map visualization.
I decided to get a little creative and also capture the weather data for each team member by using the Open Weather API using the Current Weather Data endpoint, which allows you to get current weather data for any location on Earth, including over 200,000 cities, by using geographical coordinates (lat, lon).

At this point I have all the pieces of the puzzle:
- User’s Location data from Twitter User Look Up APIs
- Longitude and latitude data from PositionStack API
- Weather data from Open Weather API
- Map visualization with Postman Echo
Now it’s time to build out a single workflow (or maybe many) to put all of these pieces together.
Building workflows
One thing I learned while working on this project was that there are so many different ways to build request workflows with Postman. In my case, I found three specific ways that I will be diving deeper into in my upcoming blog post. However, the common thread behind these workflows is the ability to create, set, and parse through data objects across each request using serialization. My colleague Ian Douglas wrote a wonderful blog post on this topic which talks about the idea of “serializing” data to store and convert complex data types when writing and reading from memory.
For this case, I am storing this data into object environment variables. Variables in general are necessary when working with multiple APIs and requests. In this scenario, I used an environment variable to set all of the Twitter usernames that I will be using in the Twitter API to get the location data and name for each user. I was then able to create an object with that data using pm.environment.set() and set that serialized data into a string, using JSON.stringify(), into another environment variable to be used in a query parameter for the PositionStack API to get each user’s longitude and latitude.
let response = pm.response.json();
// building users object
let obj= {
     name : response.data.name,
     location:response.data.location,
     latitude: null,
     longitude: null
}
pm.environment.set("user-object", JSON.stringify(obj));
Initially, this data is set as null, but as the data passes through another API and is deserialized and parsed using the JSON.parse(), more and more data can be added to each request.
var dataOut = pm.response.json().data[0];
let lat = dataOut.latitude;
let long = dataOut.longitude;

//add long and lat from object
var userObj = JSON.parse(pm.environment.get("user-object"));
userObj.latitude = lat
userObj.longitude = long

// set lat and long to main object
pm.environment.set("user-object", JSON.stringify(userObj));
We are getting the longitude and latitude data from the API’s response. Then the initial environment variable is parsed and the data is added to the object and finally set again to using pm.environment.set() to be used in another request.
Using these methods as a model for each scenario gives us the overall workflow:
- Get user’s location from Twitter API.
- Convert Location into longitude and latitude.
- Use longitude and latitude to get weather data for each user based on their location.
- Visualize all the data in the map.
Here’s a visual overview of everything in this workflow. The final POST request uses the Postman Echo API which replaces the random data with real data for each user from the Twitter, PositionStack, and Open Weather APIs:

Create your own team visualizations
Overall, this collection was created to showcase the magic of Postman’s versatility. Just knowing the basics of working with variables, objects, serialization, and visualizations can take you a long way.
Keep an eye out for my upcoming blog post about the three ways to build Postman workflows, in which I’ll use this same example to dive deeper into working with individual Postman requests, sending requests from scripts, and building request workflows.
If you are interested in playing around with this collection and visualizing your own teammates across the globe, be sure to fork my collection.
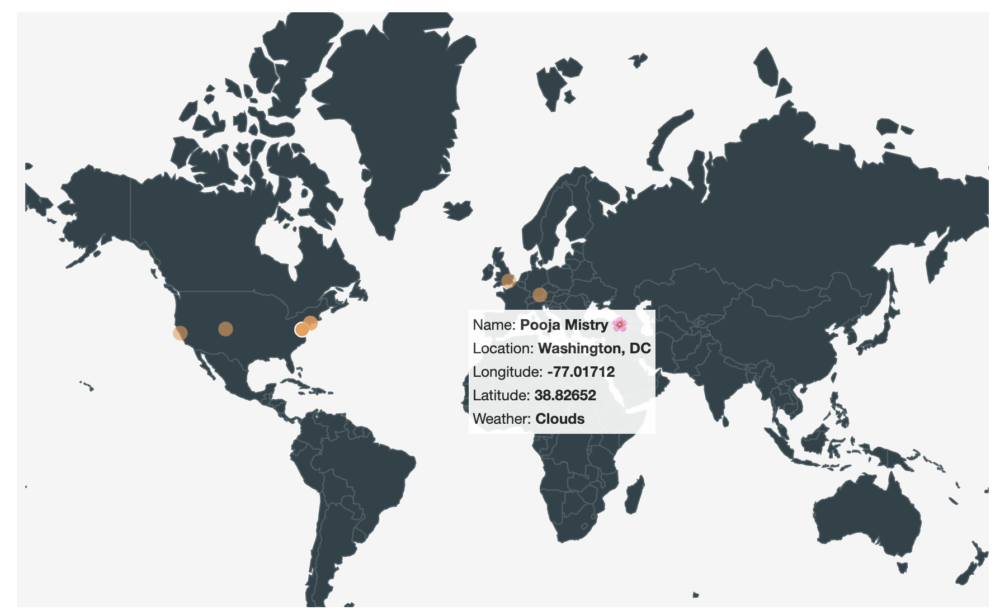
Give us all a follow or or use this collection to find other Twitter users in your network to visualize.
To get started with this collection:
- Fork this collection into your own workspace.
- Get Twitter bearer token and add
bearer_tokento current value in collection variable. - Get PositionStack API key and add
api-access-keyto current value in the collection variable. - Get Open Weather API key and add
weather_api_keyto current value in the collection variable. - Use collection runner to run through Individual Postman Requests and capture all objects as environment variables for each user.
Check out visualization in Postmanauts - Visualize request in all folders.

is it possible to visualize response for collection runner?