
How to Auto-Sync Postman Collections with AWS CodeCommit Repositories
Earlier this spring, Postman partnered with Codebase—a student organization from the University of California, Berkeley—to create a suite of cloud integrations. After a semester of hard work, the Codebase team successfully built out several cloud-based workflow integrations in AWS, Microsoft Azure, and Google Cloud Platform within Postman.
The resulting Codebase Cloud Integrations public workspace in Postman contains seven unique integrations in the form of Postman Collections. Each collection is complete with documentation for getting started, a working environment specific to the collection, and a mock environment specific to the collection. While these integrations are not supported natively in the Postman platform, by leveraging the power and versatility of APIs, you can make a series of API calls to essentially act as though these integrations were built in. Fork one of the integration collections to explore how.
In this blog post, we’ll explore the AWS CodeCommit Integration. AWS CodeCommit is a fully managed source control service that hosts secure Git-based repositories. Using this integration, users can programmatically upload Postman Collections to a repository in AWS CodeCommit and keep their collections in lock-step with their AWS repositories—all without having to navigate the AWS website.
How to submit Postman Collections to AWS CodeCommit
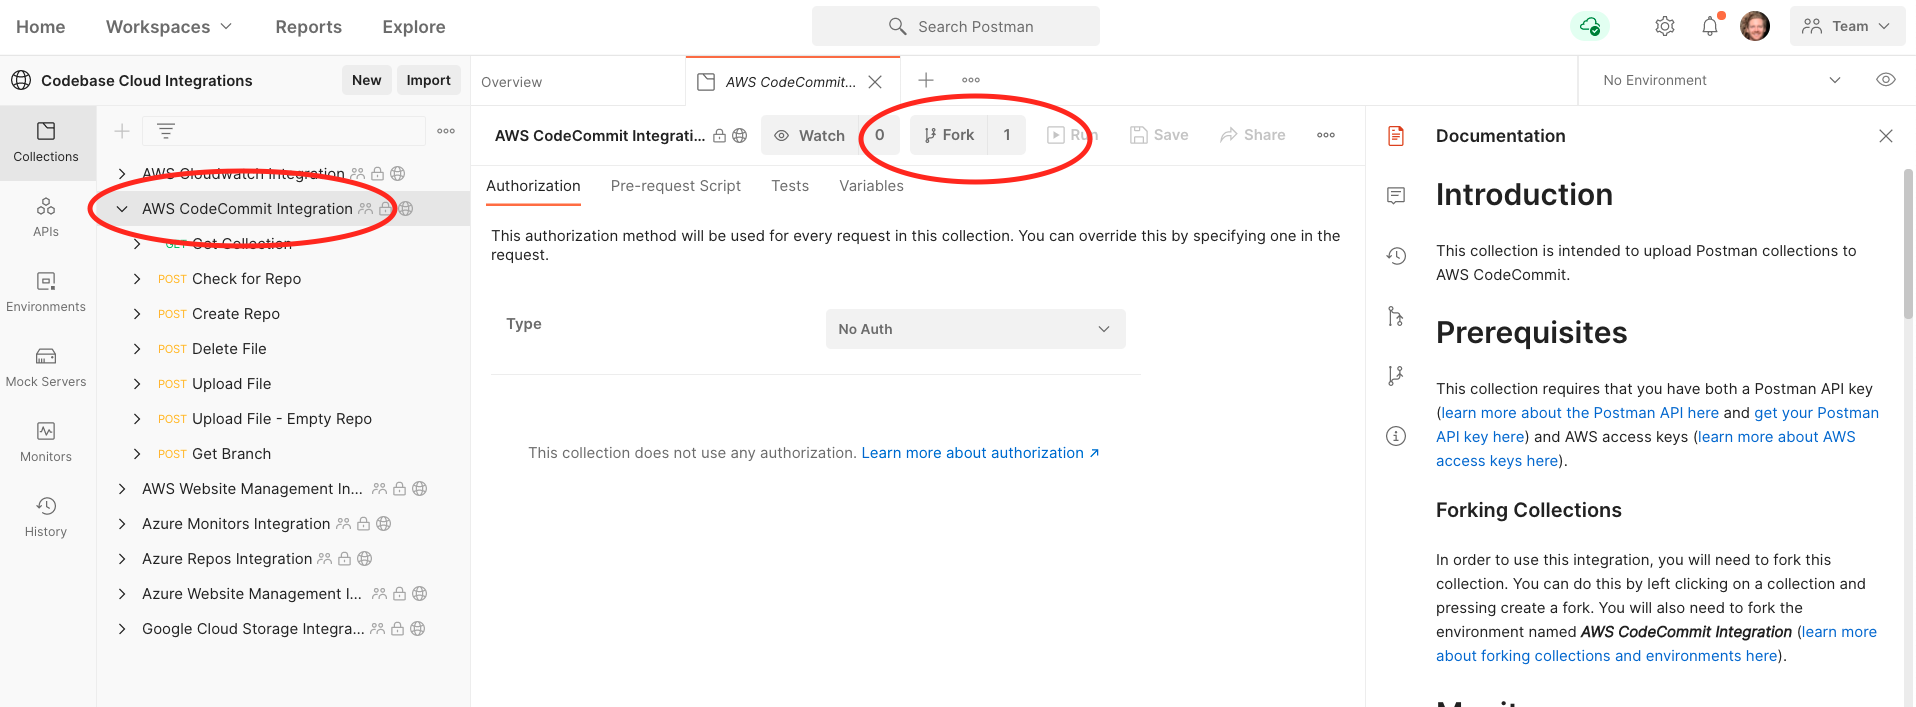
1. Fork the AWS CodeCommit Integration collection from the Codebase public workspace into your own workspace:
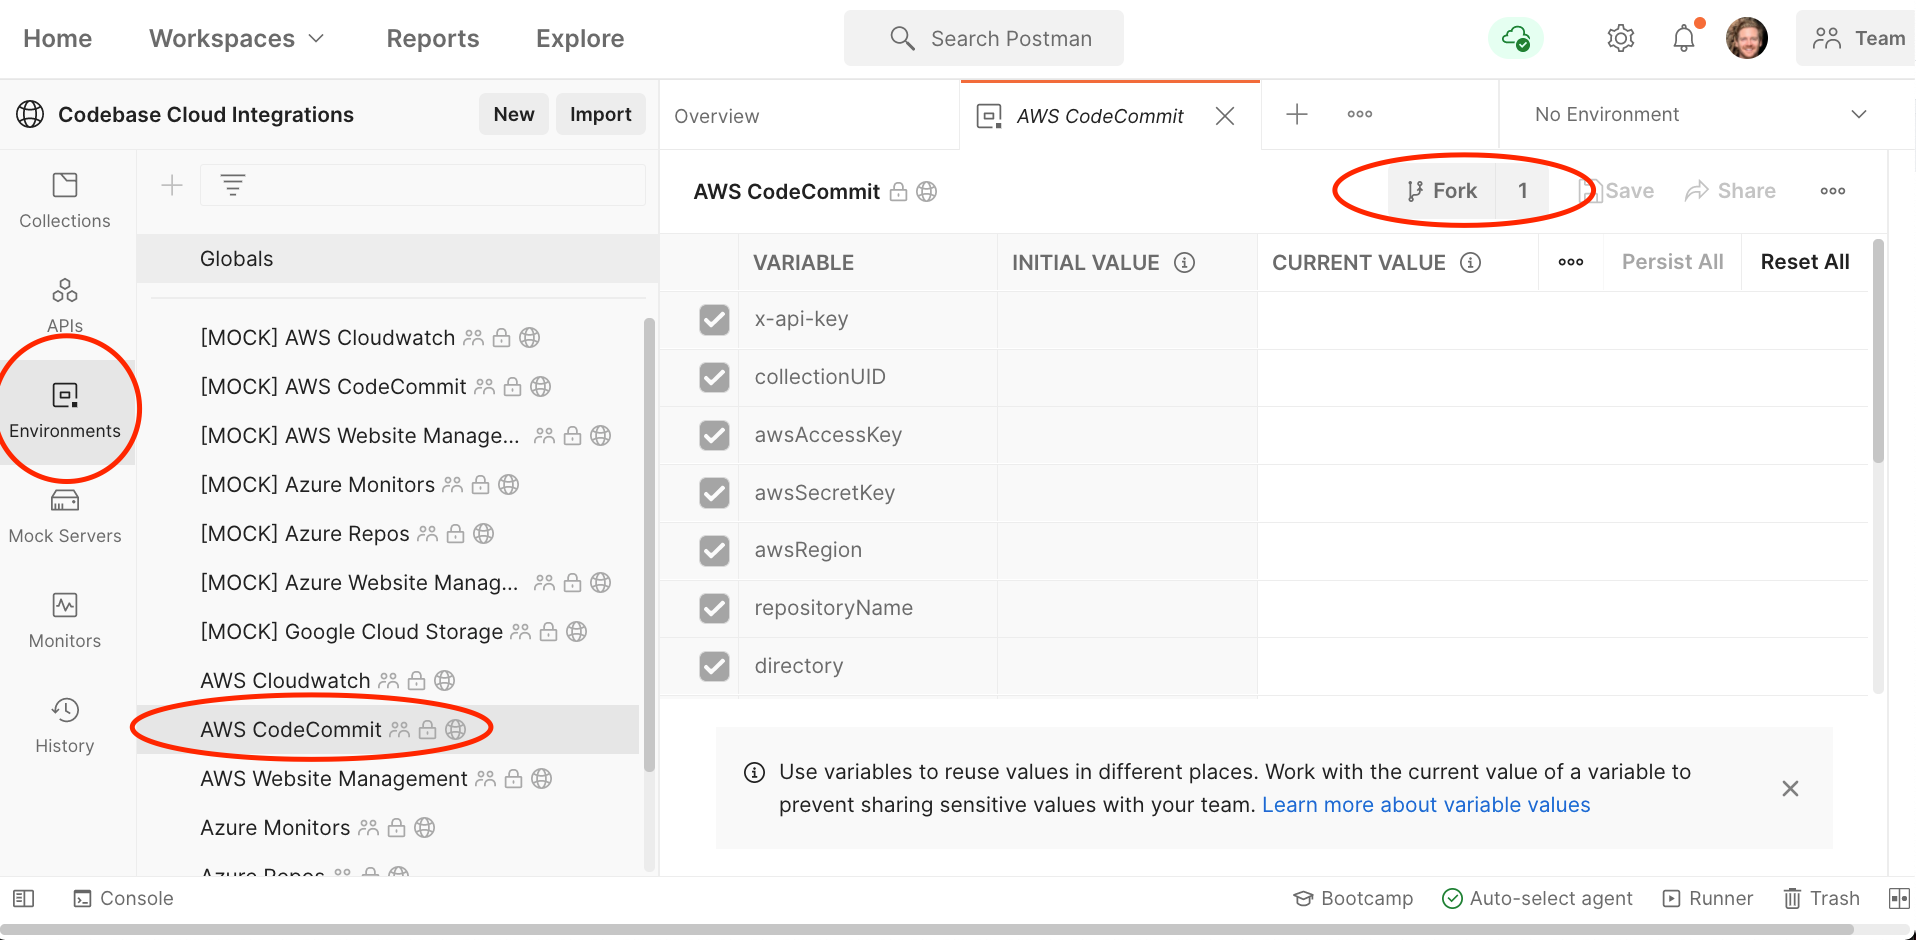
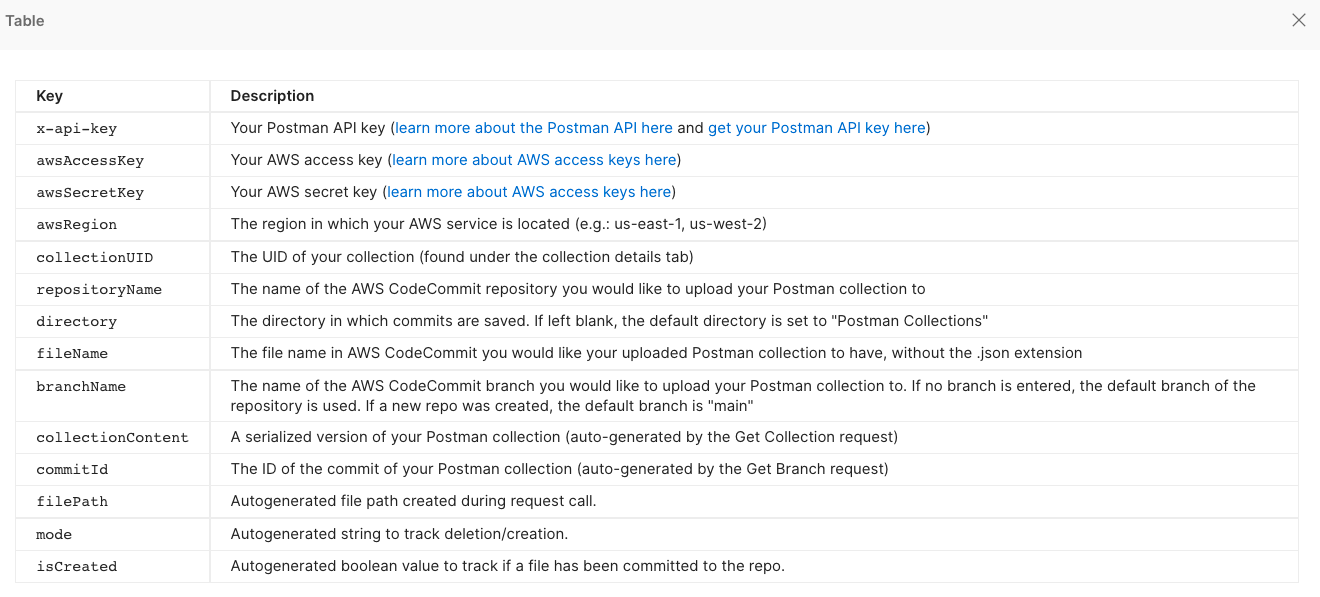
2. Fork the AWS CodeCommit environment to the same workspace. This contains all the variables you need to fill out in order to access your AWS account. (More info on environments here.) As you go through the setup process, you’ll need to enter the appropriate values for the various environment variables:
3. Obtain a Postman API key. The Postman API will be used to obtain the uid of the collection you want to upload to an AWS CodeCommit repository. If you don’t already have an active API key, click the Generate API Key button from the first link in this step. Enter the value in the environment variable called x-api-key. (Note: Enter sensitive values like API keys only in the column listing current values in the Variables tab to prevent accidentally sharing them publicly.)

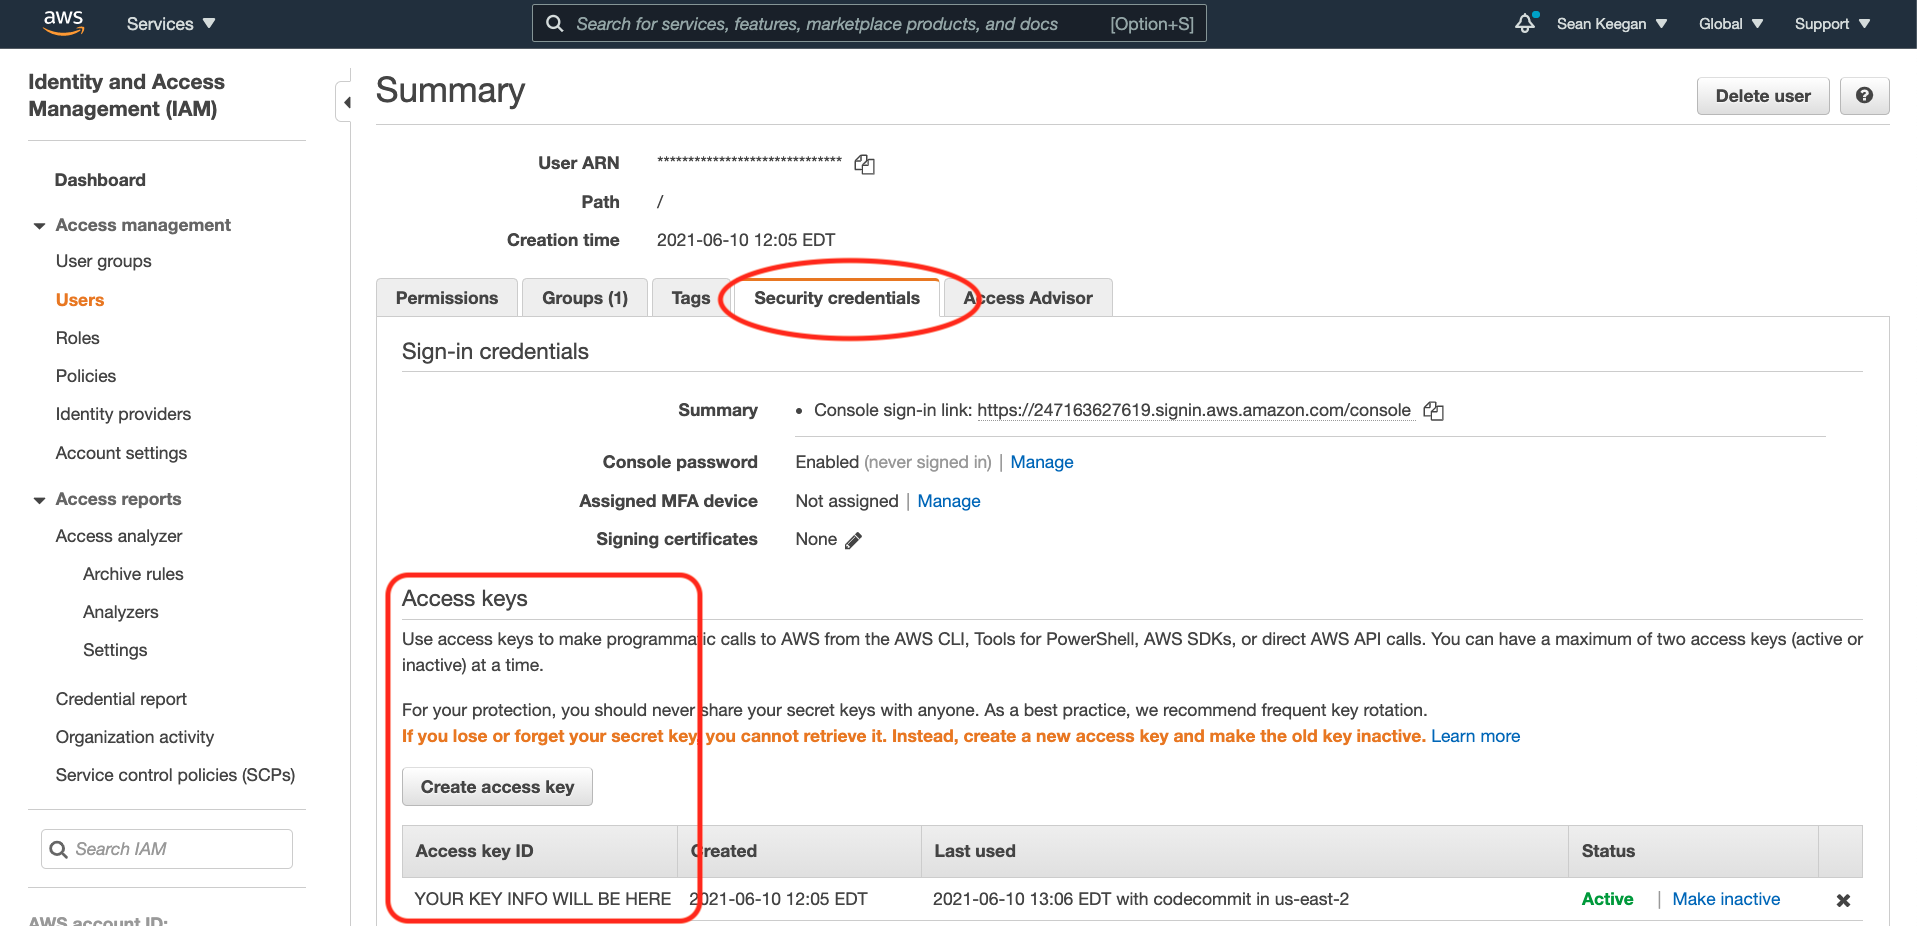
4. To set up your integration, you will need a valid access key ID and secret access key from your AWS account. You can retrieve these from the Identity and Access Management (IAM) dashboard within your AWS console. From the IAM dashboard, select Users from the pane on the left. Next, find the user that will be making API requests to AWS and click on their name. Once the appropriate user is selected, click the Security credentials tab. Finally, click the Create access key button to generate the AWS access key and secret key. Once you obtain these values, copy and paste them into your environment variables awsAccessKey and awsSecretKey. You can learn more about AWS access keys here.
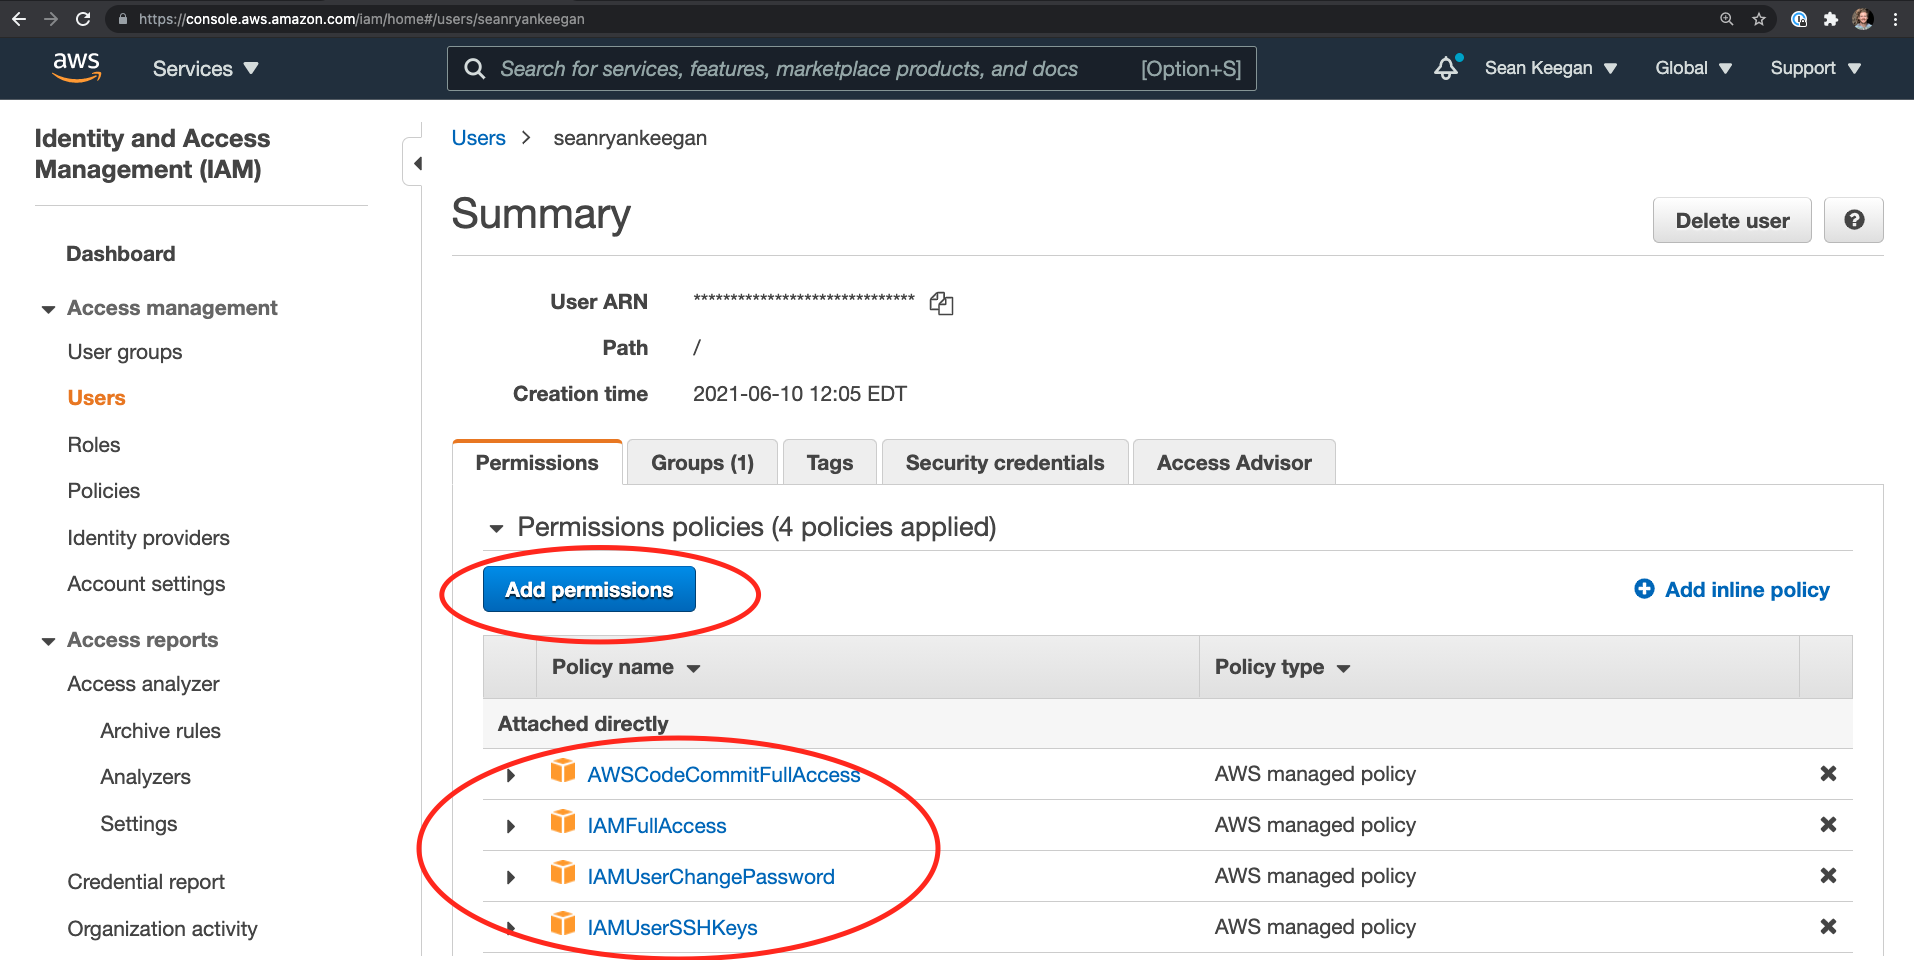
5. To make an API call to AWS CodeCommit, a user needs to have the proper permissions in AWS. Manually add or edit user permissions from the IAM Management Console. Make sure the user is granted permissions for AWSCodeCommitFullAccess, IAMFullAccess, IAMUserChangePassword, and IAMUserSSHKeys. Those permissions should successfully enable a user to make changes to an AWS CodeCommit account via API calls.
6. Next, you need the uid of the collection that will be saved to CodeCommit. To find this value, with the collection selected, click the “Info” icon on the right side of the screen, and copy the value at the top under ID. The gif below shows how to find this value. Enter this value in the environment variable called collectionUID.
7. The last mandatory environment variables needed are repositoryName and fileName. The repositoryName variable is the name of the AWS CodeCommit repository you would like to upload your Postman collection to. The repositoryName variable can either be the name of a new repository to be created in AWS or the name of an existing repository to be updated in AWS. The fileName variable is the name of the JSON file that will be saved in AWS CodeCommit that represents your Postman Collection, without the .json extension.
8. At this point, all of the non-discretionary environment variables should be set. You should have entered in your x-api-key, awsAccessKey, awsSecretKey, collectionUID, repositoryName, fileName. You should also enter the appropriate awsRegion (this can be found in the address bar of your AWS console.) The remaining values will either be auto-generated or have default values if you do not enter anything:
9. With all the variables filled out, set the AWSCodeCommit environment as the active environment. Once this is done, the integration is ready to be executed. To run this collection manually within Postman, you can use the Collection Runner. Open the Collection Runner by clicking Runner in the bottom right of the Postman UI, and drag in the “AWS CodeCommit Integration” collection into the Runner. Then click the blue Run button to initiate the integration collection:
Potential collection workflows
Below is a visual of the general flow of this collection. The first request in the collection, labeled “Get Collection,” will always run first to capture the uid of the collection being uploaded to the repository. From there, the collection checks your AWS CodeCommit account to see if a repository exists with the name entered in the repositoryName variable. One of three possible scenarios can occur from there.
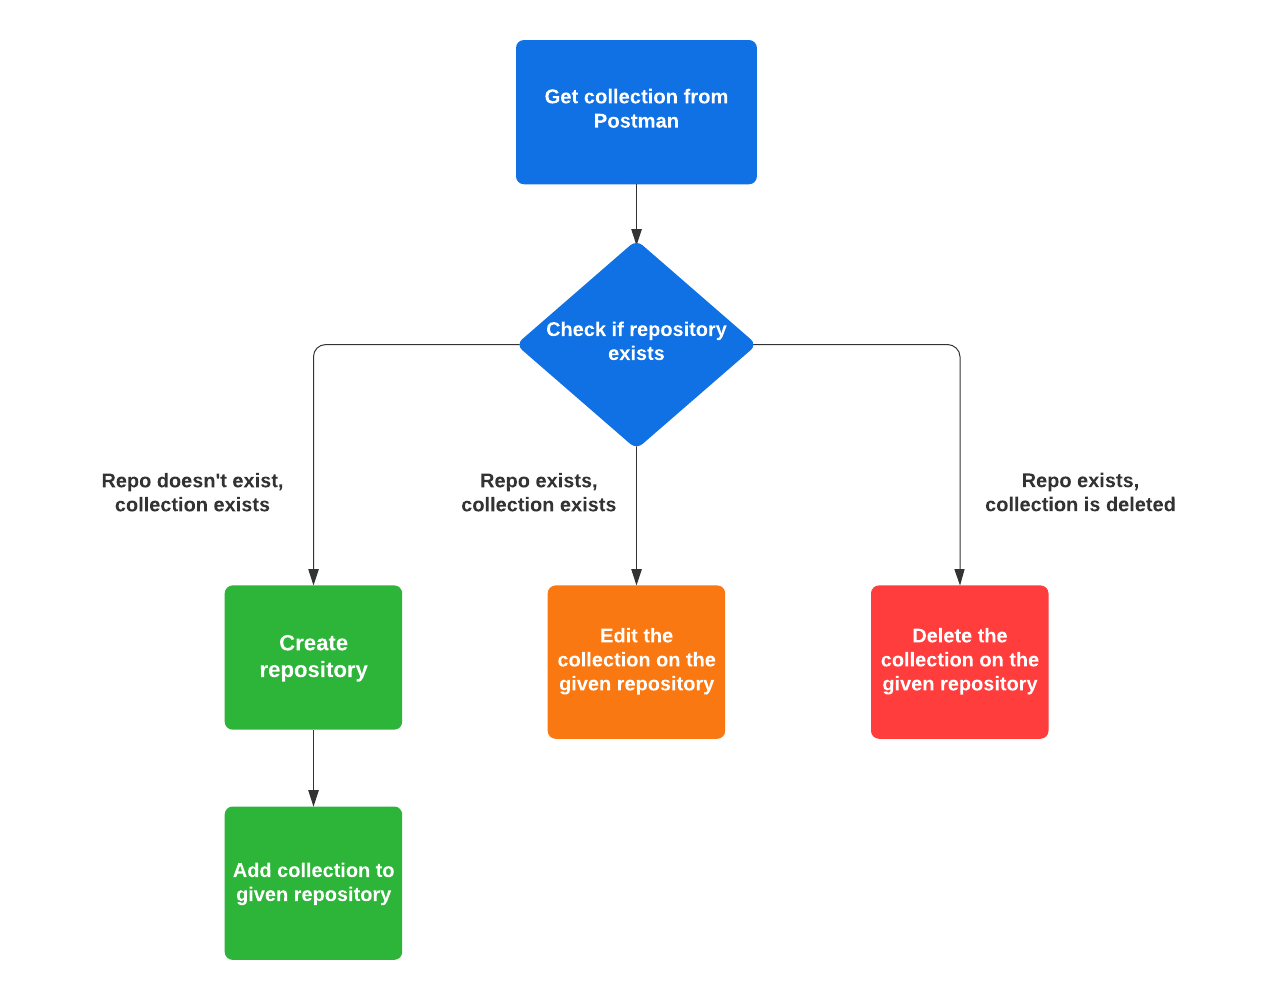
Scenario A
The repository does not exist in AWS CodeCommit, but the collection exists in Postman: If the repository does not already exist in AWS CodeCommit, the integration collection first creates a repository in AWS CodeCommit. Next, it adds the JSON file representing the Postman collection to the given repository.
Scenario B
The repository exists in AWS CodeCommit, and the collection exists in Postman: If both the repository and the Postman Collection already exist, the integration collection will upload a new file for the collection in the given repository to replace the old file. The integration collection also checks for branches within the repository.
Scenario C
The repository exists in AWS CodeCommit, but the collection was deleted in Postman: In an effort to mimic GitHub’s flow, the integration collection will recognize when the collection is missing and then delete the corresponding file in AWS CodeCommit.
Automate your updates
Postman monitors are a tool to automate tasks at regular intervals. In the AWS CodeCommit integration, a monitor is used to automatically check for changes made to a collection and push updates to an AWS CodeCommit repository. Monitors can be scheduled to run as often as every five minutes, but once a day is recommended for this integration.
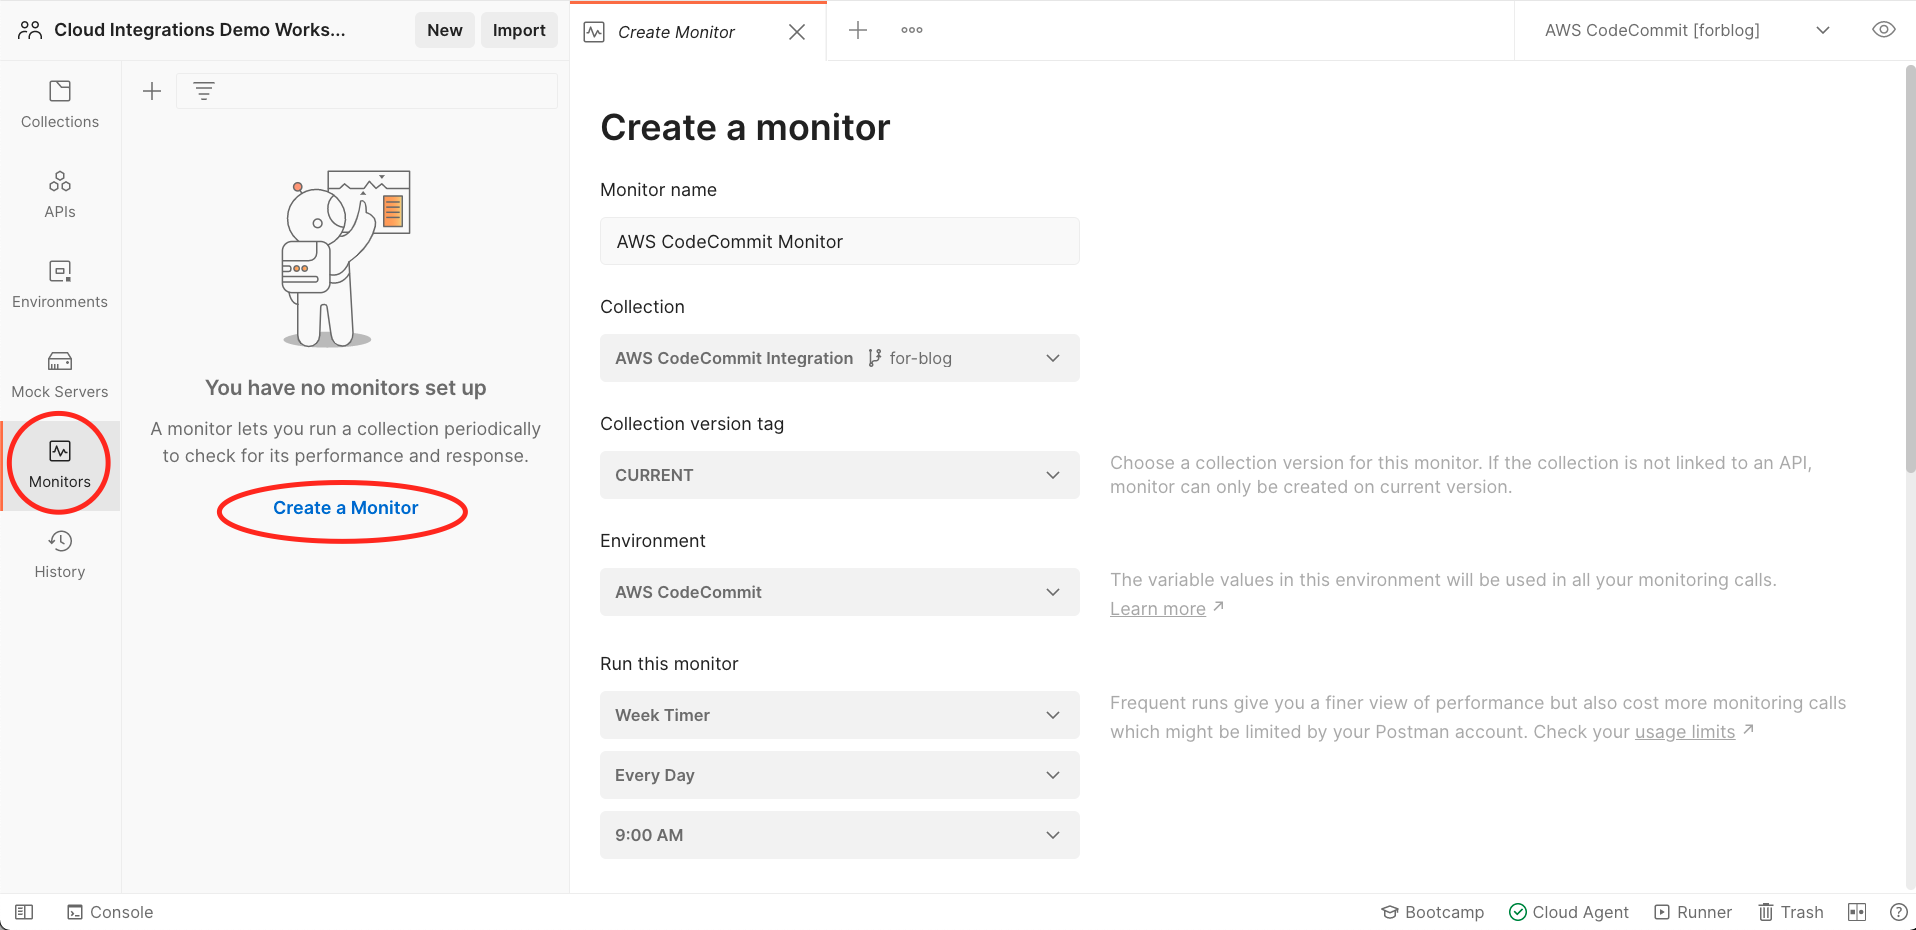
In order to make this monitor, select Monitors from the left pane in the Postman UI and select Create a Monitor. Input the desired Monitor name. Then select the “AWS CodeCommit Integration” collection as the collection to be run. Select the “AWS CodeCommit” environment as the environment and select how often you want it to run to check if your collection has been updated (we recommend once a day). Finally, scroll all the way down and select the orange Create button to officially create your monitor. (Learn more about creating a monitor here).
Simulate the experience with mock servers
If you would like to see example responses and interact with the collection without having to input valid credentials, you can achieve this by creating a mock server. Before creating a mock server, you need to fork the [MOCK] AWS CodeCommit environment into your own workspace. This environment will be used for the mock server you create.
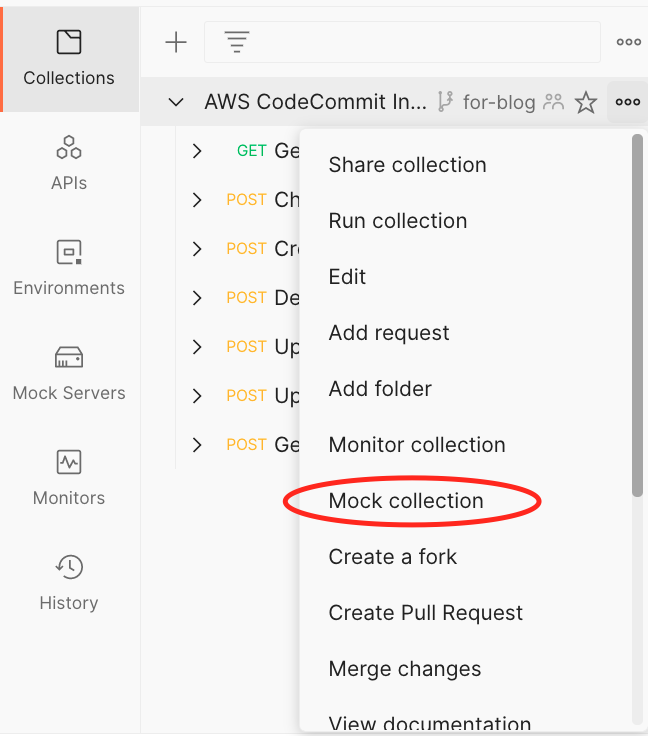
Next, to actually create a mock server, click on your forked version of this integration and select Mock collection in the drop-down menu:
From here, enter the name you want to use for the mock server; there will also be a field to select the collection you want to base it off of, and the AWS CodeCommit Integration collection should already be selected by default. Next, select the environment [MOCK] AWS CodeCommit. Once complete, you will be given a mock server URL. Copy this value and paste the value into the mockUrl variable in your [MOCK] AWS CodeCommit environment. There will be a pre-populated value in the mockUrl variable, so paste in your new mockUrl value into the environment. From here, you can simulate the workflow of this integration.
Get started with this integration today
If you’re using AWS CodeCommit, this integration automatically syncs the latest version of your collections in Postman. Whether you’re looking to avoid navigating through the AWS UI or like the peace of mind of automatic updates, this integration has you covered.
Technical Review by Claire Froelich.

this solution is single user only, it’s not able to manage sync conflicts for other users