Harden your API by adding chaos engineering to your tests
 This is a guest post written by Manuel Gerding, product manager at Steadybit.
Software development has changed in the last few years. While we used to develop our software as a monolith running on our own hardware, we deploy software today as a distributed system that leverages several connected services, which may even run on different cloud platforms. From the outside perspective of an API, the change is barely visible. A good API intentionally hides these details and reflects them neither in the API design nor the API documentation.
However, we do need to consider these details when testing an API. By shifting the architectural approach to a distributed system, we have accepted the possibility of additional error cases. We can’t expect that the underlying platform, infrastructure, and wide range of connected services will always work smoothly. No matter how much effort we put into it, we cannot prevent a slow network, an improperly scaled system, or a faulty database.
That’s why teams can benefit significantly from integrating Postman’s end-to-end API testing capabilities into Steadybit for chaos engineering experimentation. In this blog post, we’ll first show you how to test an API from a functional perspective in normal conditions. Then, we’ll extend the test in order to experiment with API behavior in turbulent conditions.
Let’s get started: Our system under test
For this post, we’ll use a relatively simple example of a system under test. It is an online shop consisting of five microservices: one microservice for each product category (hot-deals, fashion, and toys), one to orchestrate all the products (gateway), and one to show the products to the user on a web frontend (shopping-ui). All communication between the microservices happens via REST without any caching. You can get further information via the project’s GitHub repository.

We’ll start by writing an end-to-end API test in Postman to check whether the online shop API returns the right number of products. After that, we’ll extend the scenario with a chaos engineering experiment in Steadybit to check how the shop behaves when one instance of a product-related microservice (hot deals) isn’t fully available.
Write an end-to-end API test with Postman
In this section, we’ll walk through how to write an end-to-end API test in Postman. This includes the following steps:
- Creating a Postman Collection with an HTTP request.
- Verifying the HTTP response using Postman tests.
Create a Postman Collection with an HTTP request
Creating a Postman Collection with an HTTP request is pretty straightforward. We’ll simply follow these steps:
- Sign into Postman.
- Create a new collection and name it
shopping-demo. - Add a new HTTP GET request to the collection that requests our endpoint
http://k8s.demo.steadybit.io/products.
We can now check whether the endpoint correctly returns all products by sending the request and manually verifying the response:
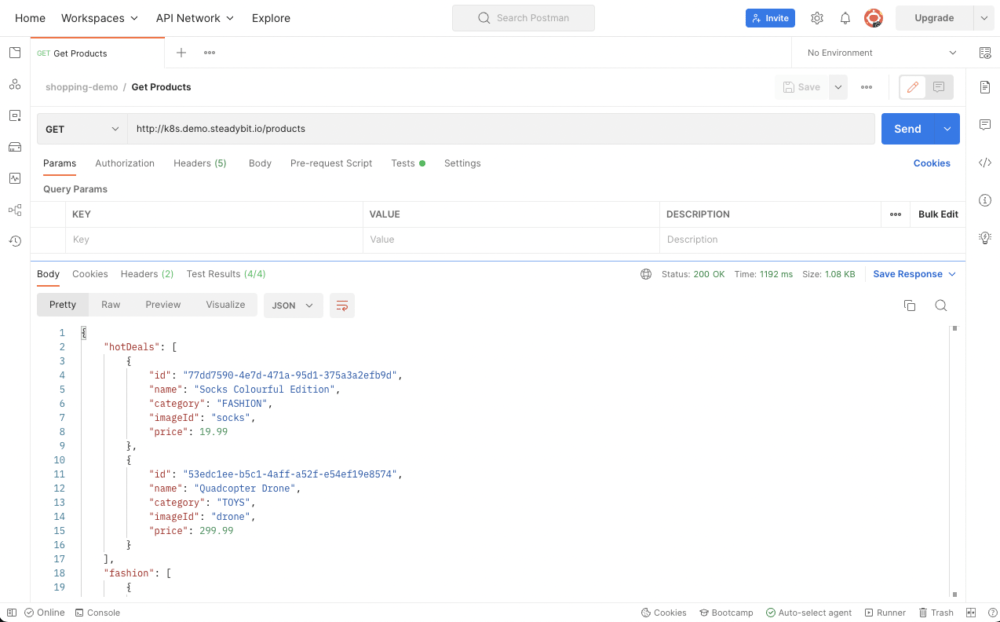
The HTTP response looks good: the status code is 200 OK, and the HTTP body consists of multiple products from all three categories—namely, two hot-deals, three fashion, and three toys.
Verify the HTTP response using Postman tests
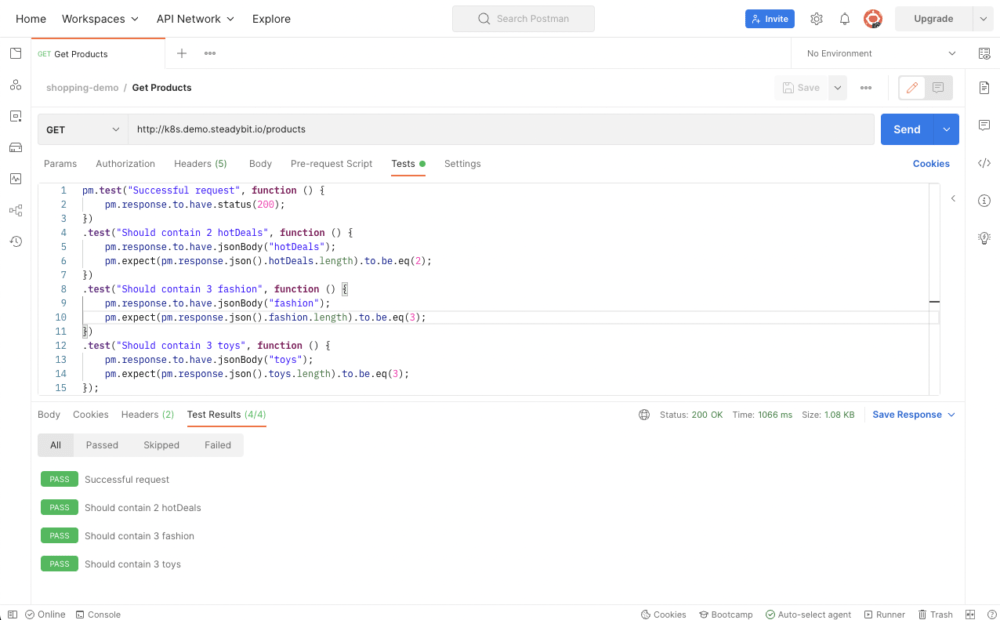
Next, we can automate the validation of the HTTP response body by adding the following code to the Test tab in Postman. This will make it easier to reuse the check later in another test.
pm.test("Successful request", function () {
  pm.response.to.have.status(200);
})
.test("Should contain 2 hotDeals", function () {
  pm.response.to.have.jsonBody("hotDeals");
  pm.expect(pm.response.json().hotDeals.length).to.be.eq(2);
})
.test("Should contain 3 fashion", function () {
  pm.response.to.have.jsonBody("fashion");
  pm.expect(pm.response.json().fashion.length).to.be.eq(3);
})
.test("Should contain 3 toys", function () {
  pm.response.to.have.jsonBody("toys");
  pm.expect(pm.response.json().toys.length).to.be.eq(3);
});
When we send the request again to the online shop’s gateway HTTP endpoint, we will see that our Postman tests have passed. This confirms that our API responds as expected in normal conditions:
Chaos engineering as the next step
So far, our tests have covered the happy state of our endpoint in normal conditions. However, we at Steadybit have seen that peace and harmony are rare in production environments. Failures are commonplace. For example, what happens to your API when a single instance is not responding, crashing, or redeployed? We strongly advise testing the API for these circumstances.
Let’s find out whether our online shop API is safe. We packaged every microservice as a container and deployed it into a Kubernetes cluster with a redundancy of two pods. So, we assume that if one instance of a microservice fails, the other will take over. In the meantime, Kubernetes will detect the failing instance and replace it quickly.
Something similar happens during the deployment of a new version via a rolling update. That’s the scenario this blog post will cover: a rolling update deployment for the product microservice hot-deals. We will use Steadybit to test whether our online shop API performs as expected when we update both instances of the hot-deals microservice. If you haven’t worked with Steadybit before, you can get started for free by creating your account and installing the agents in your environment.
We will follow the steps below to integrate our Postman API test into a newly created chaos engineering experiment in Steadybit:
- Create a chaos engineering experiment in Steadybit.
- Integrate our Postman API test into the chaos engineering experiment.
- Run the chaos engineering experiment.
- Fix the system under test.
Create a chaos engineering experiment
Once you have signed up for your Steadybit account and installed the agents, you can log in to the Steadybit platform, go to the Experiments tab, and create a new experiment using our wizard. The wizard guides you through all the essential aspects of a chaos engineering experiment.
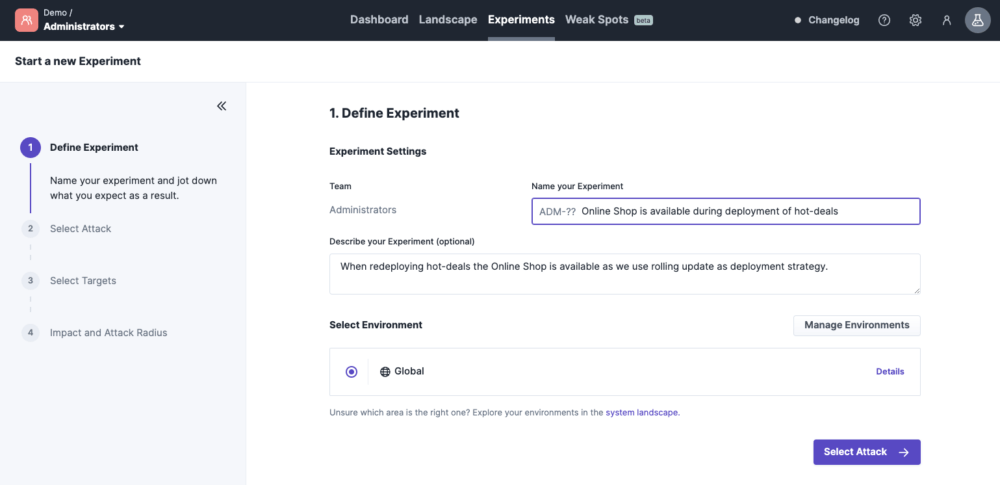
- Define Experiment: We start by giving the experiment a meaningful name, describing our expected outcome, and choosing the right environment (Global defaults to everything the Steadybit agent has discovered):
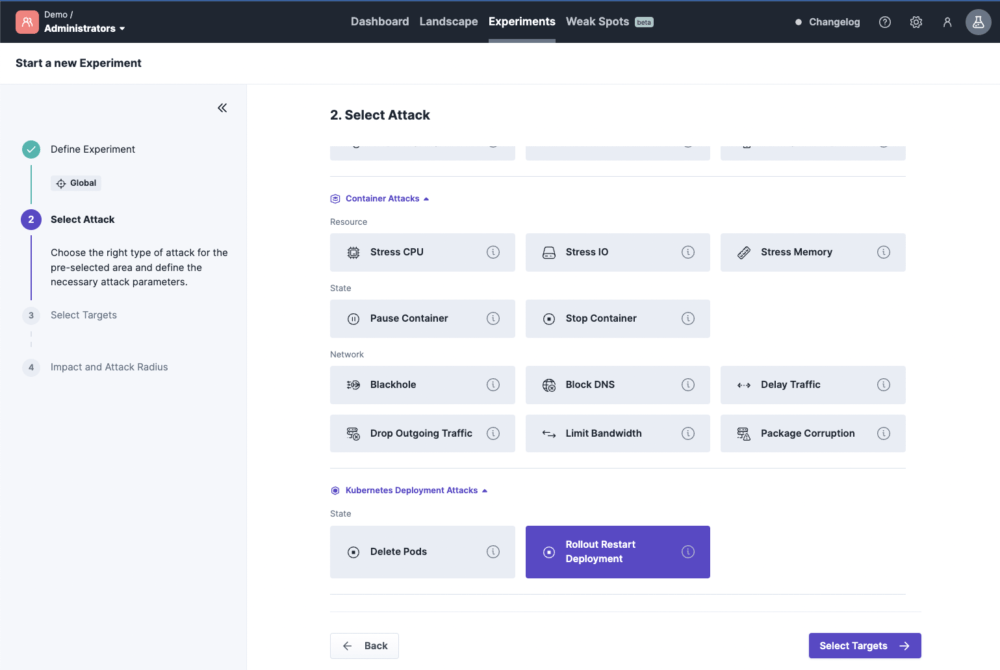
- Select Attack: Next, we determine how we want to influence the system. So, which turbulent condition do we want to inject? To simulate an ongoing deployment, we decide on the Rollout Restart Deployment attack:
- Select Targets: In the third step, we need to define the target of our experiment. In our case, this will be the Kubernetes deployment
hot-deals. We can easily use the discovery data of the Steadybit agents to select the right one: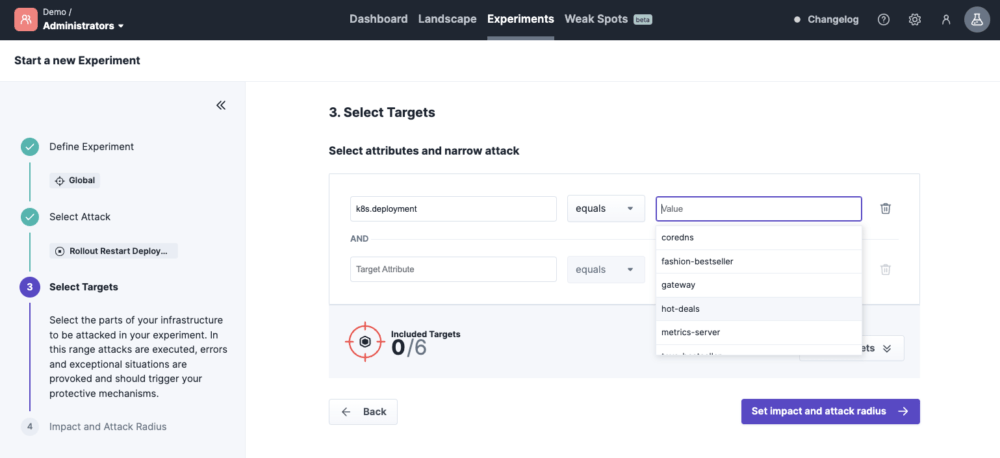
- Impact and Attack Radius: In the last step, we could decide to attack a portion of targets randomly. However, since we only attack a single Kubernetes deployment, we can keep the default of one out of one available target and complete the wizard by clicking Save.
The chaos engineering experiment is now successfully saved in Steadybit and ready for use.
Integrate our Postman API test into the chaos engineering experiment
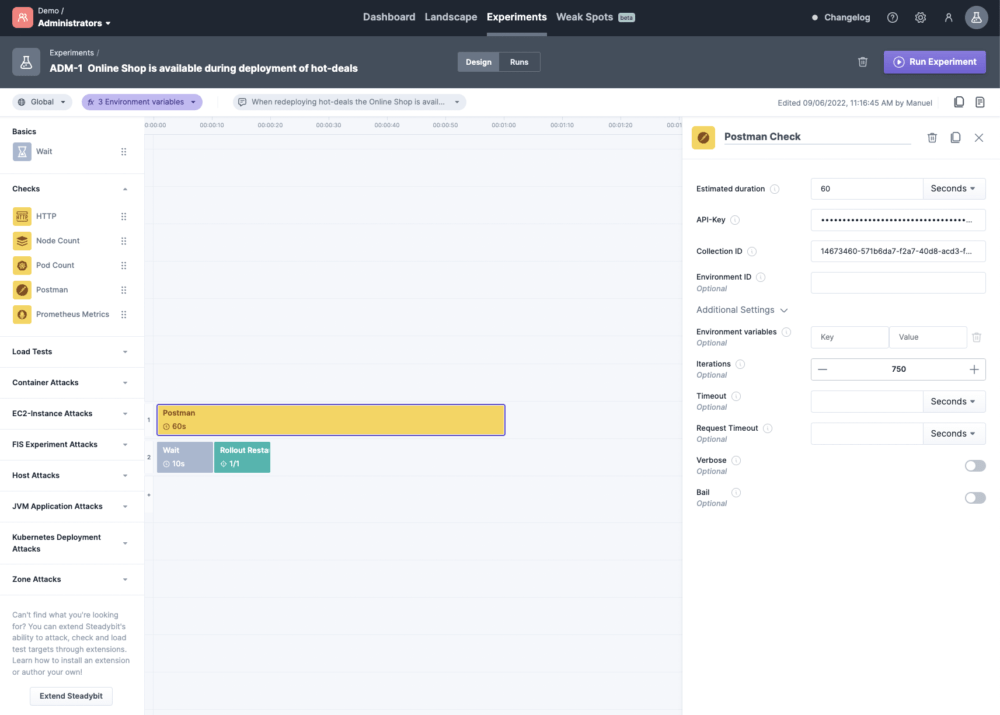
Now, as a final step, we can integrate our Postman API test into our chaos engineering experiment. We can easily extend it via drag and drop by choosing the Postman check from the corresponding category. To allow Steadybit to access our Postman Collection, we need to generate an API key in Postman and identify the collection ID. We can finalize the experiment with some additional fine-tuning and end up with a design similar to the one below:
Run the chaos engineering experiment
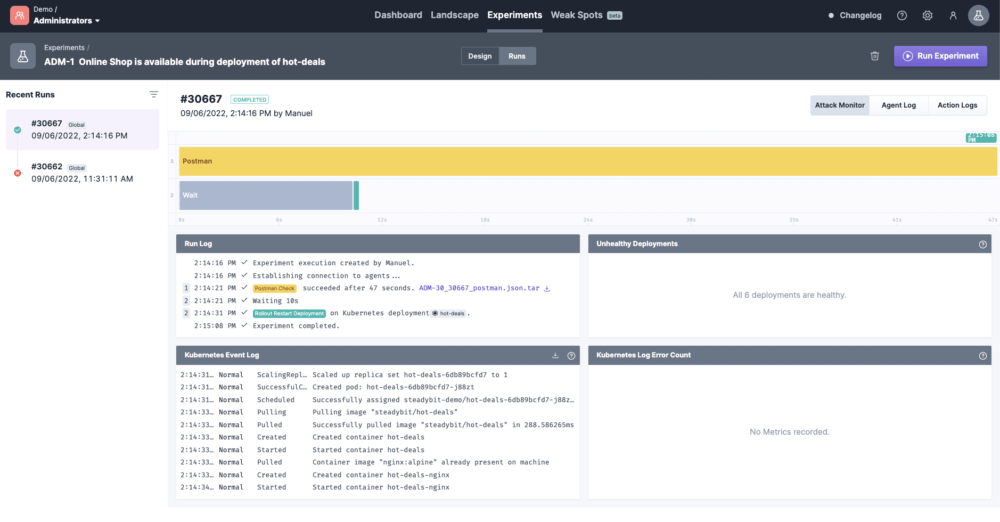
We can now learn how our online shop behaves while redeploying the hot-deals Kubernetes deployment by clicking Run Experiment. The Steadybit UI jumps to the Runs view, where we get details about what is happening in our system. At the same time, the platform connects to the necessary agents to simulate the rolling update and also triggers our Postman API test.
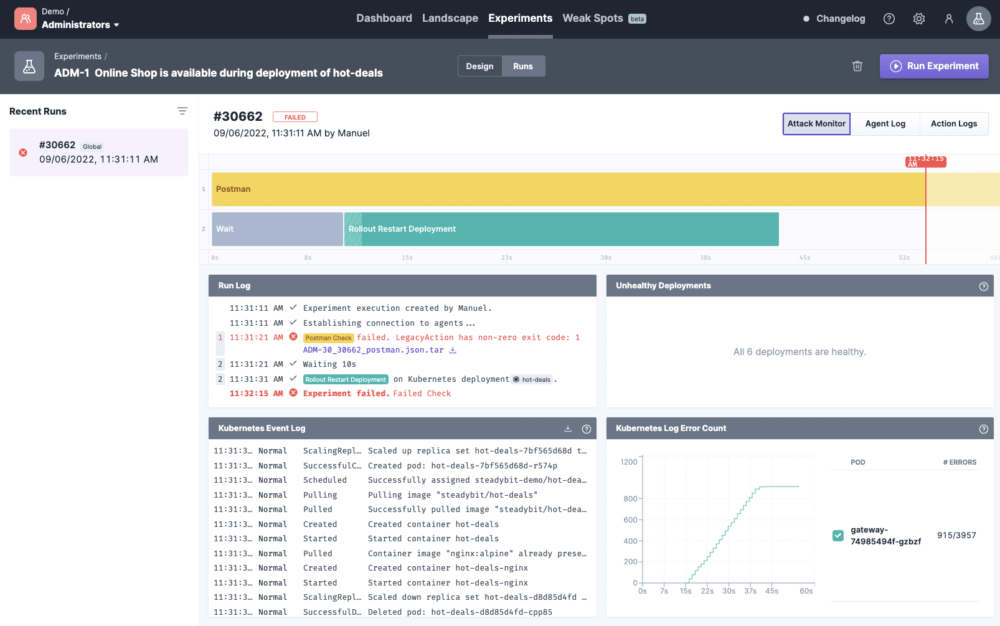
We can track the experiment’s progress in the Attack Monitor and verify that Steadybit simulates the rolling update in parallel to the API test. Underneath, we see all the effects in our system. For example, you can see that the error logs in the gateway are increasing (see the Kubernetes Log Error Count widget) and that Kubernetes redeployed our hot-deals deployment:
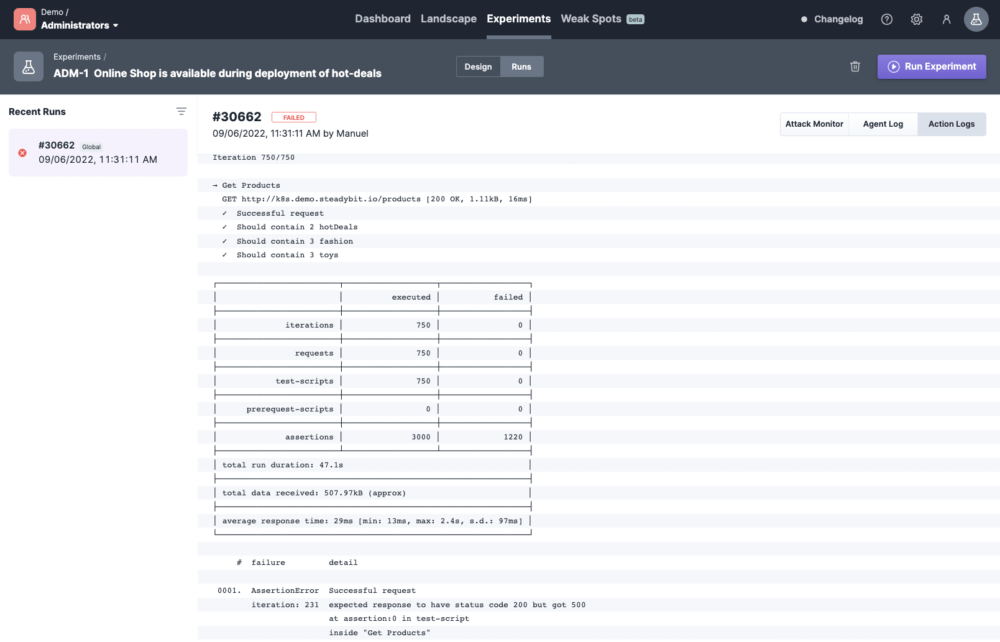
To get more information about our Postman API test, let’s inspect the action log. Scrolling through the logs, we find some HTTP requests resulting in the status 500 Internal Server Error instead of 200 OK. Also, we can see in the summary that 1220 of 3000 assertions failed. So, our API does not work as expected during a redeployment of hot-deals.
Fix the system under test
We can now fix our API to get it working when performing a rolling update deployment. Thanks to the Kubernetes log in Steadybit, we can identify that Kubernetes deletes the old pod immediately after it schedules the newly updated pod. So, the newly created pod has no time to start up successfully and become ready to fulfill incoming requests. We can easily address that misconfiguration in Kubernetes by configuring the readiness probe. See the code below for an example configuration.
yaml
---
apiVersion: apps/v1
kind: Deployment
metadata:
...
  containers:
    - image: steadybit/hot-deals
...
      readinessProbe:
        httpGet:
          path: /actuator/health/liveness
          port: 8083
        initialDelaySeconds: 60
        failureThreshold: 2
        periodSeconds: 1
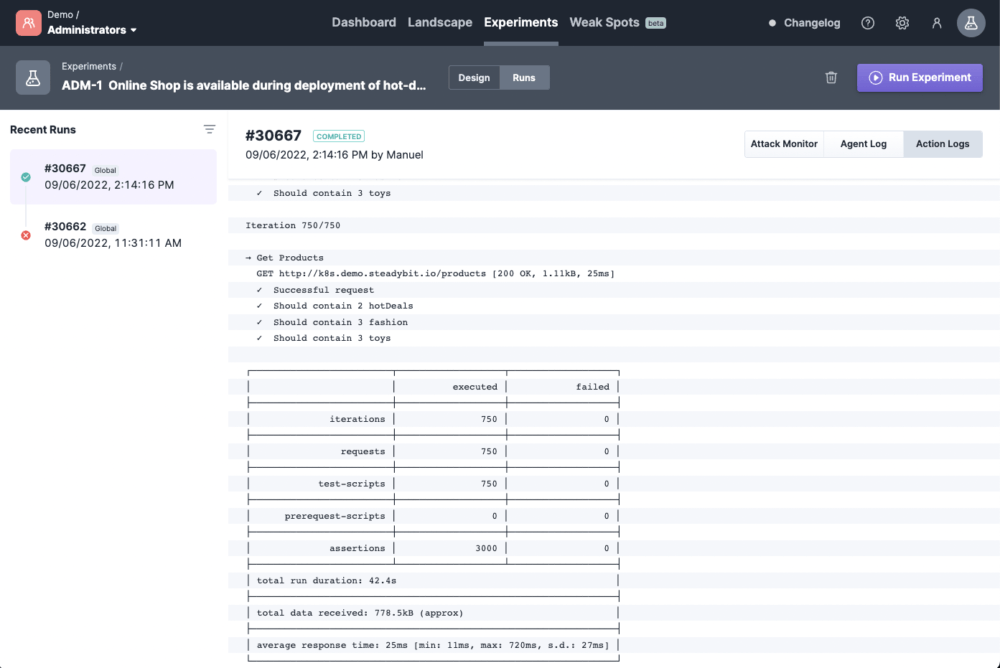
After applying the updated deployment configuration, we can verify the fix by re-running our chaos engineering experiment:
This time, we can see from the log timestamps that Kubernetes waits until a new pod is ready before removing an old one. Thus, the Postman API test runs without any failed assertions, and our API always works:
Steadybit and Postman
In this blog post, we have seen the benefits of combining chaos engineering with end-to-end API testing. Testing your system’s behavior under turbulent conditions is crucial, as a production environment is rarely a happy place. You can also think about more complex test cases, like whether your system survives a database outage, whether it recovers afterward, and how well it works when your central messaging infrastructure is unavailable. Thanks to Steadybit and Postman, we can mimic these circumstances and check whether supposed fixes allow us to remain functional.


Lucidly written. The pictures could have been larger; difficult to read their contents.