
Serverless Functions the Fast Way

This is a guest post written by Jason Lengstorf, VP of developer experience at Netlify.
For frontend developers, one of the biggest hurdles to creating full-blown web apps is the backend. In fact, there are often multiple hurdles hiding in the backend. For example, how do you process form submissions? And how can you store data? It might seem that you need to create and manage a full-blown server in order to handle these types of use cases. But what if you could handle form submissions, requests to and from a database, and other server-like activities with a single JavaScript function, deployed with two lines of configuration?
With “serverless functions,” you can do exactly that. In other words, yes, it’s possible to create complete backends—which can handle many server-like activities—using only JavaScript functions.
In this tutorial, we’ll learn what serverless functions are, how to create them, and how you can deploy them in minutes with Netlify Functions.
What is a serverless function?
Serverless functions are a way to encapsulate event-driven, server-like logic without the boilerplate steps of setting up a full-blown server. Serverless functions can talk to databases, call third-party services, process user input, and more. They cannot store data themselves or keep a long-running process available.
What does “serverless” mean?
A serverless function doesn’t actually mean that there is no server. It means that you, the developer, are not responsible for setting up or managing the server infrastructure—all you need to worry about is the actual business logic that needs to be performed.
Now, let’s get started with the tutorial, which will walk through these five steps:
- Create your first serverless function
- Deploy the functions to Netlify
- Handle form data
- Send authorized requests to third-party APIs
- Deploy the form
1. Create your first serverless function
Let’s start by creating the simplest possible serverless function and deploying it to the internet. This should take about five minutes. 🤯
Create the project and function file
On your computer, create a new folder for the functions to live in:
# create a new folder
mkdir serverless-functions-the-fast-way

# move into the new folder
cd serverless-functions-the-fast-way/
Next, make a functions folder in the new folder:
# create a directory called functions
mkdir functions
Inside the functions folder, create a new file called hello-world.js—this will be your serverless function:
# create the file for your first serverless function
touch functions/hello-world.js
Inside hello-world.js, add the following code:
exports.handler = async () => {
  return {
    statusCode: 200,
    body: 'Hello world!',
  };
};
This is a complete serverless function. No joke. This JavaScript function returns an HTTP status code of 200 (for “OK”) and a plain text body of “Hello world!”
Now that we’ve created the serverless function, let’s get set up to test it locally.
Set up Netlify
First, install the Netlify CLI on your computer and log in to make sure that you have access to your Netlify account:
# install the Netlify CLI
npm i -g netlify-cli

# log into your Netlify account
ntl login
Note: If you don’t already have a Netlify account, you can set one up for free using your GitHub, GitLab, Bitbucket, or email address in a few seconds.
Next, create netlify.toml at the root of your project:
# create a Netlify config file in the project root
touch netlify.toml
Inside netlify.toml, configure Netlify Functions by adding two lines of config:
[build]
  functions = "functions"
This tells Netlify that you want to enable Netlify Functions and that it should look in the functions folder to find them. Once you’ve set this, Netlify will do the rest!
Start the server
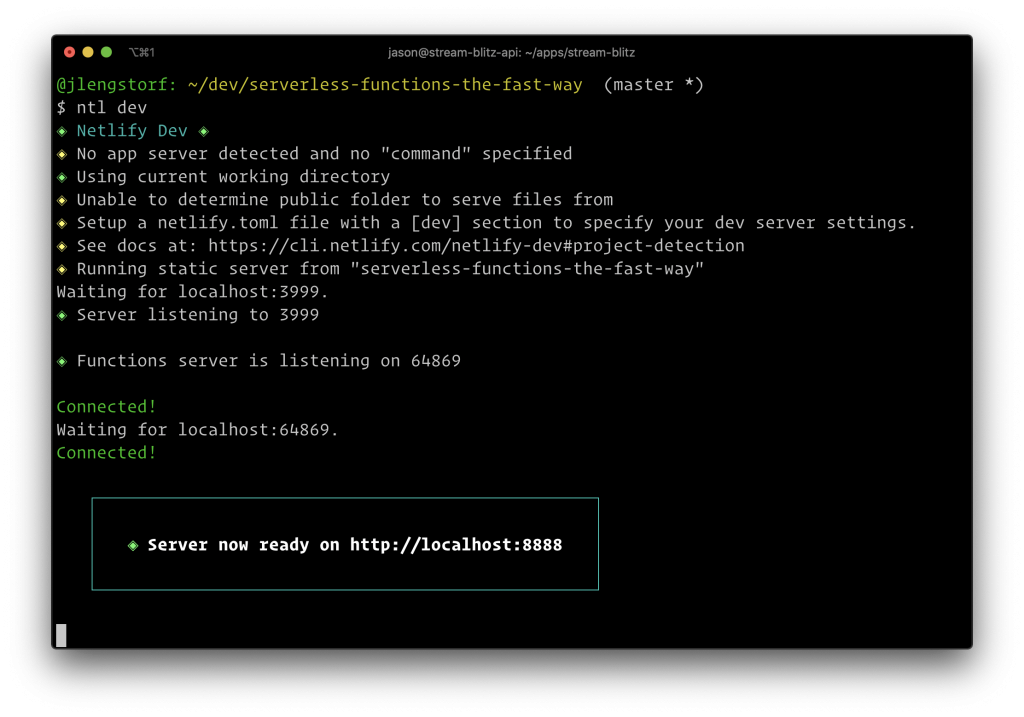
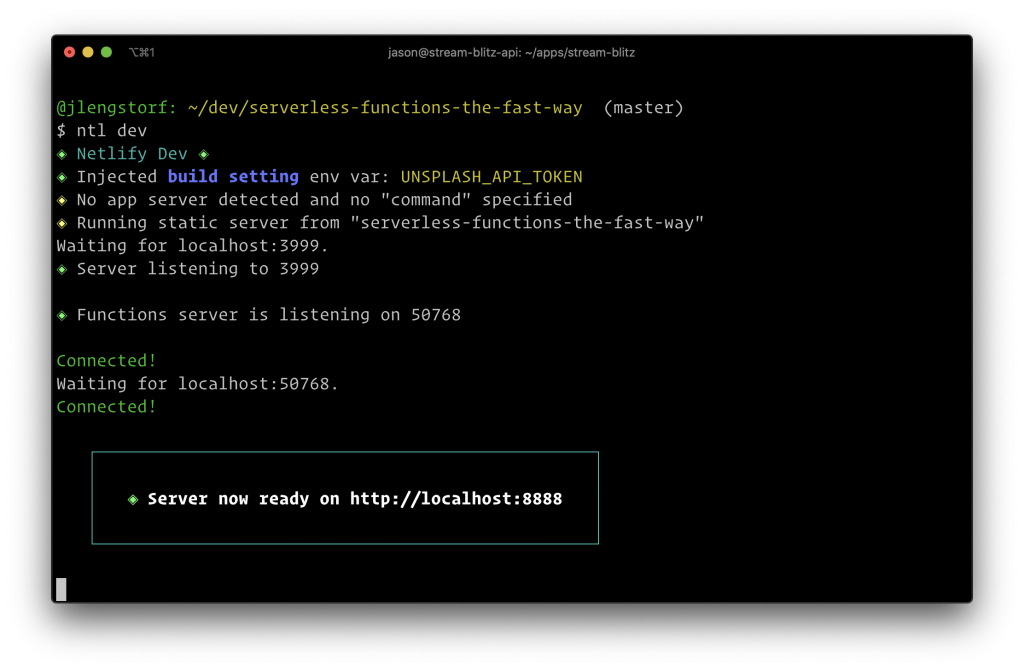
You have access to a local development server called Netlify Dev that supports serverless functions. To run it, you’ll use the CLI:
ntl dev
This starts up a local server with your serverless function available for testing:
Send a request
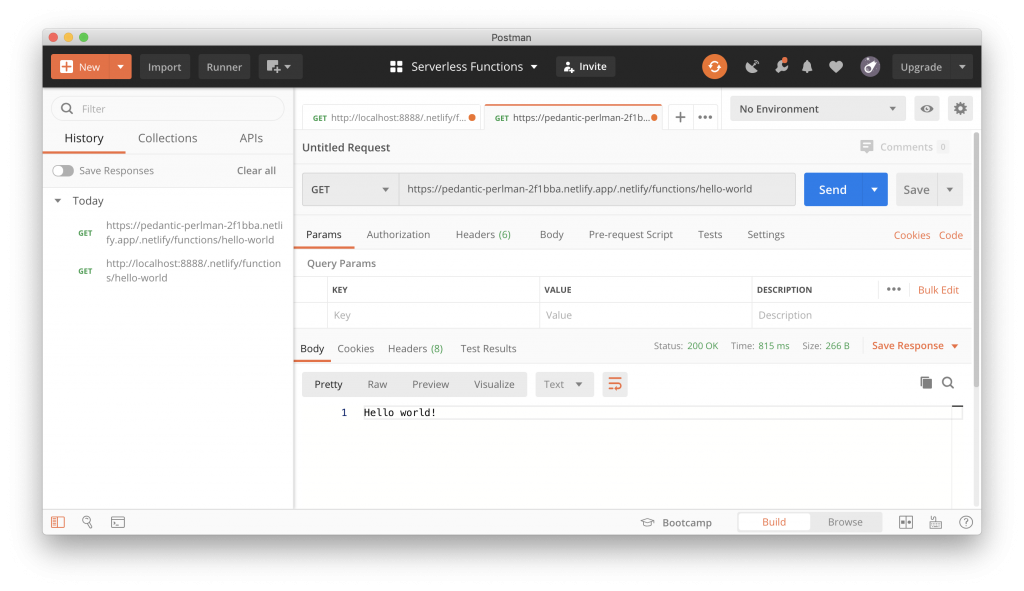
Netlify makes serverless functions accessible by URL using the format {SITE_URL}/.netlify/functions/{FUNCTION_FILE_NAME}—this means that your test function is available locally at http://localhost:8888/.netlify/functions/hello-world. You can try out your serverless function by sending a request in Postman:
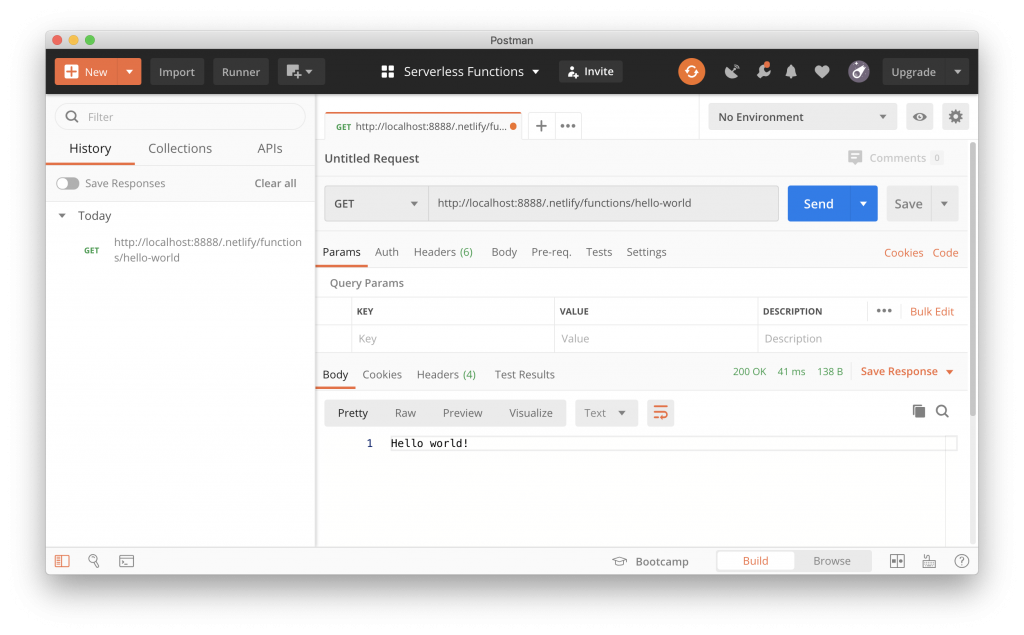
You can see that the result comes back with a “200 OK” response and the text “Hello world!” Congratulations, you’ve just written and tested your first serverless function!
2. Deploy the functions to Netlify
Next, let’s get this function live at a public URL, so it can be used from anywhere in the world.
Create a new GitHub repository and push your code to it
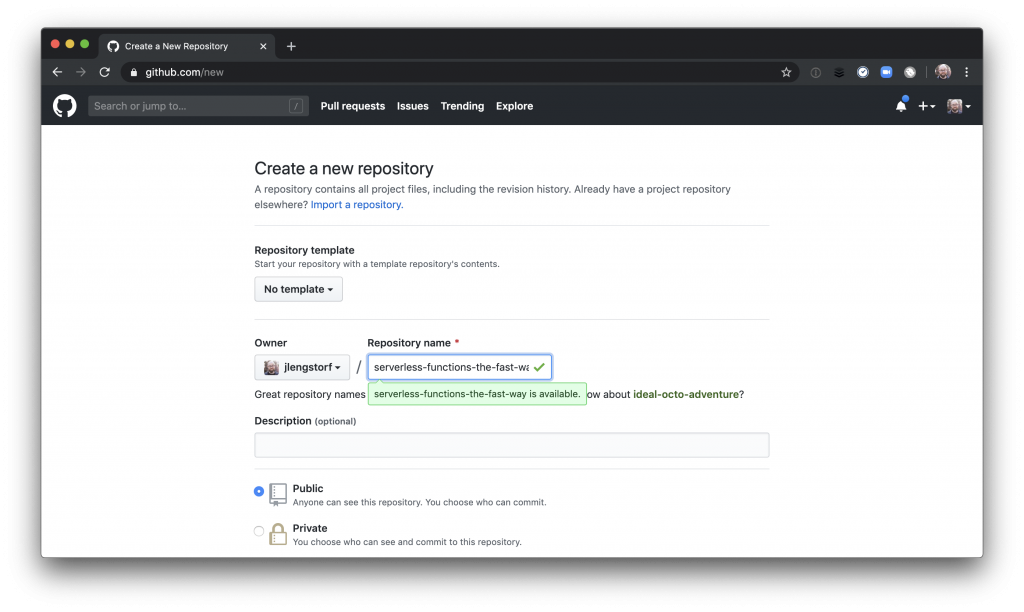
First, go to your GitHub account and create a new repository:
Next, you’ll need to:
- Initialize the project folder as a Git repository
- Add the GitHub repo as its remote origin
- Add all the files and commit them
- Push the code to your GitHub repo:
git init

# NOTE: don’t forget to add your own username and repo here!
git remote add origin [email protected]:yourusername/serverless-functions-the-fast-way.git
git add -A
git commit -m 'first serverless function!'
git push origin master
Initialize a new Netlify site
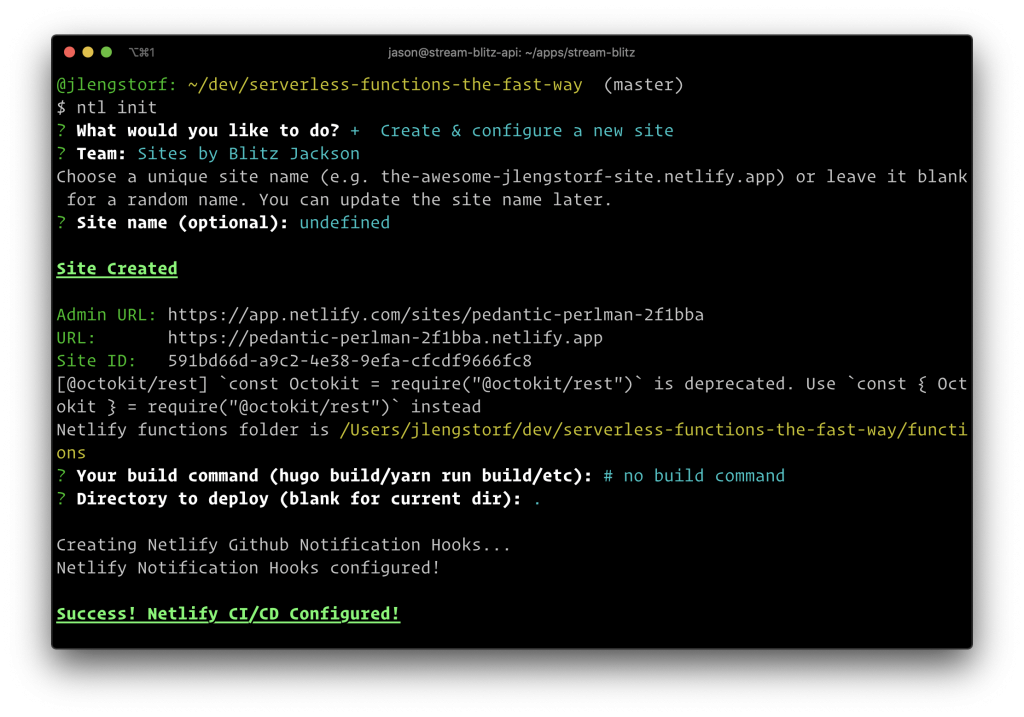
Now that your code is available on GitHub, you’ll need to initialize a new Netlify site. Using the CLI, this takes a single command:
ntl initThe CLI will guide you through creating a new site and then show you your new site’s URL and other details. Choose “Create & configure a new site” when prompted. You don’t need a build command and you’re going to keep static files in the repo root, so you can keep the default answers to those CLI prompts.
The CLI will guide you through creating a new site and then show you your new site’s URL and other details. Choose “Create & configure a new site” when prompted. You don’t need a build command and you’re going to keep static files in the repo root, so you can keep the default answers to those CLI prompts.
Once the site is live, you can send a request to the live function by replacing http://localhost:8888 with your new Netlify site URL:
We’re using the Postman API Client in this example, but this also works if you visit your function in the browser. (You can see my function by visiting https://pedantic-perlman-2f1bba.netlify.app/.netlify/functions/hello-world.)
At this point, you’ve successfully built, tested, and deployed a serverless function. Not bad for writing six lines of JavaScript and two lines of config!
3. Handle form data
To take your serverless functions to a more practical place, let’s create a simple HTML form that will allow your site visitors to search for an image, which you’ll get using the Unsplash API.
Create an HTML form
To start, let’s create an HTML file at the root of your project called index.html. Inside, create a form with a single field, named query that takes a search query as input and submits it to a serverless function called search (you’ll create this in the next step):
<!DOCTYPE html>
<html lang="en">
  <head>
    <meta charset="UTF-8" />
    <meta name="viewport" content="width=device-width, initial-scale=1.0" />
    <title>Search for a Photo!</title>
  </head>
  <body>
    <main>
      <h1>Search for a Photo!</h1>
      <form action="/.netlify/functions/search" method="POST">
        <label for="query">Search</label>
        <input type="text" id="query" name="query" />
        <button>Submit</button>
      </form>
    </main>
  </body>
</html>
Create a serverless function
Next, add a new function called search.js in the functions folder and add the following, which uses Node’s built in querystring module to parse the form data and return it:
const qs = require('querystring');

exports.handler = async (event) => {
  const { query } = qs.parse(event.body);

  return {
    statusCode: 200,
    body: JSON.stringify({ query }),
  };
};
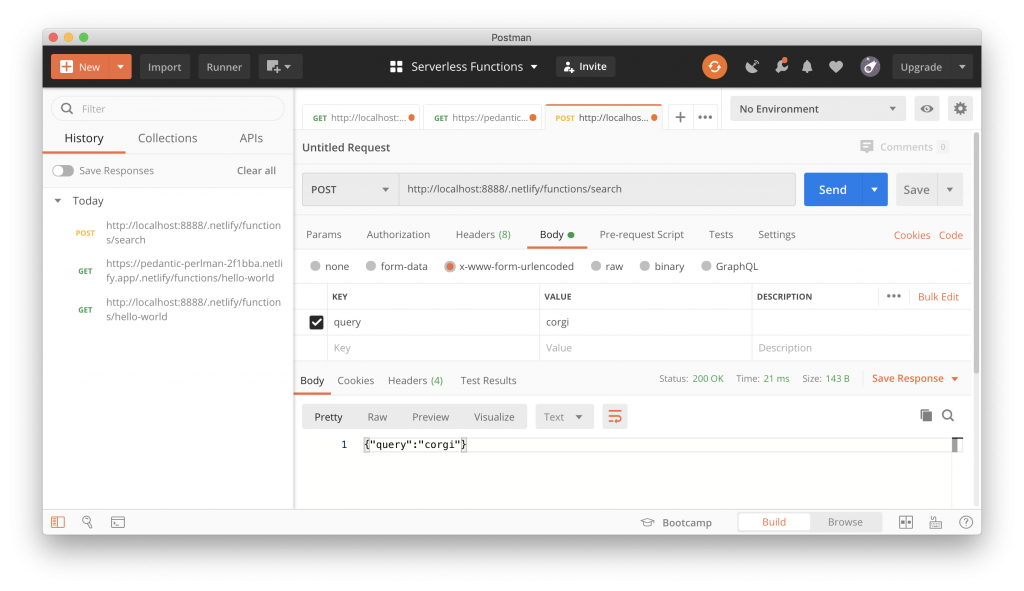
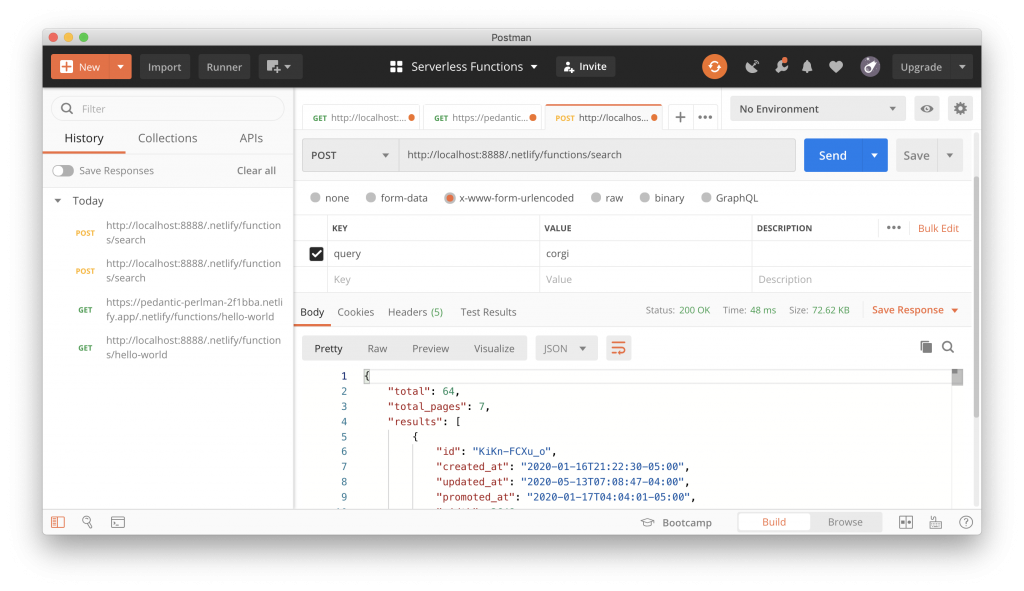
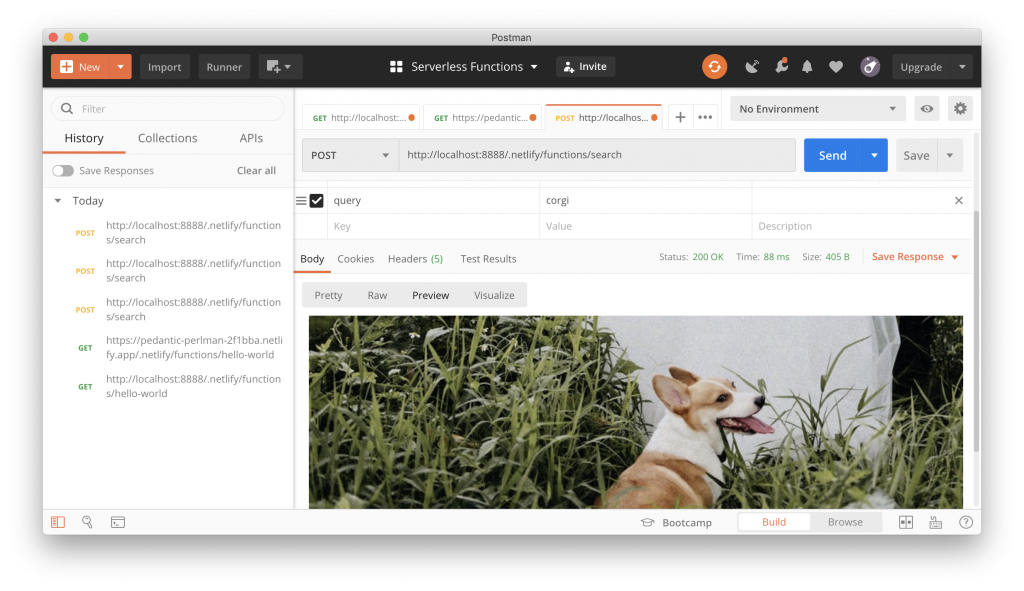
To test, stop the server if it’s still running (press control + C), then run ntl dev and send a POST request to http://localhost:8888/.netlify/functions/search with a URL-encoded body of query=corgi. The function will respond with the query:
Now you’ll need to send this query off to Unsplash to get photos back.
4. Send authorized requests to third-party APIs
Because requests to the Unsplash API require private credentials, you can’t send requests from the client-side—that would expose the credentials and allow anyone to impersonate you when making API calls. Fortunately, serverless functions can make requests securely with credentials, which means you can safely use your Unsplash API key in your serverless function to search.
Note: Joyce Lin and I talked all about keeping sensitive credentials secure in Jamstack apps on Learn With Jason. Check it out for more details!
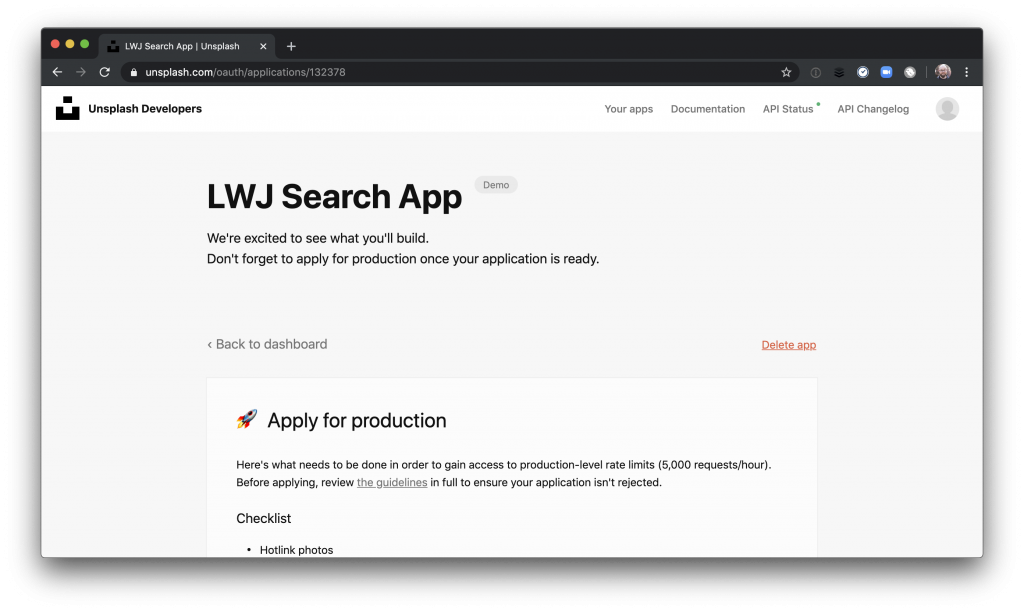
Get an API key
Head over to https://unsplash.com/developers, sign in, create an app, and get your access key:
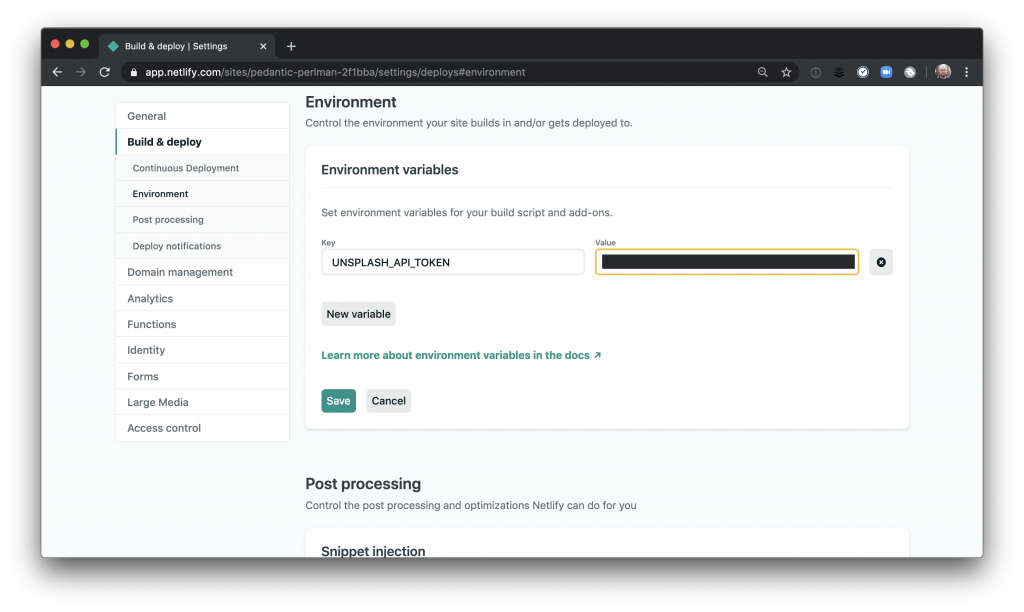
Add the API key as an environment variable in the Netlify app
Next, you’ll need to store the Unsplash access token as an environment variable for your Netlify site. This is done through the Netlify web app, which you can quickly open through the CLI:
ntl openInside the app UI, click “Settings,” then “Build & deploy,” and finally, “Environment.” Add a new environment variable called UNSPLASH_API_TOKEN with the access token as its value:
Update the function
Now that you have the access token in your environment, you can update the function to send search requests to Unsplash.
First, let’s initialize your project with a package.json and install node-fetch so you can make requests using the Fetch API:
# create a package.json for this project
npm init -y

# install dependencies
npm install node-fetch
Next, let’s refactor your function to make a secure request to Unsplash and return the results as JSON:
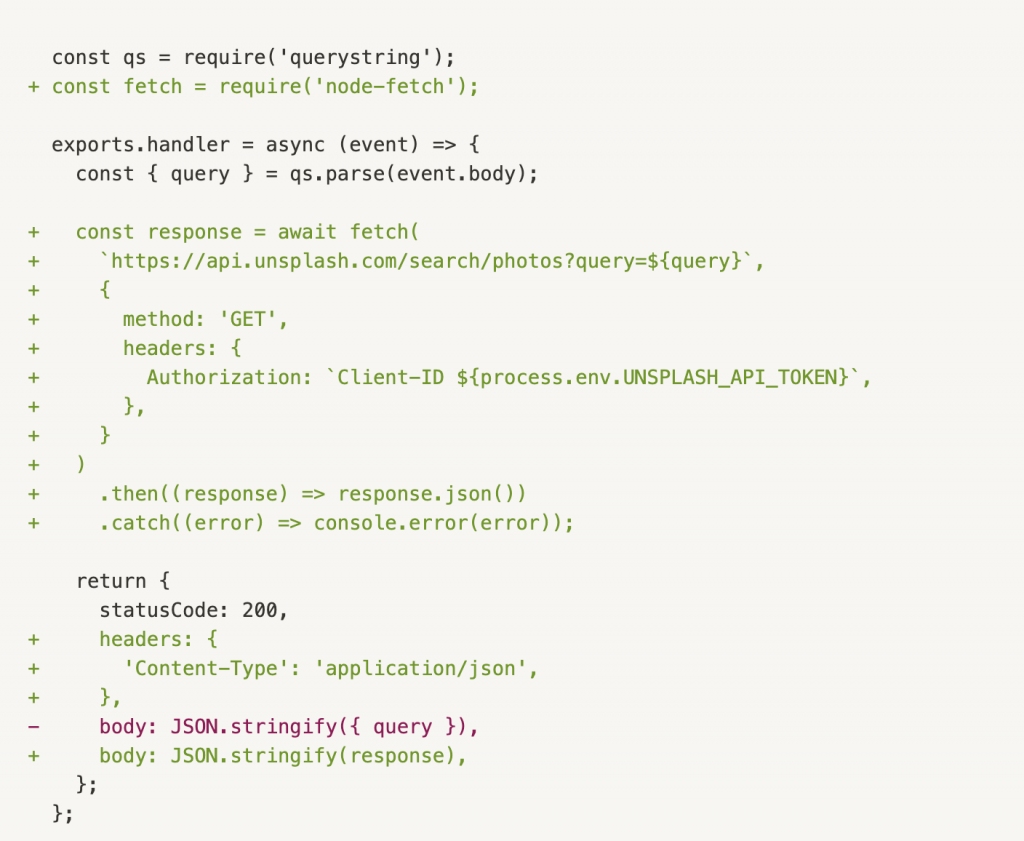
To test this, run ntl dev—note that the environment variable is loaded automatically for local testing:
You can re-run your POST request and you’ll see the Unsplash response come back:
Return HTML
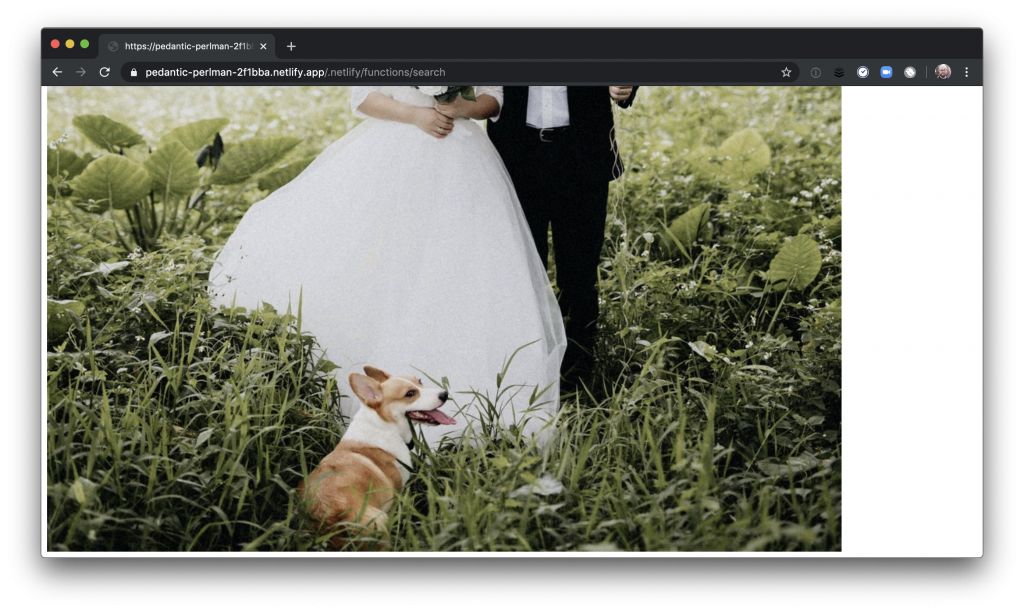
In addition to JSON, you can return HTML (or any content type, really!). Let’s refactor your function to return an HTML <img> tag to display the first image returned from Unsplash:
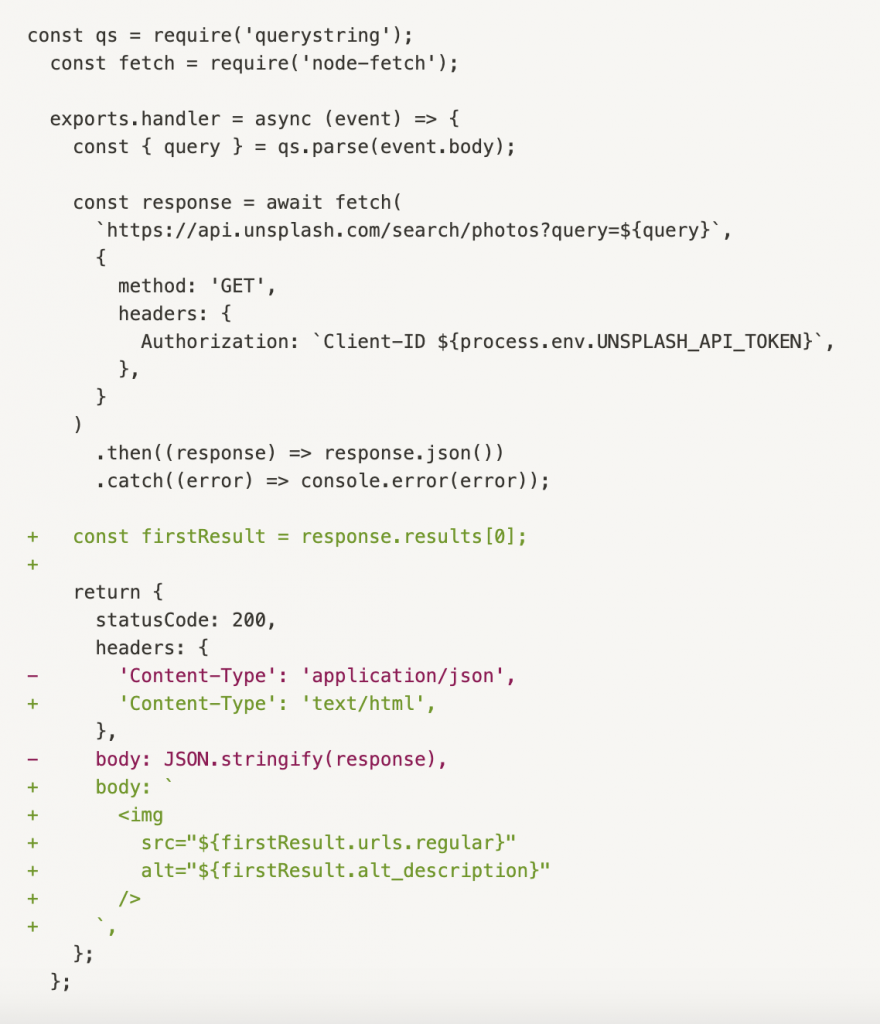
After saving this change—note that ntl dev automatically reloads the function when you save—you can re-run your POST request and see that the image HTML is returned:
5. Deploy the form
The last step is to deploy your search form to production.
To start, you’ll need to add node_modules to the .gitignore file:
  # Local Netlify folder
  .netlify
+ node_modules
Next, let’s commit the rest of your new files:
git add -A
git commit -m 'add search form and function'
git push origin master
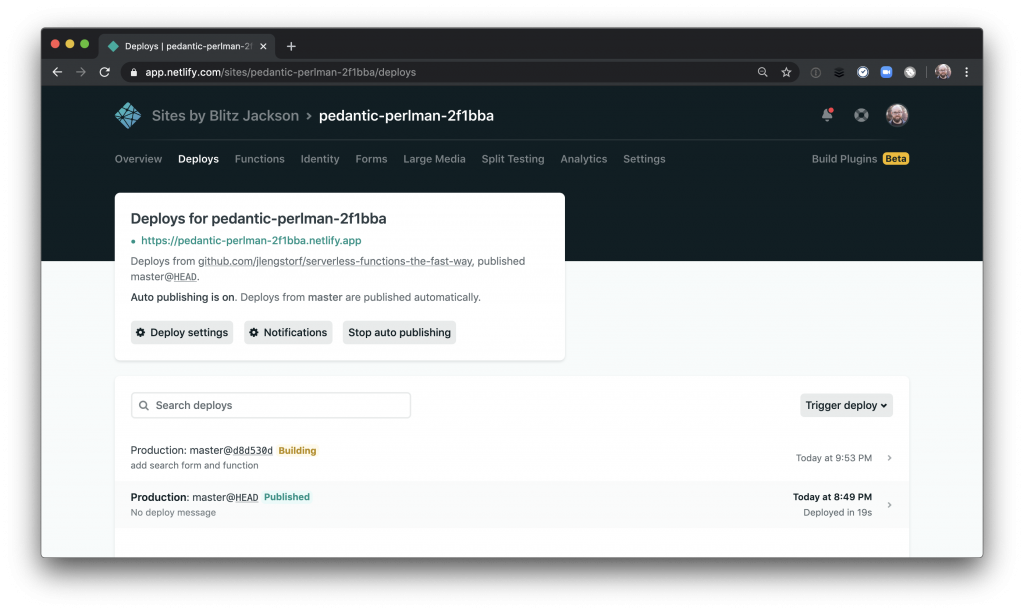
The site will automatically rebuild because you pushed changes to Git. You can see it rebuilding if you open up the Netlify web app:
Once the site finishes deploying, visit the live site and you’ll see your search form:
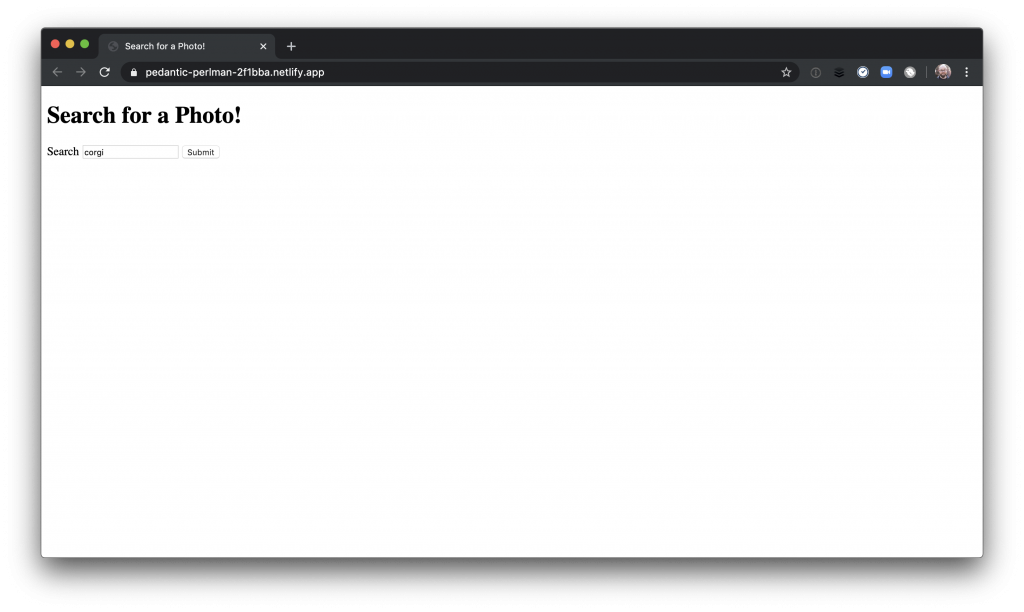
Enter in a search term, press the submit button, and you’ll see an Unsplash image!
You’ve now written, tested, and deployed two serverless functions, as well as sent authenticated requests to third-party APIs. That’s a whole bunch of backend-style code without having to build, configure, or manage any actual backends!
This is just the beginning
This tutorial covered the essentials of building and deploying serverless functions with Netlify. From here, you have all the building blocks to create anything you can imagine using serverless functions. Whether you want to build serverless microservices, create a Stripe-powered Jamstack e-commerce store, or do something entirely new and different, the principles you’ve learned in this tutorial will help get you there!
Next steps
What do you think about this topic? Tell us in a comment below.
Do you have your own experience or tips to share with the Postman community? We want to hear from you. Learn more about our guest blogger program and submit your idea here.


Thanks for sharing this, I have a question regarding testing this kind of function; basically, do we have to send requests and make sure we are getting the correct responses? or do we need to execute a specific testing type when we are talking about serverless?
Thanks