How to Build an API: A Step-by-Step Guide
What to expect from this tutorial:
Before diving in, here’s an overview of what you’ll learn:
- Understand the API’s use case: Define what your API will do and identify the resources it will handle.
- Sketch out the structure: Create a diagram showing how resources relate to each other and decide on data formats.
- Choose your tools: Select a framework and language for building your API.
- Build the API: Create models, routes, and controllers that handle requests.
- Test functionality: Use Postman to verify that your API endpoints work correctly.
- Understand best practices: Learn patterns that make APIs maintainable and developer-friendly.
Building your first API can feel overwhelming. Between understanding REST principles, choosing frameworks, implementing endpoints, and testing functionality, there’s a lot to learn. But with the right approach and tools, the process becomes straightforward and even enjoyable.
This tutorial shows you how to build a simple REST API from scratch, with a focus on API design and implementation. You’ll learn how to create a functional API and test it using the Postman API Platform. While this tutorial uses Ruby on Rails for implementation, the design principles apply to any framework or programming language.
Designing the pet tracker API
For this tutorial, imagine you run a pet daycare business. You need an API to help track pets and their owners. The two main resources are:
-
Owners: People who bring pets to the daycare
-
Pets: Animals being cared for at the daycare
It helps to visualize how these resources relate to each other. A diagram might look like this:
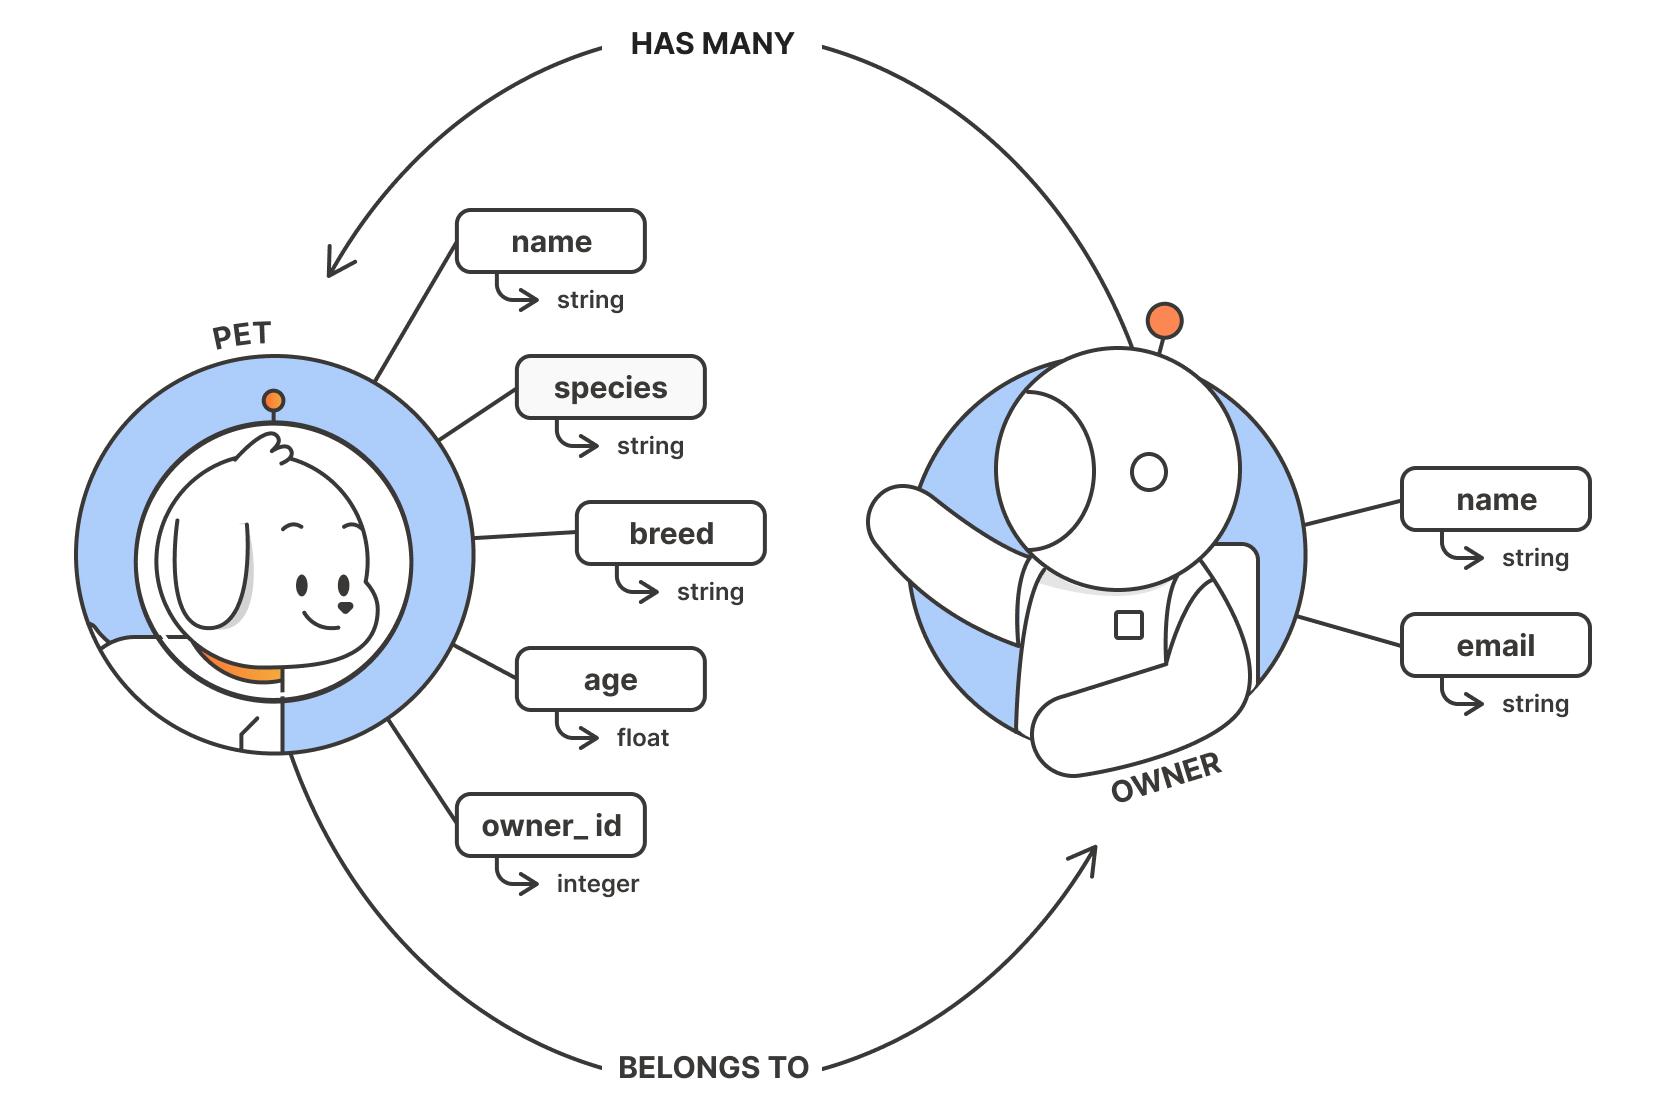
One owner can have many pets, but each pet belongs to one owner. This “one-to-many” relationship shapes how we structure the database and design endpoints.
Why Ruby on Rails?
For this tutorial, we’re using Ruby on Rails because it abstracts away much of the complexity associated with common API development tasks, such as routing and database access. Rails follows the “convention over configuration” principle, which means you write less boilerplate code and can focus on building features.
Rails APIs use three main concepts:
-
Models: Represent data and business logic. They define how your resources are structured and interact with the database.
-
Controllers: Handle incoming requests, process data, and return responses. They act as the bridge between routes and models.
-
Routes: Map URLs to controller actions. When a request comes in, Rails uses routes to determine which controller method should handle it.
In a full-stack Rails app, there’s also a “view” layer that renders HTML. Since we’re building an API that returns JSON, we won’t need views.
Prerequisites
Before starting, confirm you have Ruby, Rails, and SQLite installed. For detailed installation instructions, see the Rails documentation.
To check if Ruby is installed:
ruby -vTo check if Rails is installed:
rails -vIf you need to install Rails:
gem install railsStep 1: Create a new Rails API application
Rails provides a command-line tool that generates a new application with all necessary files and folders. The --api flag configures the application to use minimal middleware suitable for APIs.
Create your new API:
rails new pet_tracker_api --apiThis command creates a new directory called pet_tracker_api with the entire application structure. Rails generates controllers, models, configuration files, and everything else you need.
Navigate into your new project directory:
cd pet_tracker_apiStep 2: Generate models
Models represent your resources and define their structure. We need two models: Pet and Owner.
Generate the Owner model:
rails generate model Owner name:string email:stringGenerate the Pet model:
rails generate model Pet name:string breed:string age:integer owner:referencesThese commands create several files:
-
Model files in
/app/models/ -
Migration files in
/db/migrate/
The owner:references part of the Pet model creates the foreign key relationship automatically. Rails knows that each pet belongs to an owner.
Define model relationships
Open the model files in your code editor and add the relationship declarations.
The Pet model (app/models/pet.rb) should look like this:
class Pet < ApplicationRecord
  belongs_to :owner
end
The Owner model (app/models/owner.rb) should look like this:
class Owner < ApplicationRecord
  has_many :pets
end
These declarations tell Rails about the one-to-many relationship. An owner has_many pets, and a pet belongs_to one owner.
Step 3: Run migrations
Migrations create the actual database tables based on your model definitions. Run the migration:
rails db:migrateYou’ll see output showing that Rails created the owners and pets tables:
== CreateOwners: migrating ====================================
-- create_table(:owners)
   -> 0.0012s
== CreateOwners: migrated (0.0013s) ===========================

== CreatePets: migrating ======================================
-- create_table(:pets)
   -> 0.0008s
== CreatePets: migrated (0.0009s) =============================
Your database is now ready to store owners and pets.
Step 4: Configure routes
Routes define which URLs your API responds to and which controller actions handle those requests. Open config/routes.rb and add:
Rails.application.routes.draw do
  resources :owners do
    get 'pets', on: :member
  end
  resources :pets
end
Rails’ resources creates standard CRUD routes for /owners and /pets. We add one custom member route: GET /owners/:id/pets.
You can see all your routes by running:
rails routesStep 5: Generate controllers
Controllers contain the logic that handles requests. Generate controllers for both resources:
rails generate controller Owners index create show update destroy --skip-routesrails generate controller Pets index create show update destroy --skip-routesThese commands create controller files in /app/controllers/. The files are stubbed out with empty methods that we’ll implement next.
Step 6: Implement controller actions
Now we’ll write the actual code that handles requests and returns responses.
Owners controller
Open app/controllers/owners_controller.rb and add this code:
ruby
# app/controllers/owners_controller.rb
class OwnersController < ApplicationController
  before_action :set_owner, only: [:show, :update, :destroy, :pets]

  def index
    render json: Owner.all
  end

  def create
    owner = Owner.new(owner_params)
    if owner.save
      render json: owner, status: :created
    else
      render json: owner.errors, status: :unprocessable_entity
    end
  end

  def show
    render json: @owner
  end

  def update
    if @owner.update(owner_params)
      render json: @owner
    else
      render json: @owner.errors, status: :unprocessable_entity
    end
  end

  def destroy
    @owner.destroy
    head :no_content
  end

  def pets
    render json: @owner.pets
  end

  private

  def set_owner
    @owner = Owner.find(params[:id])
  end

  def owner_params
    params.permit(:name, :email)
  end
end
Let’s break down what this code does:
before_action :set_owner: Runs the set_owner method before certain actions to find the owner by ID.
index: Returns all owners as JSON.
create: Creates a new owner with the provided parameters. Returns status 201 (Created) on success or 422 (Unprocessable Entity) if validation fails.
show: Returns a specific owner as JSON.
update: Updates an owner’s attributes and returns the updated owner.
destroy: Deletes an owner and returns status 204 (No Content).
pets: Custom action that returns all pets belonging to a specific owner.
owner_params: Strong parameters that whitelist which attributes can be updated (security feature).
Pets controller
Open app/controllers/pets_controller.rb and add similar code:
# app/controllers/pets_controller.rb
class PetsController < ApplicationController
  before_action :set_pet, only: [:show, :update, :destroy]

  def index
    render json: Pet.all
  end

  def create
    pet = Pet.new(pet_params)
    if pet.save
      render json: pet, status: :created
    else
      render json: pet.errors, status: :unprocessable_entity
    end
  end

  def show
    render json: @pet
  end

  def update
    if @pet.update(pet_params)
      render json: @pet
    else
      render json: @pet.errors, status: :unprocessable_entity
    end
  end

  def destroy
    @pet.destroy
    head :no_content
  end

  private

  def set_pet
    @pet = Pet.find(params[:id])
  end

  def pet_params
    params.permit(:name, :breed, :age, :owner_id)
  end
end
The Pets controller follows the same pattern as the Owners controller, implementing standard CRUD operations.
Step 7: Start your API server
Your API is now complete and ready to run. Start the Rails server:
rails serverYou’ll see output like:
=> Booting Puma
=> Rails 7.0.0 application starting in development
=> Run `bin/rails server --help` for more startup options
Puma starting in single mode...
* Puma version: 5.6.4 (ruby 3.1.0-p0) ("Birdie's Version")
* Min threads: 5
* Max threads: 5
* Environment: development
* Listening on http://127.0.0.1:3000
Your API is now running at http://localhost:3000/.
Testing your API with Postman
Now that your API is built, you need to test it. While there are many testing approaches, Postman provides an intuitive, user-friendly way to validate API functionality at any scale.
Before starting, make sure your Rails server is running on http://localhost:3000/. You can start it with rails server from your project directory.
Create a new owner
Let’s test the API by creating a new owner.
-
Open Postman and create a new request.
-
Configure the request:
-
Method:
POST -
URL:
http://localhost:3000/owners -
Headers: Add
Content-Type: application/json
-
Add a request body:
In the Body tab, select raw and paste this JSON:
{
  "name": "Priscilla Ostman",
  "email": "[email protected]"
}-
Click Send.
You should receive a response with status 201 Created:
{
  "id": 1,
  "name": "Priscilla Ostman",
  "email": "[email protected]",
  "created_at": "2025-11-07T10:30:00.000Z",
  "updated_at": "2025-11-07T10:30:00.000Z"
}
The response includes the new owner’s ID and timestamps. Rails automatically adds created_at and updated_at fields.
Create a pet
Now let’s add a pet for this owner.
-
Create a new POST request:
-
Method:
POST -
URL:
http://localhost:3000/pets -
Headers:
Content-Type: application/json
-
Add a request body:
{
  "name": "Max",
  "breed": "Golden Retriever",
  "age": 3,
  "owner_id": 1
}
Notice that owner_id is set to 1 to associate this pet with the owner we just created.
-
Click Send.
You should receive a 201 Created response:
{
  "id": 1,
  "name": "Max",
  "breed": "Golden Retriever",
  "age": 3,
  "owner_id": 1,
  "created_at": "2025-11-07T10:35:00.000Z",
  "updated_at": "2025-11-07T10:35:00.000Z"
}
Get all pets for an owner
Let’s verify that our custom endpoint works.
-
Create a new GET request:
-
Method:
GET -
URL:
http://localhost:3000/owners/1/pets
-
Click Send
You should see an array with Max:
json
[
  {
    "id": 1,
    "name": "Max",
    "breed": "Golden Retriever",
    "age": 3,
    "owner_id": 1,
    "created_at": "2025-11-07T10:35:00.000Z",
    "updated_at": "2025-11-07T10:35:00.000Z"
  }
]
This confirms that the relationship between owners and pets is working correctly.
Adding validation
Open app/models/owner.rb and add validations:
class Owner < ApplicationRecord has_many :pets validates :name, presence: true validates :email, presence: true, format: { with: URI::MailTo::EMAIL_REGEXP } end
Open app/models/pet.rb and add validations:
class Pet < ApplicationRecord
  belongs_to :owner

  validates :name, presence: true
  validates :age, numericality: { greater_than_or_equal_to: 0 }
end
Now try creating an owner with invalid data again. You’ll receive a 422 Unprocessable Entity response with error details:
{
  "name": ["can't be blank"],
  "email": ["can't be blank"]
}
This gives API consumers clear feedback about what went wrong.
Additional testing scenarios
Continue testing other endpoints to ensure everything works:
Get all owners:
-
GET http://localhost:3000/owners
Get a specific owner:
-
GET http://localhost:3000/owners/1
Update an owner:
-
PATCH http://localhost:3000/owners/1 -
Body:
{"name": "Priscilla Ostman"}
Delete a pet:
-
DELETE http://localhost:3000/pets/1
Get all pets:
-
GET http://localhost:3000/pets
Testing with invalid data
Good APIs handle errors gracefully. Try sending a request without required fields:
{
  "name": ""
}
Without validation in the model, this would create an owner with an empty name. You can add validation to prevent this.
Organizing your tests in Postman
As your API grows, you’ll want to organize requests into collections. Collections group related requests and make testing complete workflows easier. As your team grows, collections, environments, and tests keep everyone aligned and prevent config drift.
-
Create a collection:
-
Click New → Collection.
-
Name it “Pet Tracker API”.
-
Save requests to the collection:
-
After configuring each request, click Save.
-
Choose the Pet Tracker API collection.
-
Use variables:
-
Set up a collection variable for
base_url=http://localhost:3000 -
Use
{{base_url}}/ownersin your requests
-
Add tests:
In Postman, you can write JavaScript tests to verify responses. Click the Scripts tab in a request and add:
pm.test("Status code is 201", function () {
    pm.response.to.have.status(201);
});

pm.test("Response has id", function () {
    var jsonData = pm.response.json();
    pm.expect(jsonData).to.have.property('id');
});
These automated tests run every time you send the request, catching regressions quickly.
Next steps and advanced topics
You’ve now built a functional REST API and tested it with Postman. Here are topics to explore as you continue learning:
-
Filtering and pagination: Handle large datasets efficiently with query parameters
-
Serializers: Control exactly what data gets returned in responses
-
Authentication: Add API keys, OAuth, or JWT to secure endpoints
-
Automated testing: Write Rails controller tests to catch regressions
-
Deployment: Deploy to platforms like Heroku, AWS, or Render
The more consistent and documented your API is, the easier it becomes for both developers and AI agents to use.
Final thoughts
You’ve now built a complete REST API with Ruby on Rails and tested it with Postman. Regardless of which framework or language you choose next, the models, controllers, routes, validation, and testing patterns you learned will apply.
Postman helps throughout the entire API lifecycle, from design and development through testing and documentation. As your APIs grow more complex, features like environments, mock servers, and automated testing become even more valuable.
For more resources, check out the Rails Guides and Postman Docs.


It was rather over my head and too much for a beginner like me. I have been trying to find an API that I can use to source some funny quotes to display on a matrix display. I am sure it would be very good to a more advanced user.
The explanation of API was incredibly insightful. The practical example of the pet daycare business, was particularly effective in illustrating how API can be designed, developed and tested for business scenarios. The explanation struck a perfect balance between theory and practical application, making it easy to understand even for those with technical background but new to APIs. Thanks!
So easy and fast learning