Generating Client SDKs and AI-Ready CLIs with Postman
Postman can generate a fully documented, type-safe SDK directly from a collection or an OpenAPI spec, in nine languages, and it can also generate a CLI SDK that agentic tools like Claude Code can drive on your behalf.
We’ll work through it end-to-end against a public sample collection so you can follow along even if you don’t have your own API yet. If you’d rather watch it first, here’s the companion video:
What you’ll do
-
Fork the Book API collection in your own Postman workspace.
-
Generate a TypeScript SDK from the Book API Collection.
-
A CLI workflow to regenerate the SDK from a terminal.
-
Generate a Go-based CLI SDK that wraps the same API for Agents.
-
Claude Code calling your API through that CLI SDK
Before you start
You’ll need:
-
The Postman desktop app.
-
A Postman account.
-
Node.js + Yarn (for running the TypeScript SDK).
-
GoLang Installed(for building the CLI SDK).
-
The Postman CLI installed and authenticated.
-
A local Git repo and a GitHub account.
Step 1 — Create a blank workspace in Postman
First, fork this repository on GitHub and run the following commands to get started.
yarn install && yarn run dev
Once setup, open the Postman Desktop application. In the top-left Workspaces menu, click Create Workspace and give it a Name(e.g. Book API Playground). Select Internal as your Workspace Type. For your Workspace setup, select the From a Git repository option and choose the folder of the Book API repo you just cloned.
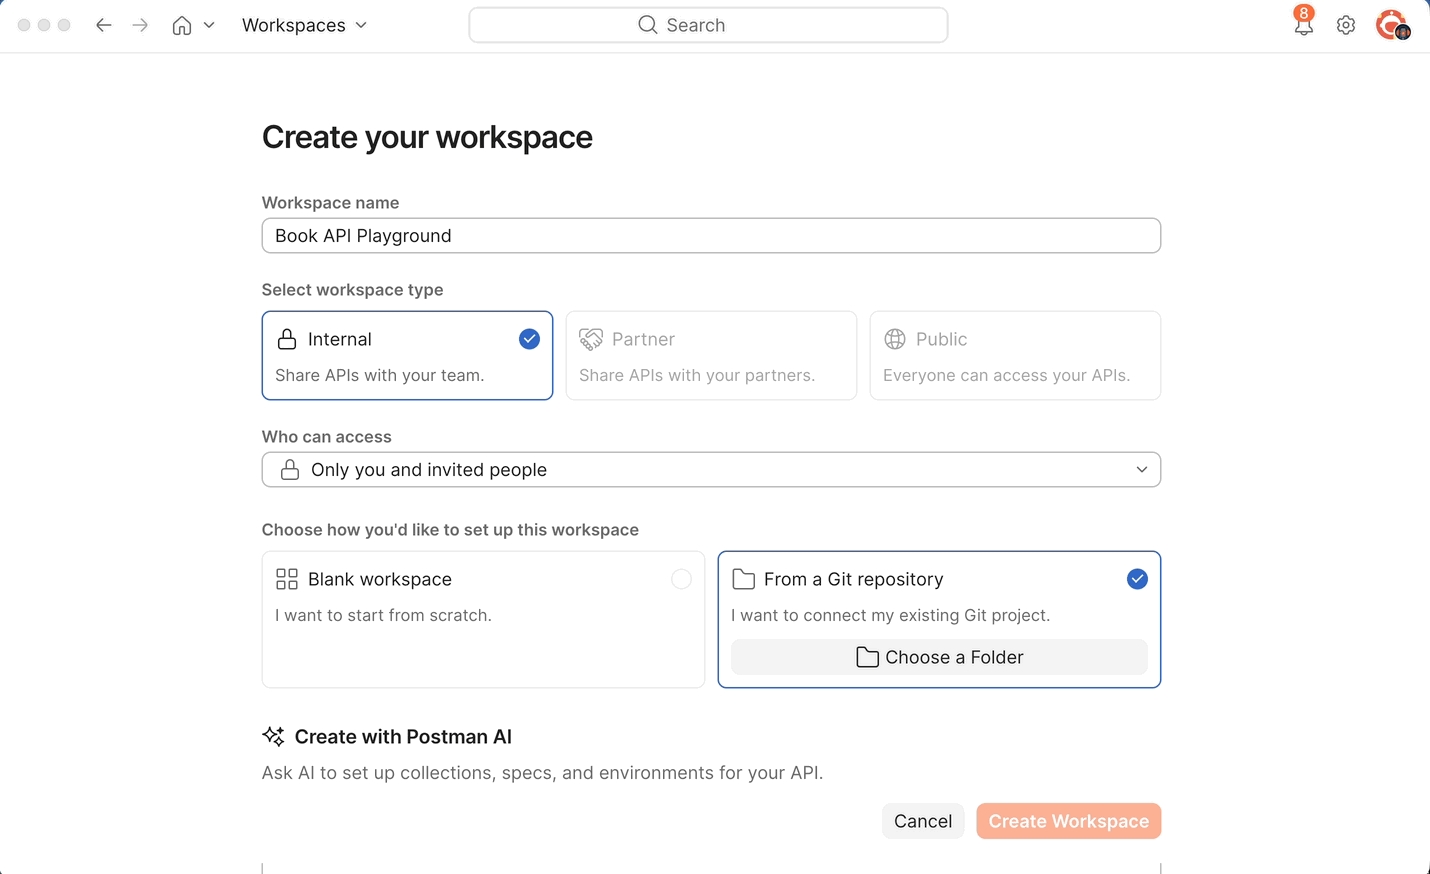
You’ll land in your new workspace, connected to your git repository, with the cloned folder opened in the left navigation menu. Postman creates two new directories in this folder:
-
.postman/(hidden) — internal mapping and metadata. -
postman/— where generated SDKs and other artifacts will be written.
Step 2 — Generate the Book API Collection
Click the ask AI button in the right pane of the workbench. This will trigger Agent mode to peruse the codebase in your connected git repository, understand the exposed API endpoints and generate a Postman Collection based off of them.
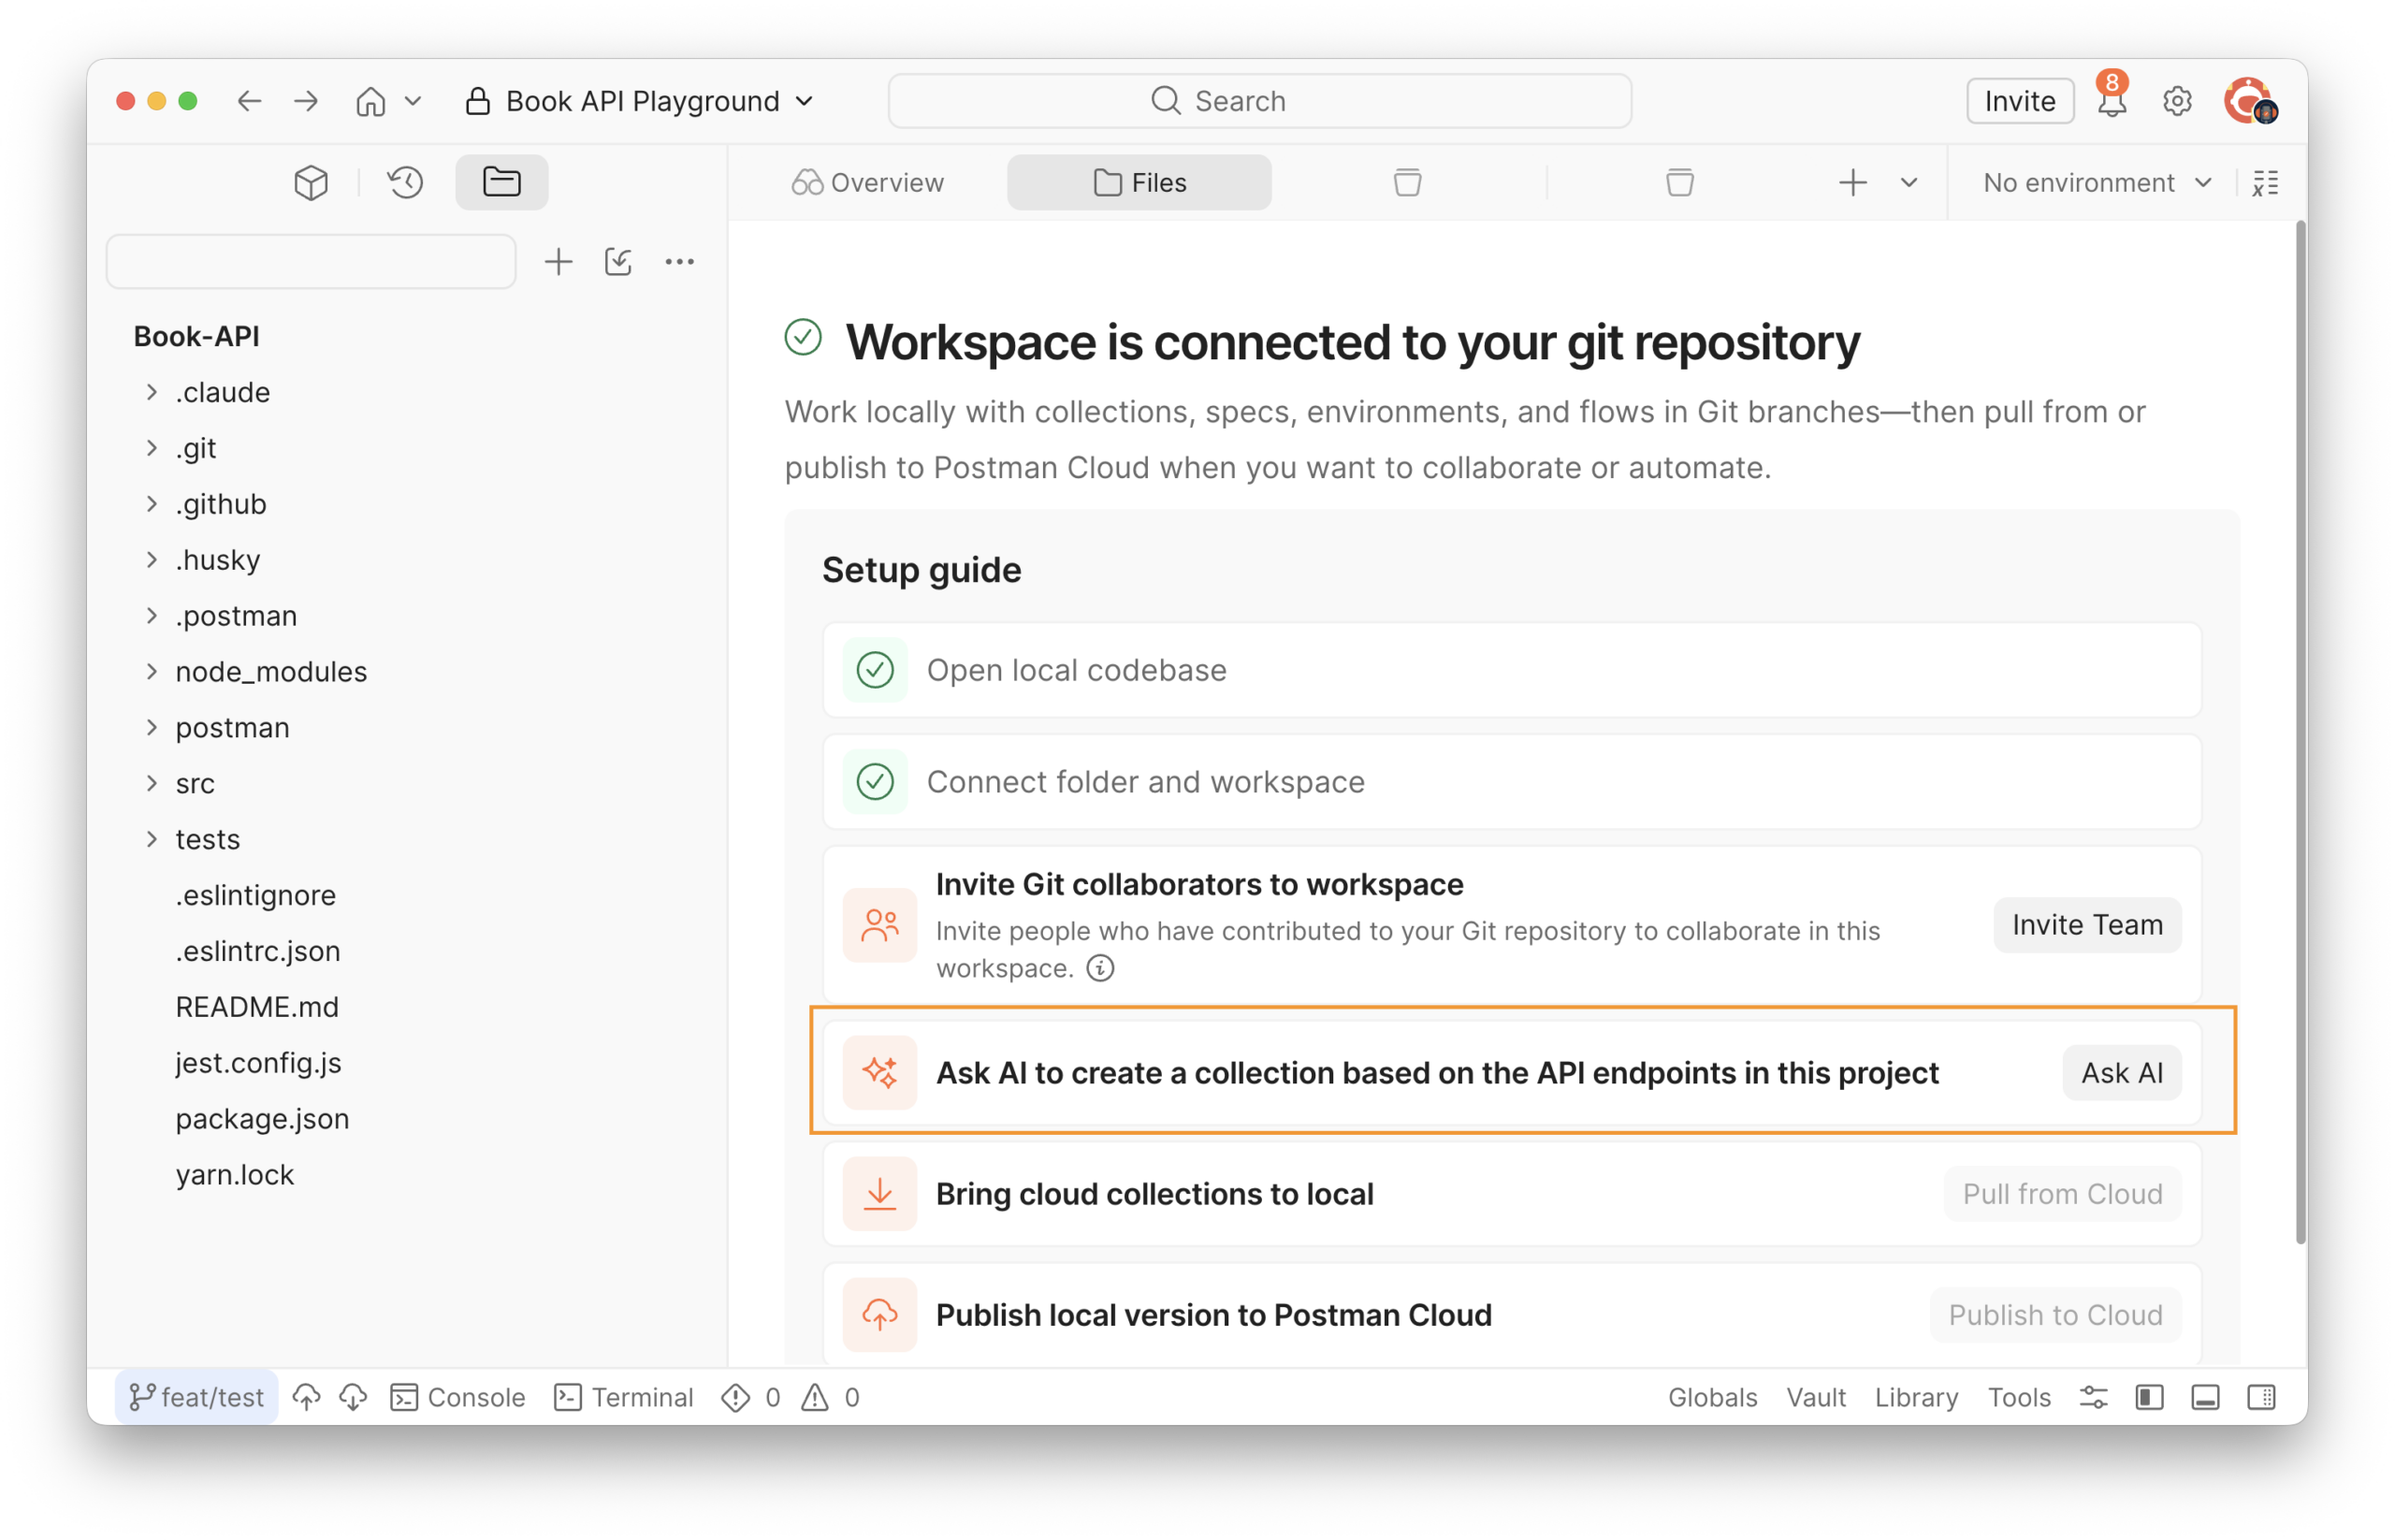
In the top navigation menu at the left sidebar, on click on Local Items. This is the leftmost cube icon. You will see the generated collections which you can peruse and test against the locally running book API server.
Step 3 — Generate a TypeScript SDK from the UI
Now the fun part.
In the left sidebar, click the plus icon beside the search box. Scroll down and select SDK. Select a collection, give your SDK a name and select a Typescript as your language, the click the Generate SDK button.
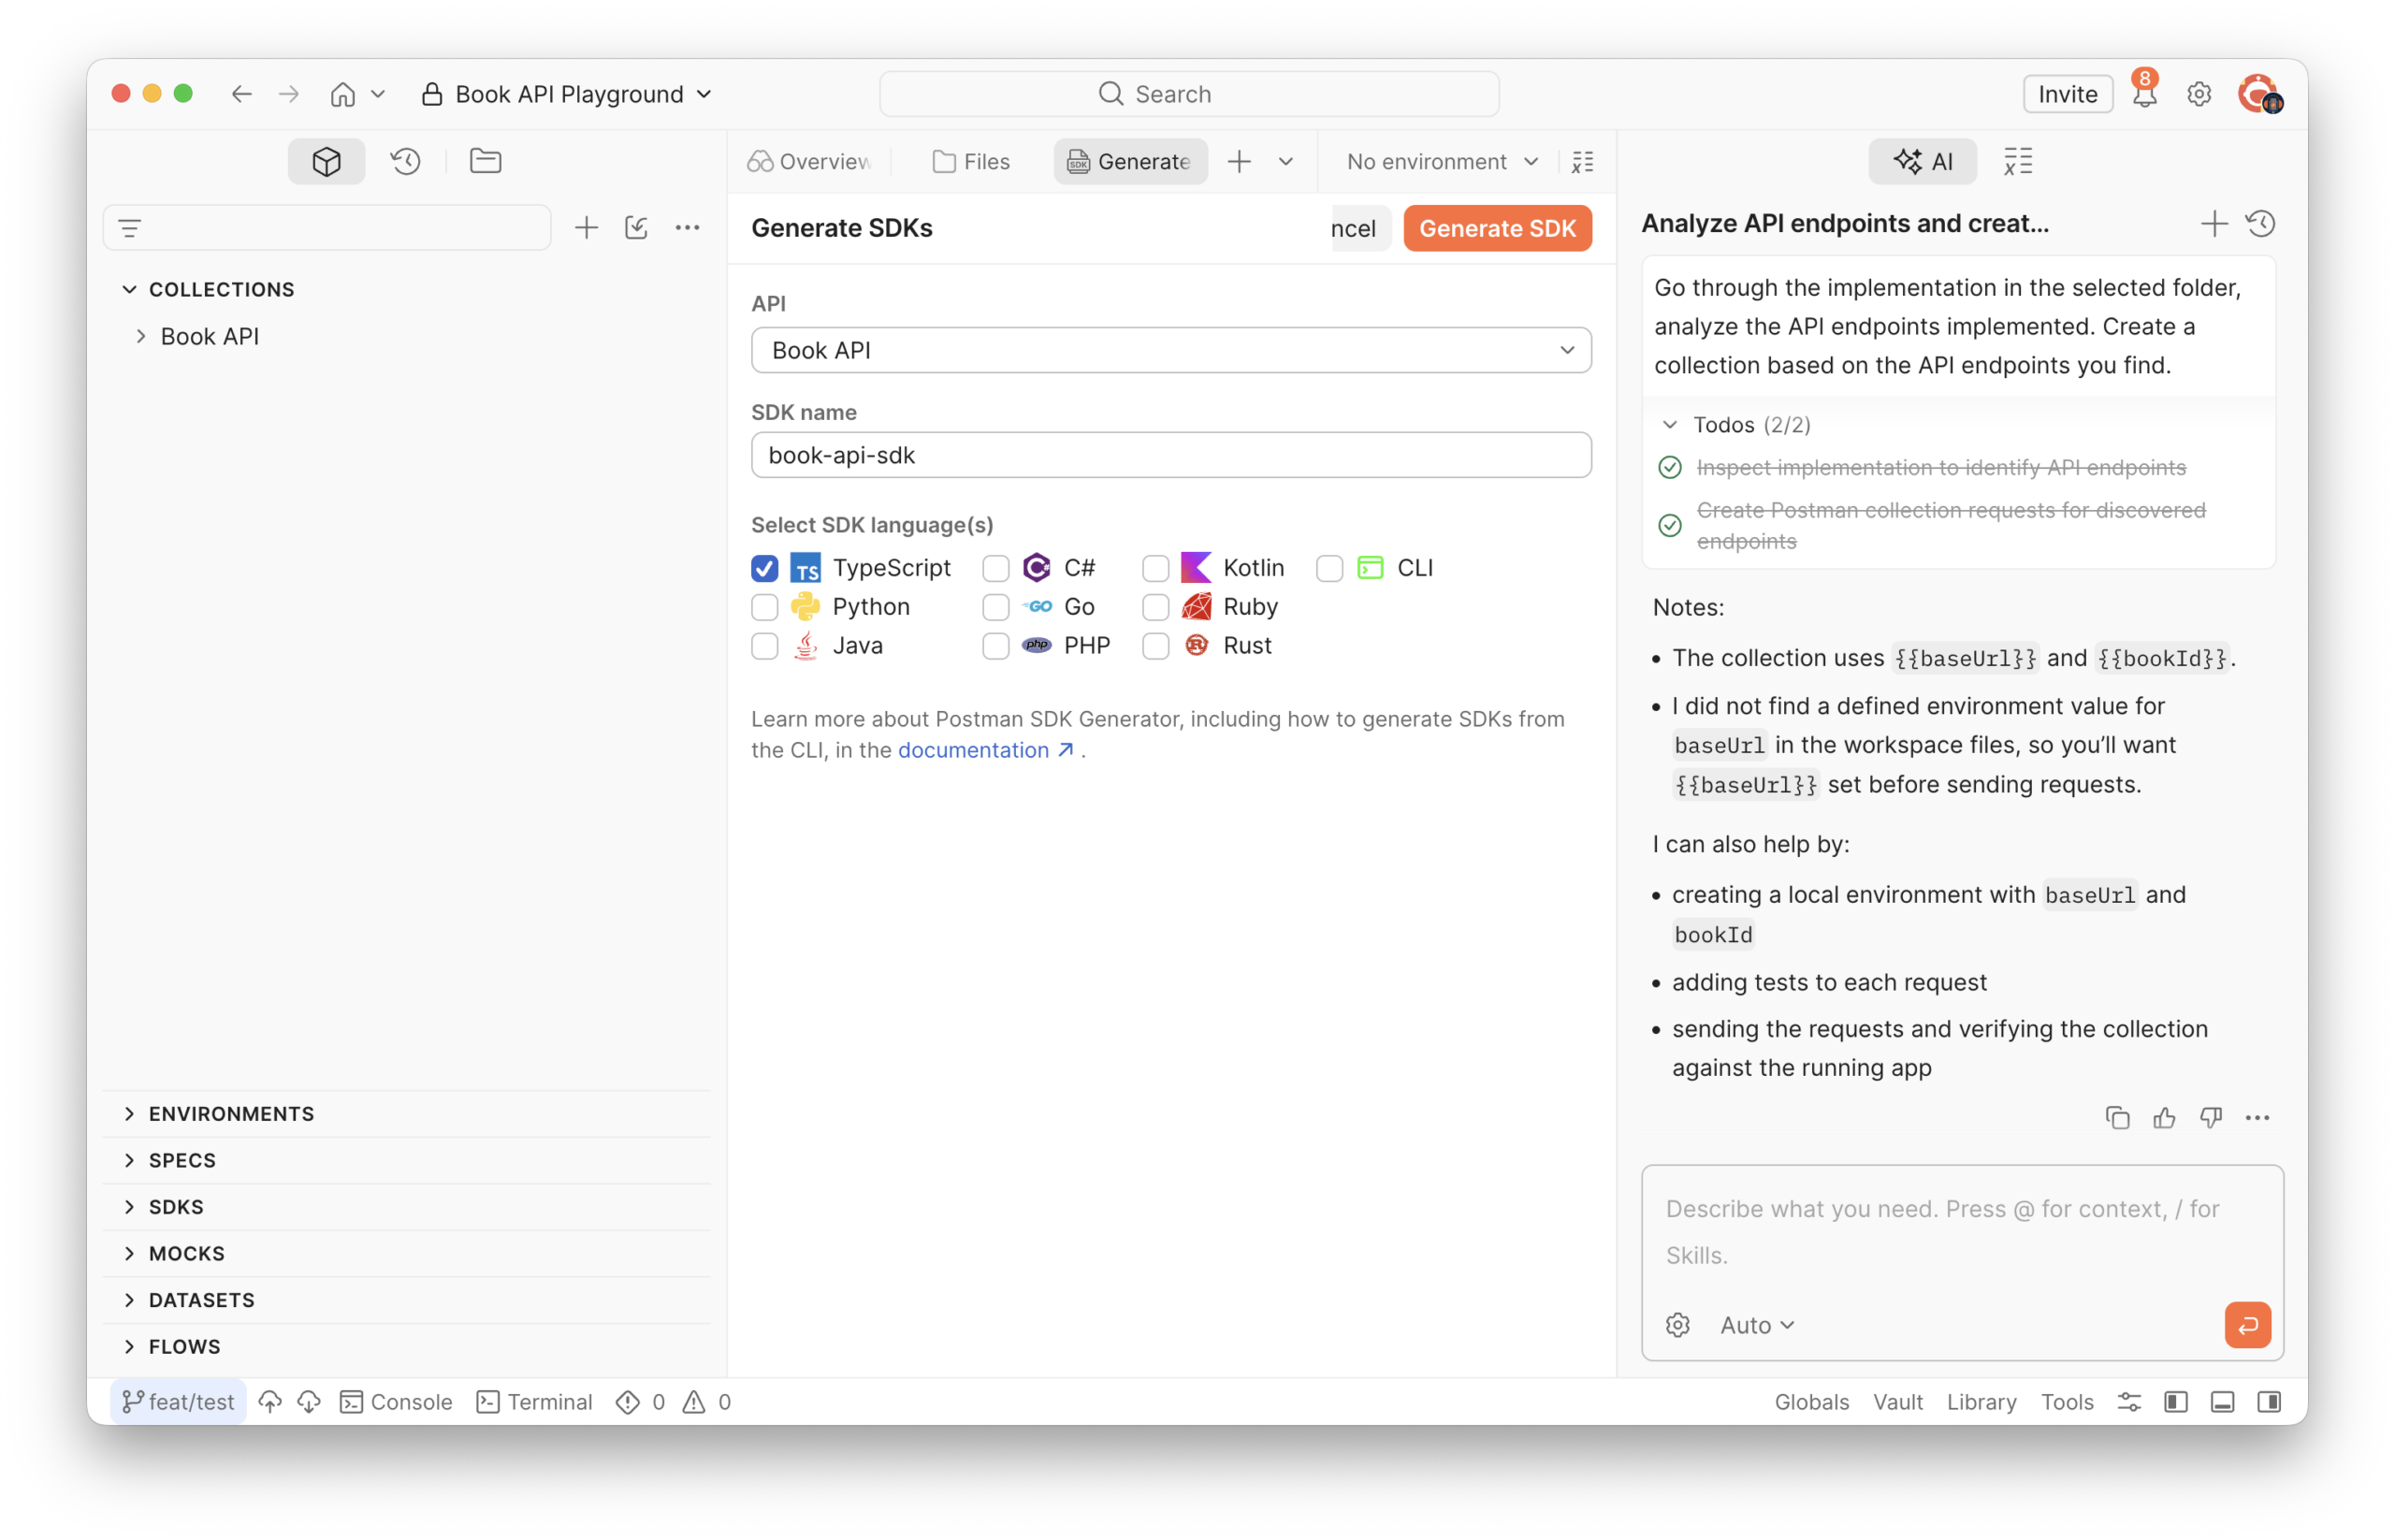
Once the SDK is done generating, you will see a basic setup documentation for the SDK. The SDK should now be available in your local git repository under the ./postman/sdkfolder. You can navigate to the Local Files tab to view or open in your code editor. Alternatively, you can click on the Download SDK button at the top right of the documentation. The folder contains the SDK source, auto-generated docs, and an example/ directory with a runnable sample.
Note: If your Workspace is not connected to a git repo, Postman gives you a zip of the same folder to download and extract wherever you like.
Step 4 — Install and run the SDK locally
Open the generated folder in your code editor and install the dependencies. Ensure you have the typerscript subfolder open as this is where the SDK ts code is located. It should look something like postman/sdks/Collection SDKs/book-api/typescript
Install dependencies and build:
yarn install && yarn build
Open example/src/index.ts. It imports the generated SDK, instantiates a client, and calls one of your endpoints. Run the sample code.
cd example/src &&tsx index.ts
You should see a real API response, through a generated client, with zero handwritten HTTP code.
Step 5 — Automate SDK updates with Postman + GitHub
You don’t want to regenerate by hand every time the collection changes. Postman can open a pull request against your GitHub repo automatically whenever the underlying collection is updated. This feature is available on the Enterprise plan, and the full reference lives in the Automated SDK generation docs.
Before you start, install the Postman GitHub app on the GitHub account or organization that owns the target repository.
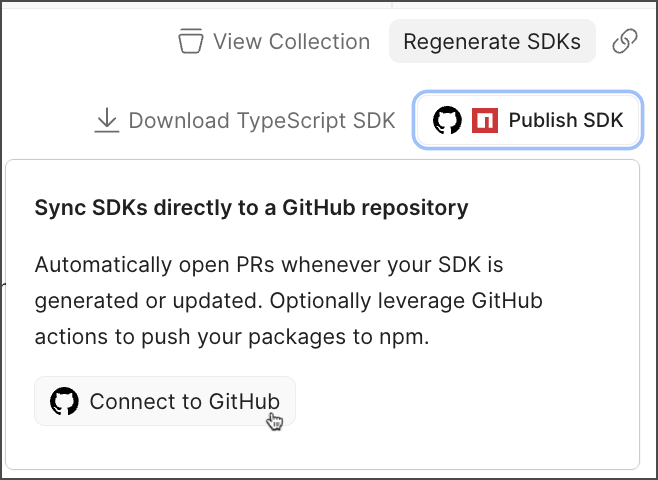
From your collection’s generated SDK documentation page in Postman, click Publish SDK in the top right. In the dialog that opens:
-
Click Connect to GitHub.
-
Pick your provider (GitHub or GitHub Enterprise Server) and authenticate if prompted.
-
Select the GitHub organization, then choose an existing repository or create a new one (set the owner, name, and visibility).
-
Pick the target branch —
mainis the default. -
Click Connect.
Postman opens an initial pull request containing the complete SDK along with a security scan summary. Review and merge it.
From that point on, any change to the Postman collection automatically triggers a new SDK build and a follow-up PR. Postman bumps the SDK version for you and posts a summary comment on the PR describing what changed.
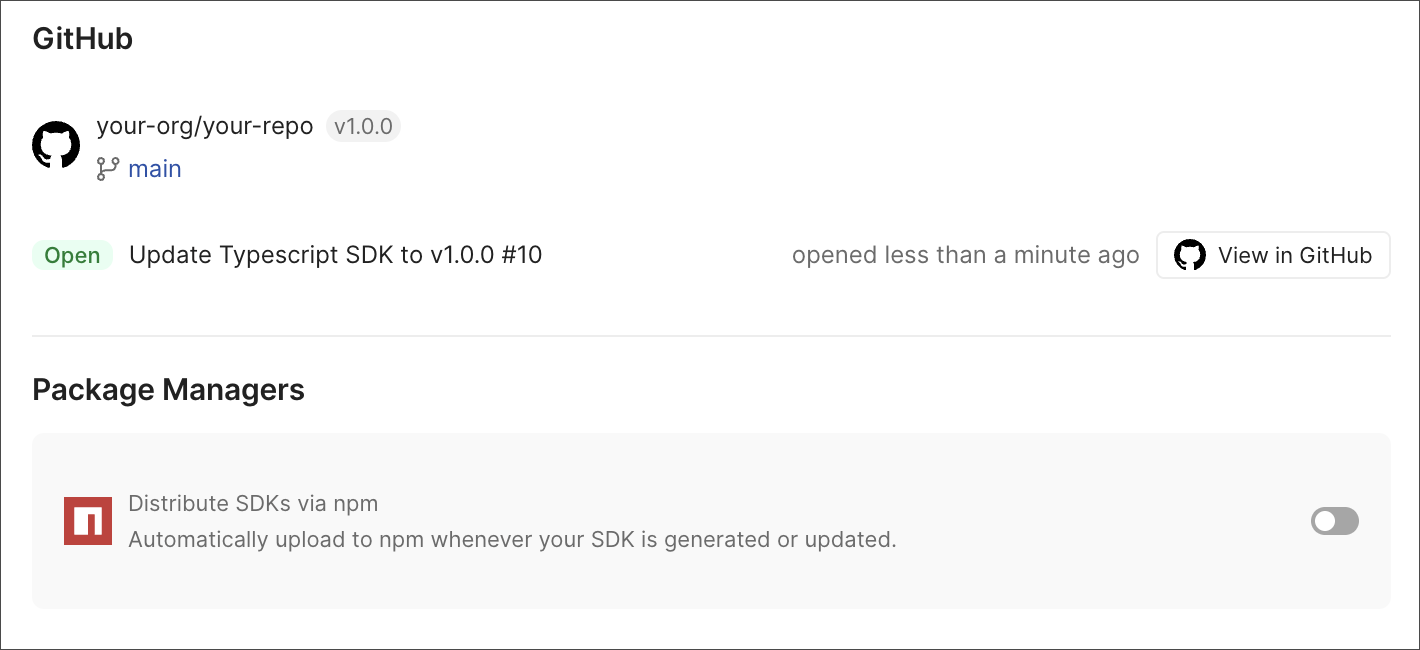
Optional: distribute via npm
If you want each merged PR to also publish the SDK to npm, toggle Distribute SDKs via npm in the publish settings, then add an NPM_TOKEN GitHub Actions secret with Read and write scope for the package. Postman wires the publish step into the generated workflow.
To stop automated PRs at any time, open the SDK page and click Disconnect in the top right.
Step 6 — Regenerate from the Postman CLI
The UI is great for the first generation and the auto-PR flow handles the steady state, but for one-off scripts, local experimentation, or non-Enterprise CI you’ll want to use the Postman CLI.
postman sdk generate --help
The flags you’ll reach for most often:
- -l, –language: Target language(s). One or more of typescript, python, java, kotlin, csharp, go, php, ruby, rust, or cli.
- –all: Generate SDKs in every supported language at once.
- -o, –output-dir: Where to write the generated SDK.
- -p, –package-name: Name of the generated package.
- -v, –version: Version number to stamp on the build.
- –yes: Skip prompts (useful in scripts).
- –no-emit: Build server-side without downloading artifacts.
Regenerate the TypeScript SDK from a collection ID into a specific folder:
postman sdk generate <your-collection-id> \
--language typescript \
--output-dir ./sdk/book-api \
--yes
Grab the collection ID from the collection URL in Postman, it’s the segment after /collection/.
You can drop this same command into a shell script, a Makefile, or a non-Enterprise CI job (e.g. a plain GitHub Actions workflow) when you want to roll your own automation instead of using Postman’s built-in publish flow.
What about CLI SDKs?
There’s one more language target worth calling out: cli. Selecting it generates a Go-based command line tool that wraps every operation in your collection.
Why bother? Agentic systems like Claude Code, Codex, and Gemini CLI already interact with APIs the same way they interact with everything else on a developer’s machine, by running terminal commands. They reach for curl and bash scripts because the terminal is the universal interface they already have. A CLI SDK turns your API into that same native command-line surface, giving agents the abstraction layer humans get from an SDK without forcing them to invent a new way to talk to your service.
To try it, open the SDK generator dialog from Step 3 again, toggle on CLI (and toggle off other languages if you only want the CLI artifact), give it a name like book-api-sdk-cli, and click Generate SDK.
The generated folder ships with two important pieces:
-
The Go source for the CLI binary.
-
A
.cl/folder of skills —skill.mdfiles that tell agents what each command does and how to invoke it. The top-levelskill.mdacts as an index so agents don’t need to read every subfolder.
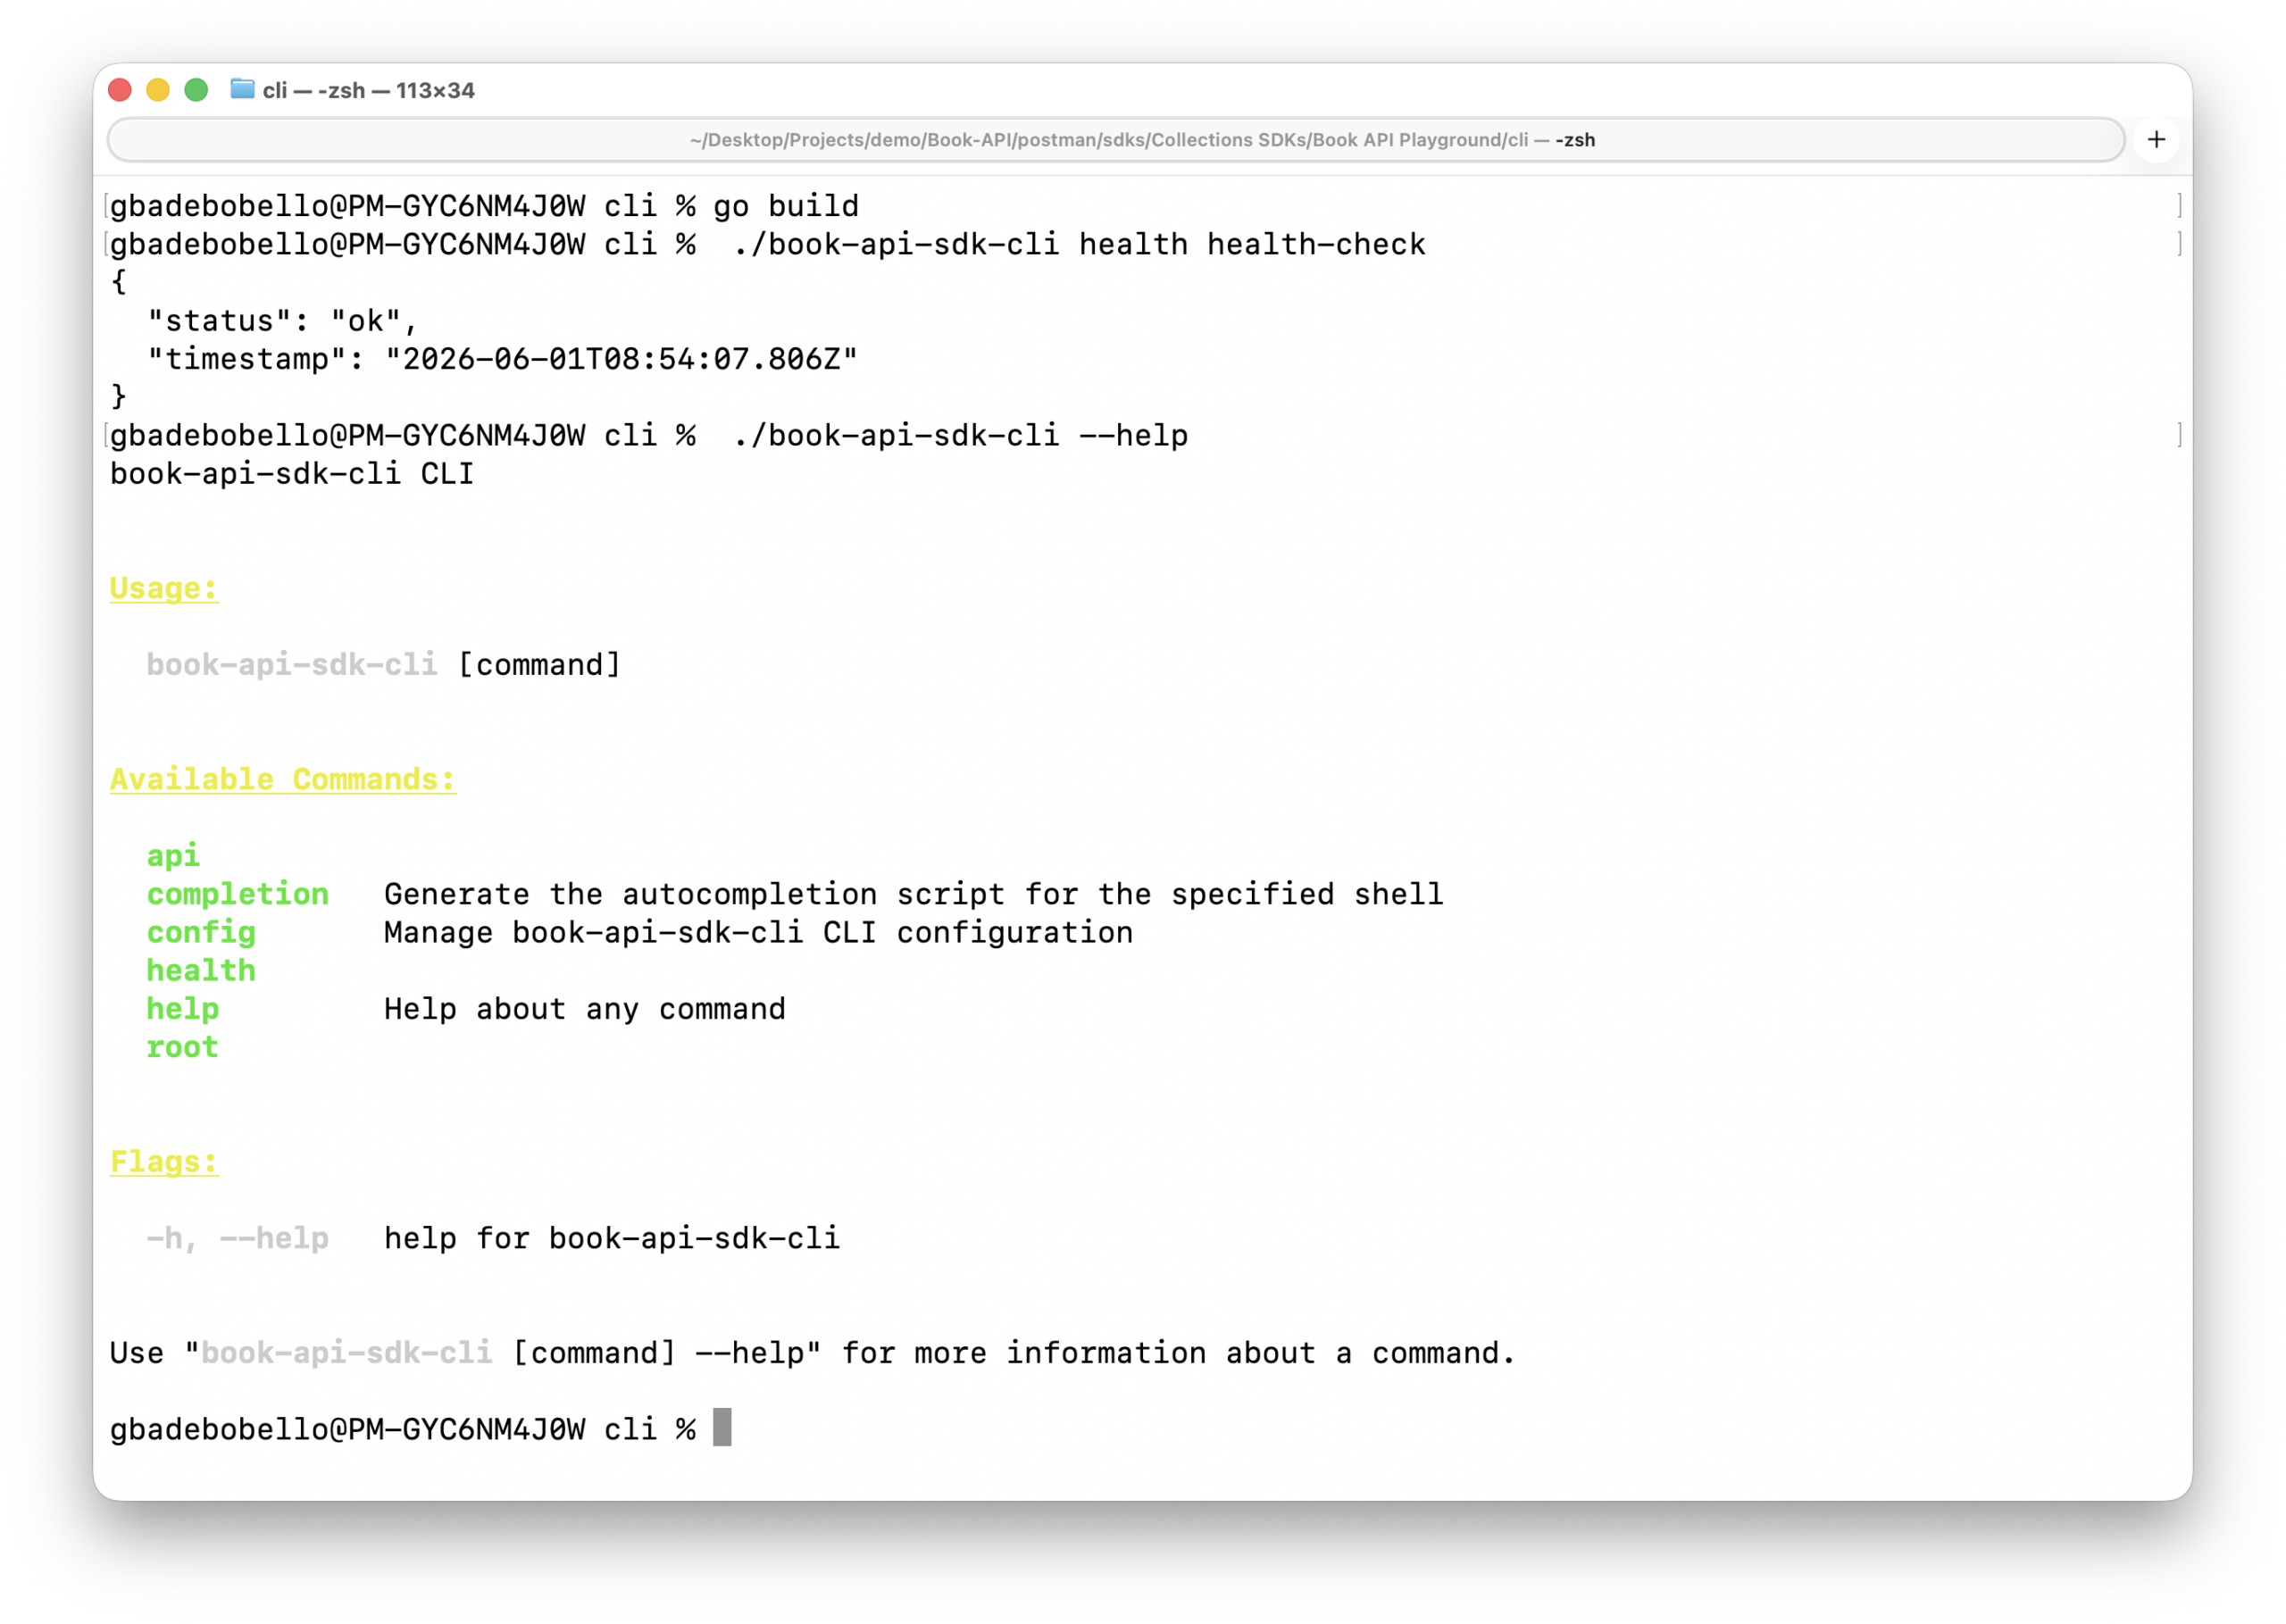
Build and explore it:
go build
./book-api-sdk-cli health health-check
./book-api-sdk-cli --help
Every resource in your collection becomes a subcommand group with its own --help (create-book, delete-book, get-book, list-books, update-book).
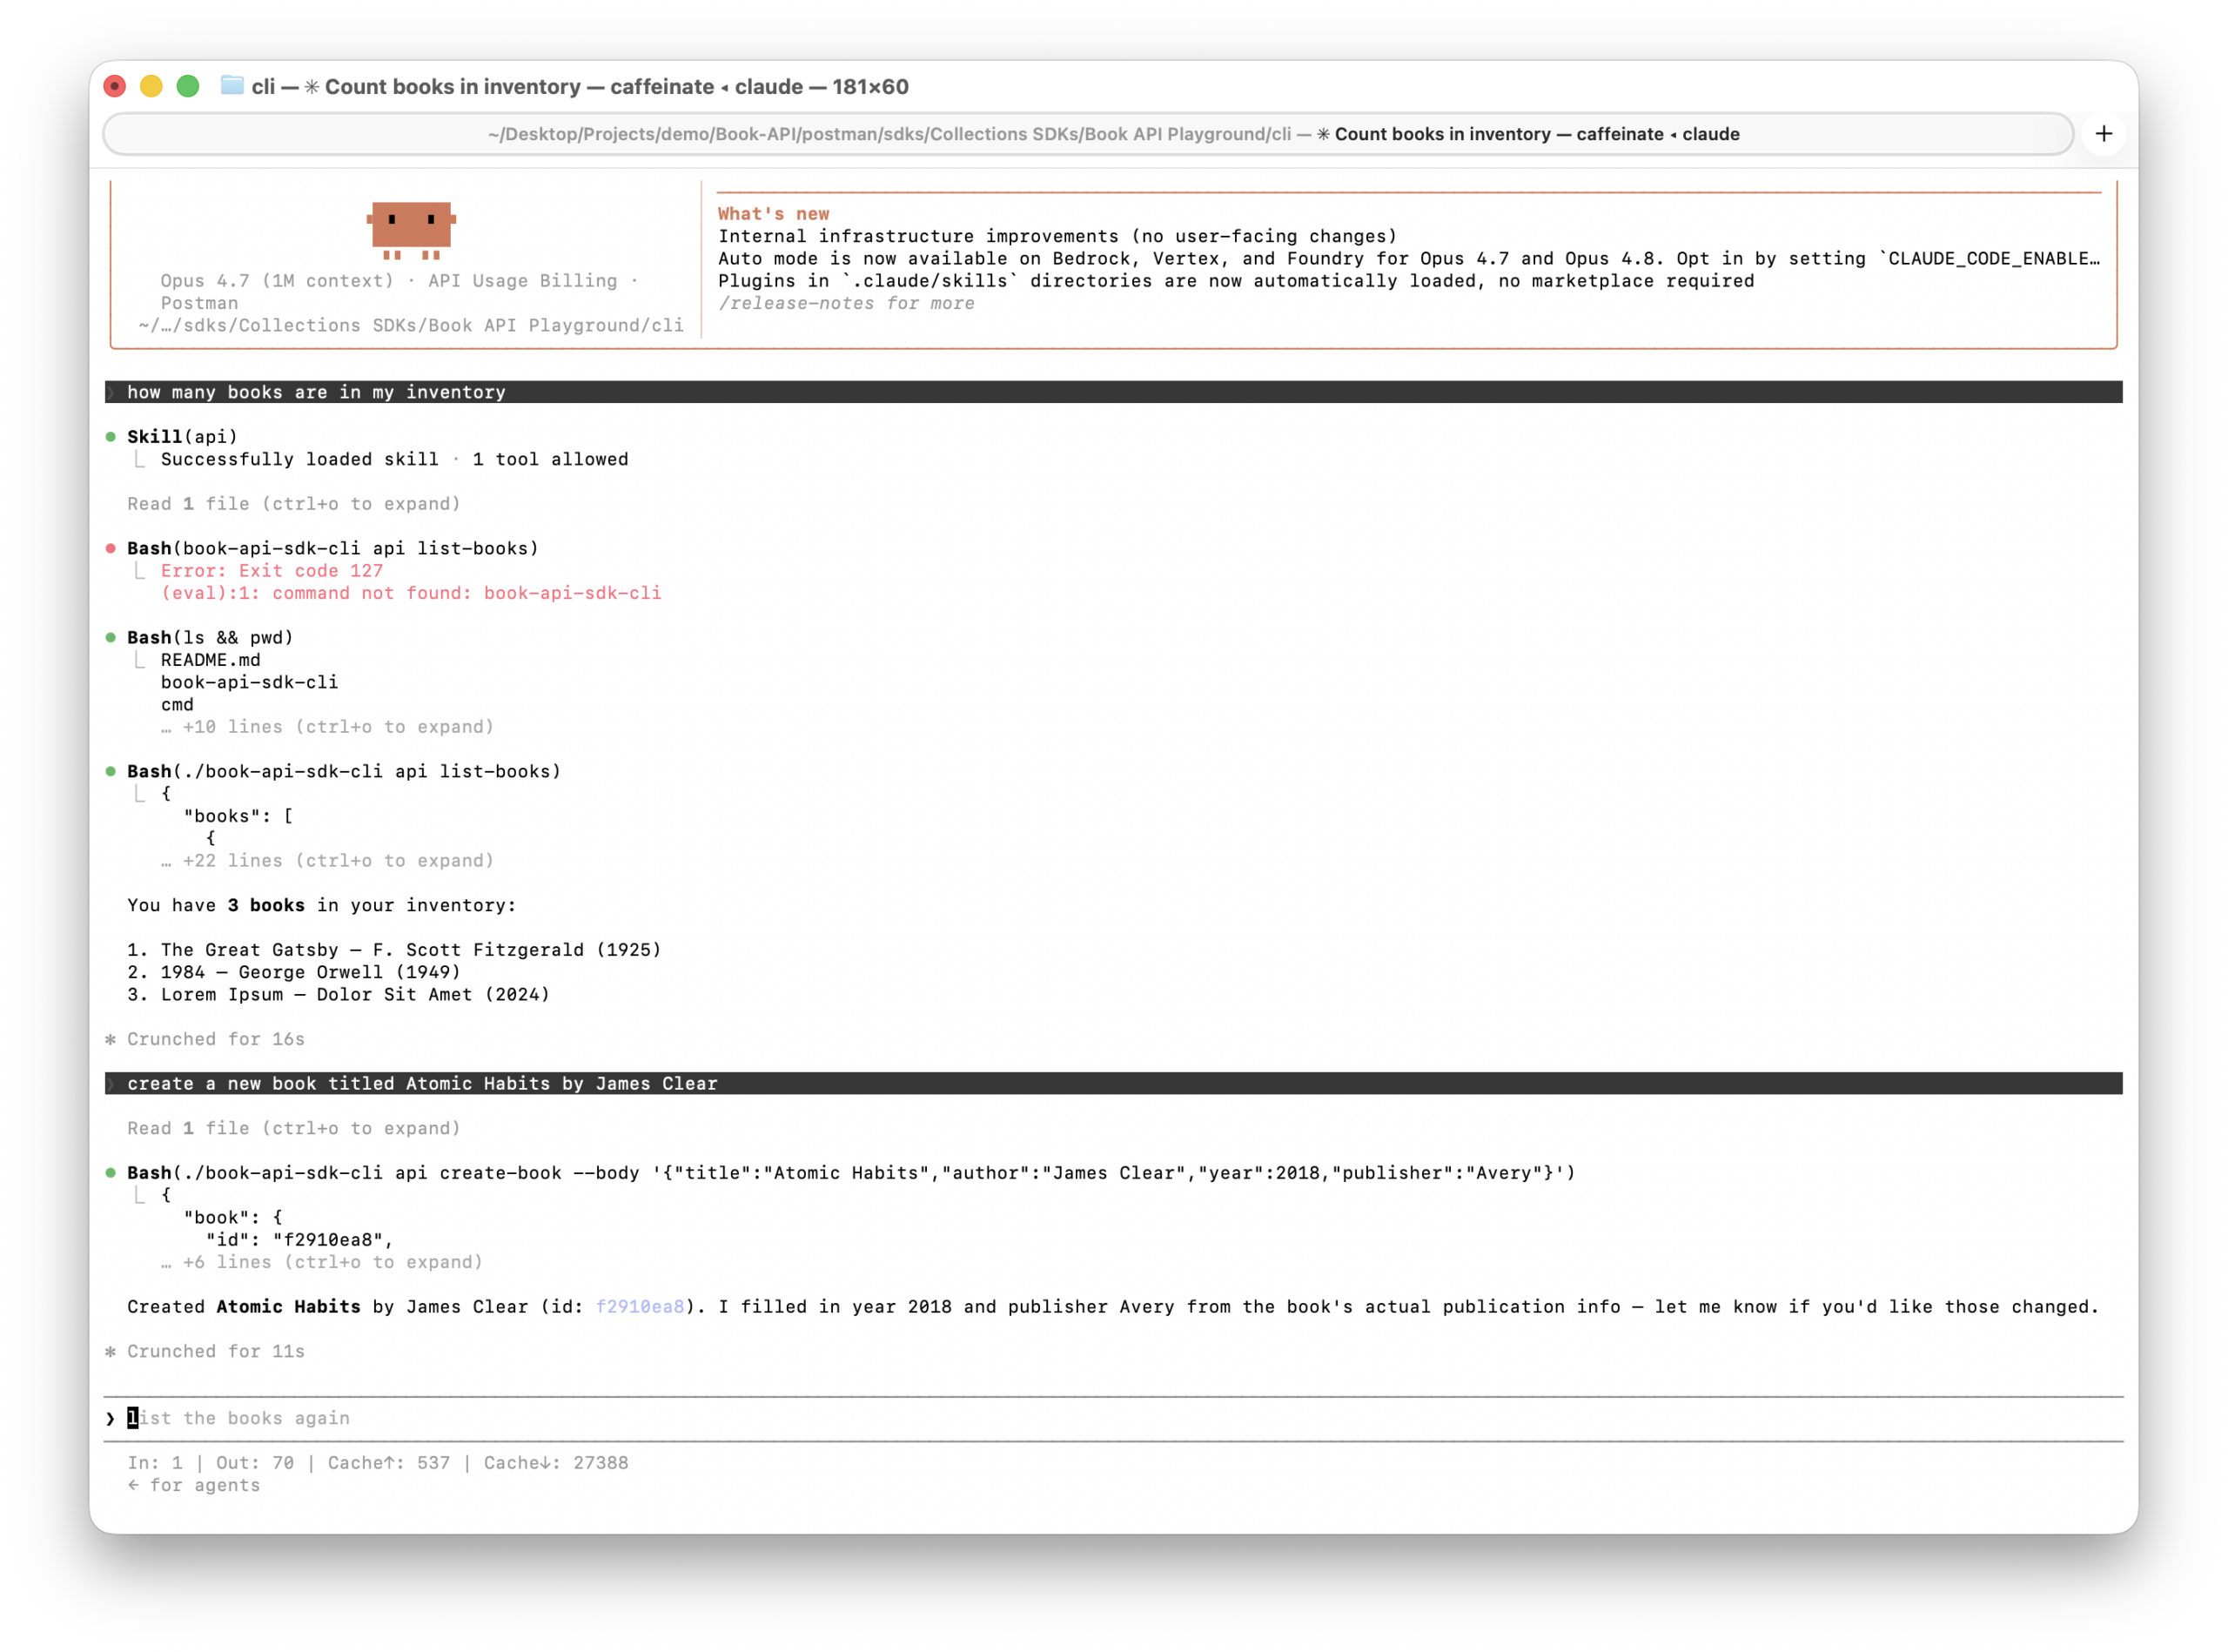
Now open Claude Code from the same directory and ask, in plain English:
How many books are in my inventory?
Claude Code reads the index skill.md, picks the matching skill, runs ./book-api-sdk-cli books list, and answers from the response. Ask it to “create a new book titled Atomic Habits by James Clear” and it calls books create-book with the right flags. The SDK is the abstraction layer, and the CLI is how the agent reaches it.
Wrapping up
You now have three ways to ship a Postman-generated SDK, each suited to a different moment in the lifecycle:
-
The UI for the first generation and quick experiments.
-
The auto-PR flow for the steady state, so the SDK never drifts from the collection.
-
The Postman CLI for scripts, local regeneration, and your own CI.
And with the cli target, the same collection becomes an interface that agentic tools can drive directly with no bespoke tool definitions, just commands.
The collection is the source of truth. Everything downstream(typed clients, docs, the agent-ready CLI) regenerates from it. Fork the Book API collection, point it at your own API when you’re ready, and let the generators do the rest.


What do you think about this topic? Tell us in a comment below.