
Build and DynamicallyTest a Banking API with Agent Mode and Postman MCP Server
What if you could build an API, generate tests with AI, and connect the whole thing to Claude—all in one workflow? That’s exactly what we’re doing in this tutorial.
We’ll build an Intergalactic Banking API (yes, for astronauts transferring credits between accounts), use Postman Agent Mode to automate test creation, and wire it up to Claude through the Postman MCP server. By the end, you’ll have a complete workflow for building AI-ready APIs that you can apply to your own projects.
What we’re building
Here’s the full stack:
- Banking API — A Node.js API for managing accounts and transactions
- Postman Collection — Requests organized for the complete CRUD workflow
- Agent Mode tests — AI-generated test scripts for validation
- MCP integration — Connect your API to Claude for natural language interactions
The patterns here work for any API. I’m using banking because financial transactions make test scenarios obvious you need to verify that money actually moves between accounts.
Prerequisites
Before we start, make sure you have:
- Postman desktop app installed
- Node.js v14+ for running the local API
- A Postman account (free tier works)
- Claude Code installed (for the MCP section)
Set up the Banking API locally
First, clone the demo repository and get the server running.
git clone https://github.com/Postman-Devrel/Banking-API-Demo
cd Banking-API-Demo
npm install
npm start
The API should now be running at http://localhost:3000. Open that URL in your browser—you should see a confirmation that the server is live.
This API handles:
- Account creation and management
- Transactions between accounts
- API key generation for authentication
Import the API specification
With the server running, let’s bring the API into Postman.
Create a workspace
In Postman, create a new blank workspace. Name it something descriptive like “Intergalactic Banking Workshop” and set visibility to your preference.
Import the OpenAPI spec
The repository includes an OpenAPI specification at Banking-API-Demo/openapi/openapi.yaml. Import it into Postman:
- Select Import in your workspace
- Choose the openapi.yaml file from your local project
- Select Postman Collection as the import format
This gives you a collection with all endpoints documented. Browse through it to see what’s available.
Fork the workshop collection
For this tutorial, fork the pre-configured collection from the AI-Powered API & MCP Bootcamp workspace. This collection has the request structure we need.
Test your setup by sending the Generate API Key request in the Admin folder. You should get a 200 OK response.
Heads up: If requests aren’t reaching your localhost, you may need the Postman Desktop Agent. Check the bottom-right corner of Postman and toggle on Desktop Agent.
Configure Agent Mode
Now for the interesting part. Agent Mode turns natural language into collection modifications—creating variables, writing tests, and updating requests.
Select your model
Open Agent Mode from the AI panel and select Claude Sonnet 4.6 as your model. Turn on Auto Run so Agent Mode can apply changes without asking for approval on each step.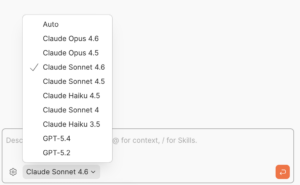
Create environment variables with AI
Instead of manually creating an environment file, ask Agent Mode to do it. Set the collection as context (click on the collection name or use @CollectionName) and send this prompt:
Create an Environment Variable file called Banking.local
Agent Mode creates the environment and switches to it. No clicking through menus.
Replace hardcoded URLs
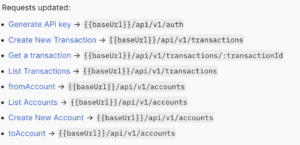
The forked collection has localhost:3000 hardcoded in every request. Let’s fix that with a single prompt:
For all the requests in this collection, add http://localhost:3000
as a collection variable called baseUrl and update all the URLs
in the collection to use {{baseUrl}}.
Agent Mode updates every request URL to use {{baseUrl}}. Check the Variables tab in your collection to verify.
Save the API key automatically
Send the Generate API Key request. Now let’s capture that key for future requests.
The response includes an API key that we need for authenticated endpoints. Rather than copying it manually, Agent Mode already knows how to set environment variables from responses.
Go to your environment and mark the apiKey value as sensitive—this prevents it from appearing in logs or shared workspaces.
Build a dynamic test workflow
Static test data gets stale. Let’s create a workflow that generates fresh data on every run.
Create sender and receiveraccounts
In the Accounts folder, duplicate the POST Create New Account request twice. Name them fromAccount and toAccount.
In each request body, replace the static owner value with a dynamic variable:
{

"owner": "{{$randomFullName}}",

"balance": 1000

}
The {{$randomFullName}} variable generates a different name each time. Wrap it in double quotes since it’s a string.
Capture account IDs with Agent Mode
We need to save the account IDs from the responses so we can use them in transactions. Set the fromAccount request as context and send:
Programmatically add a post-response script that parses the response
body, reads the accountId field, and saves its value as an environment
variable called fromAccount in the Banking.local environment.
Agent Mode generates this testscript:
const response = pm.response.json();
pm.environment.set("fromAccount", response.accountId);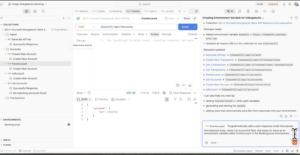
Do the same for toAccount:
Programmatically add a post-response script that parses the response
body, reads the accountId field, and saves its value as an environment
variable called toAccount in the Banking.local environment.
Send both requests and verify the variables appear in your environment.
Wire up the transaction
In the POST Create New Transaction request, update the body to use your new variables:
{

"fromAccount": "{{fromAccount}}",

"toAccount": "{{toAccount}}",
"amount": 100

}
Send the request. You should see a transactionId in the response.
Capture that too:
Programmatically add a post-response script that parses the response
body, reads the transactionId field, and saves its value as an environment
variable called transactionId in the Banking.local environment.
Now GET Transaction by ID will work automatically—it uses {{transactionId}} to fetch the transaction you just created.
Generate tests with Agent Mode
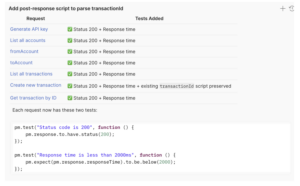
With the workflow producing valid responses, let’s add test coverage. Set the collection as context and prompt:
Write tests for all the requests in this collection.
Include only status code tests and response time tests.
Agent Mode adds test scripts to every request. For a POST request, it might generate:
pm.test("Status code is 200", function () {

pm.response.to.have.status(200);

});

pm.test("Response time is under 500ms", function () {

pm.expect(pm.response.responseTime).to.be.below(500);

});
Run the full test suite
Use Agent Mode to trigger the Collection Runner:
Run all tests using the Collection Runner.
The Collection Runner runs every request in sequence—creating accounts, making transactions, fetching results—and reports which tests pass or fail.
Connect to Claude via MCP
The Model Context Protocol (MCP) lets AI assistants interact with external tools. Postman’s MCP server gives Claude direct access to your workspaces, collections, and APIs.
Generate your Postman API key
In Postman, click your profile icon, go to Settings > API Keys, and generate a new key. Copy it immediately—you won’t see it again.
Test the MCP connection in Postman
Create a new MCP Request in your workspace:
- Transport: HTTP
- URL: https://mcp.postman.com/mcp
- Auth: Bearer Token (paste your API key)
Find the getCollection tool and run it with your workspace ID (visible in your workspace’s Overview tab). You should get your collection data back.
Add the MCP server to Claude Code
In your terminal, register the Postman MCP server:
claude mcp add --transport http postman https://mcp.postman.com/mcp --header "Authorization: Bearer YOUR_API_KEY"Verify with claude mcp list or type /mcp in Claude.
Interact with Postman through Claude
Now Claude can access your Postman data. Try these prompts:
List your workspaces:
List all my Postman workspaces.
Get a specific workspace:
Get the workspace ID for “Intergalactic Banking Workshop”.
Add tests via MCP:
Using the Postman MCP server, add tests to the Intergalactic Bank API collection.
For each request:
- Add a status code check (200 OK)
- Validate the response has a ‘success’ property set to true
Run the collection:
Run the “Intergalactic Bank API” collection and show me the test results.
Claude executes these against your actual Postman workspace—no copy-pasting collections or manually triggering runs.
What you can do from here
This workflow combines three capabilities:
- Agent Mode for AI-assisted collection development
- Dynamic variables for realistic test data
- MCP integration for AI-to-API connectivity
Apply these patterns to your own APIs:
- Use Agent Mode to generate test suites for existing collections
- Connect your staging environment to Claude for exploratory testing
- Build MCP workflows that let AI agents interact with your services
The banking API is a teaching example, but the techniques work on production APIs. Start with a single collection, add Agent Mode tests, and expand from there.
Resources
- Banking API Demo repository — Clone and run locally
- AI-Powered API & MCP Bootcamp workspace — Fork the collection
- Meet Agent Mode — Postman Academy course
- Agent Mode Prompt Library — Ready-to-use prompts
- Postman MCP Server — GitHub repository
- Postman Claude Code Plugin — Additional Claude integration
- Postman Docs: Writing test scripts — Test script reference
- Collection Runner documentation — Running collections


What do you think about this topic? Tell us in a comment below.