
Develop and test MCP in Postman: jhipster-mcp in action

AI agents are good at understanding what you want. They are less good at running a code generator correctly the first time, every time. When you ask an agent to “scaffold a Spring Boot app with a Book and an Author entity,” someone still has to translate that intent into valid input and drive the tool that produces real files. That gap between intent and a correct result is exactly where the Model Context Protocol (MCP) and a mature CLI meet.
This post looks at jhipster-mcp, an official MCP server that exposes the JHipster generator to any MCP client, and shows how I used Postman’s MCP client to test each tool while building it. If you write Java and already know JDL, you can follow the walkthrough end to end and connect to the server yourself.
A quick refresher on MCP and JHipster
The Model Context Protocol is an open standard that lets AI applications call external tools in a structured way instead of guessing at free-form text. An MCP server advertises three kinds of capabilities: tools (functions the client can call), resources (data the client can read), and prompts (reusable templates the server suggests). The wire format is JSON-RPC 2.0, so every call is a predictable request and response.
JHipster is a platform that scaffolds production-grade Spring Boot applications with an Angular, React, or Vue frontend. You describe your domain in JDL (JHipster Domain Language), and the generator writes the entities, REST resources, repositories, database changelogs, and tests for you. No boilerplate by hand.
The two fit together cleanly. An agent is good at turning a sentence into JDL. JHipster is good at turning JDL into a working application. jhipster-mcp is the layer that connects them, so an agent can generate and evolve a real project through a stable set of tools.
What jhipster-mcp is, and where it fits
jhipster-mcp is an open-source MCP server maintained under the JHipster GitHub organization. It is written in TypeScript and released under the Apache-2.0 license. It needs Node.js 20+ and a working global jhipster CLI install, because the server drives your existing CLI rather than bundling its own copy of the generator. The generator stays the source of truth.
The server exposes 13 tools that cover the full lifecycle of a JHipster project, not only the initial scaffold:
| Tool | What it does |
|---|---|
validate_jdl |
Check JDL for errors without writing anything |
create_app_from_jdl |
Scaffold a new application from a full JDL definition |
import_jdl |
Apply JDL to an existing project |
add_entity |
Add a single entity |
add_relationship |
Add a relationship between entities |
set_option |
Change a generator option |
info |
Report versions, config, and entities for a project |
project_commands |
Report how to build, run, test, and package a project |
upgrade_advisor |
Advise on upgrading to a newer JHipster version |
preview_upgrade |
Preview what an upgrade would change |
generate_ci_cd |
Generate a CI/CD pipeline configuration |
generate_deployment |
Generate a deployment configuration |
run_jhipster |
Run a JHipster command directly |
On top of the tools, it ships ready-made prompts (scaffold_crud_monolith, add_audit_fields, and monolith_to_microservices) and a set of resources: a JDL grammar cheat-sheet, plus live project state such as the .yo-rc.json config, the entity list, and the exported JDL. The grammar cheat-sheet is the interesting one. Handing it to the agent as a resource means the agent writes valid JDL on the first attempt instead of trial and error.
What I like about it
The design leans hard on safety, which matters when an autonomous agent is the caller. Each operation is sandboxed to a specific directory, with guard rails that stop the server from writing outside an expected or empty project folder. There is no arbitrary shell access, input is validated against JDL injection, and preview or dry-run behavior runs in isolation so nothing touches your working tree. When you hand a tool to an agent, you want it to fail loudly and safely rather than quietly scribble over files.
Coverage is the other strength. A lot of “AI plus generator” experiments stop at scaffolding. Here you also get CI/CD generation, deployment generation, and an upgrade advisor, which are the parts of a project’s life that usually hurt the most. The documentation is split into 9 chapters under docs/ (introduction, installation, getting started, tools, resources, prompts, context management, advanced usage, and internals), so finding the behavior of a specific tool does not mean reading source code.
Where it falls short
Two honest limitations. First, this is not a zero-setup experience. The server depends on a local, up-to-date JHipster CLI, so an agent can only do what your installed generator version supports. Second, the tool behavior is still young. You want to test each tool thoroughly before you trust it in production or wire it into CI.
That second point is where Postman earns its place in the workflow.
Driving jhipster-mcp from Postman’s MCP client
Here is the problem I ran into while building the server. To confirm a tool actually behaves the way I expect, I need something to call it. The obvious option is to point an AI agent at the server and chat with it. That works, but it is slow, it burns tokens on every exploration loop, and the agent sometimes papers over a broken tool by retrying with different arguments. When a tool misbehaves, I want to see the raw JSON-RPC, not a summary an agent wrote for me.
Postman’s MCP client solves this. It connects directly to an MCP server over STDIO or Streamable HTTP, lists every tool, prompt, and resource, and lets you call each one with arguments you control. You do not need an agent in the loop, and you do not write any code. It became my inspection bench for jhipster-mcp: call a tool, read the exact response, fix the tool, repeat. Postman also announced full MCP support on the blog if you want the wider context.
Connecting takes a few steps.
1. Build and locate the server
Clone the repo, install dependencies, and build:
git clone [email protected]:jhipster/jhipster-mcp.git
cd jhipster-mcp
npm install
npm run build
The build produces the server entry point at dist/index.js. That path is what Postman will run. You can also start the server standalone with npm start to confirm it launches, but for a STDIO connection Postman spawns the process for you, so you do not need a separate running instance.
2. Create a workspace
Open Postman and create a new workspace to keep this work isolated. A personal workspace is fine.
3. Add an MCP request and connect over STDIO
Select the + in the left sidebar and choose MCP to open a new MCP request tab. Set the transport type to STDIO, then enter the command Postman should run to launch the server:
/absolute/path/to/jhipster-mcp/dist/index.js
Click Connect. Postman may ask for permission to access your computer so it can spawn the process. Grant it. Once the handshake finishes, the server’s capabilities populate the Tools, Prompts, and Resources tabs.
Heads up: use an absolute path to
dist/index.js. A relative path resolves against Postman’s working directory, not your project folder, which is a common reason the connection comes up empty.
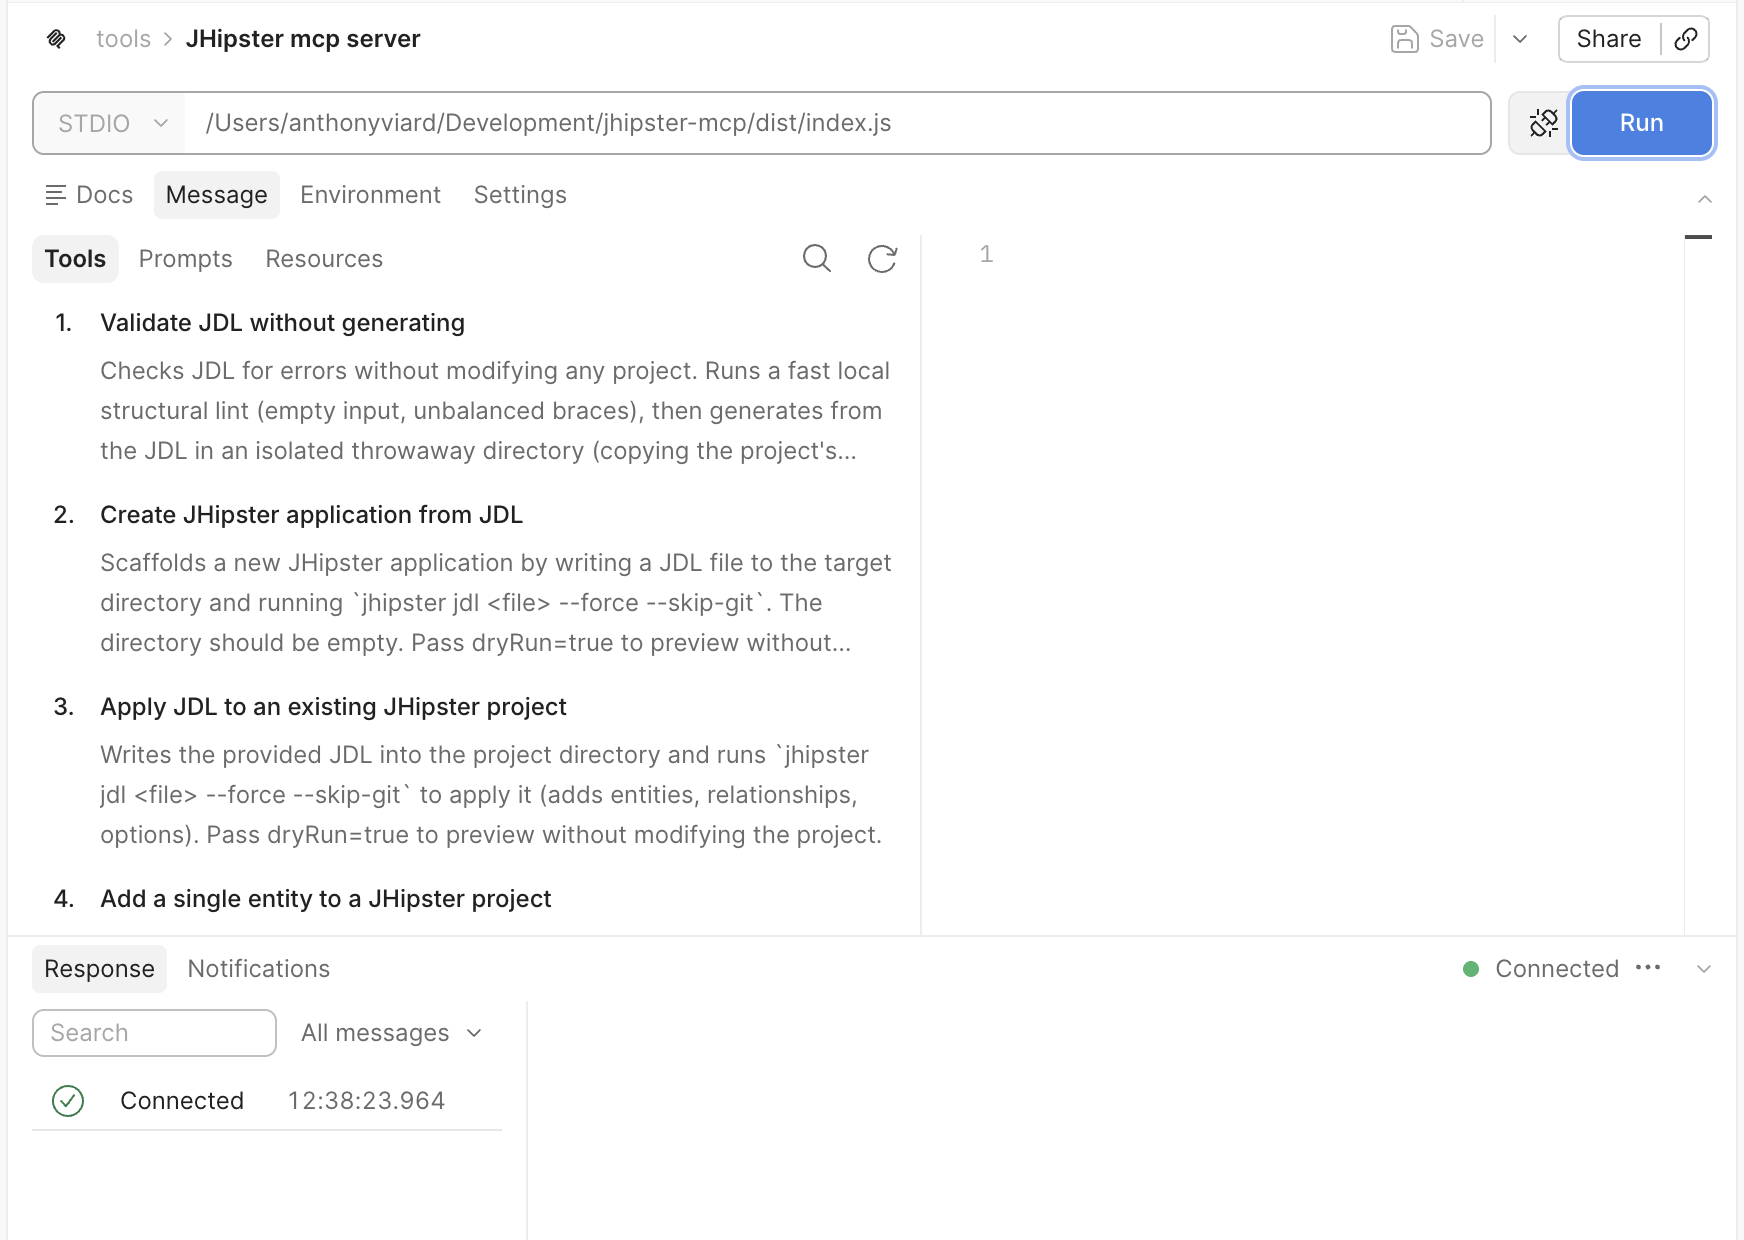
The connected MCP request in Postman. The Tools tab lists jhipster-mcp’s tools with their input schemas.
4. Read the advertised capabilities
Open each tab. Postman labels each capability with its human-readable title rather than its raw technical name, so validate_jdl appears as Validate JDL without generating. The title is what you click; the technical name is what ends up in the JSON-RPC name field. The Tools tab lists all 13 tools with their input schemas, so you can see this one expects a jdl string and an optional workingDirectory. The Prompts tab shows the three built-in prompts: Scaffold a CRUD monolith (scaffold_crud_monolith), Add audit fields to entities (add_audit_fields), and Plan a monolith → microservices split (monolith_to_microservices). The Resources tab exposes the JDL grammar cheat-sheet and the project-state resources (Project .yo-rc.json, Project entity configs, and Project JDL (export-jdl)). Under the hood, listing the tools is a single JSON-RPC call (a tools/list request) that Postman sends for you.
Being able to see the real schema for each tool, before an agent ever calls it, is half the value. Contract bugs (a wrong type, a missing required field, a confusing description) show up here immediately.
5. Call validate_jdl, then create_app_from_jdl
Start with the safest tool. Select Validate JDL without generating (validate_jdl) in the Tools tab and pass a small JDL snippet as the jdl argument. Here is the JDL I used, a two-entity bookstore:
application {
  config {
    baseName bookstore
    applicationType monolith
    packageName com.example.bookstore
    authenticationType jwt
    prodDatabaseType postgresql
    clientFramework angular
  }
  entities Book, Author
}

entity Author {
  name String required
  bio TextBlob
}

entity Book {
  title String required
  isbn String required
  price BigDecimal required min(0)
  publishedDate LocalDate
}

relationship ManyToOne {
  Book{author(name)} to Author
}
Postman turns your tool selection and arguments into a tools/call message:
{
  "method": "tools/call",
  "params": {
    "name": "validate_jdl",
    "arguments": {
      "jdl": "application {\n  config {\n    baseName bookstore\n    applicationType monolith\n    packageName com.example.bookstore\n    authenticationType jwt\n    prodDatabaseType postgresql\n    clientFramework angular\n  }\n  entities Book, Author\n}\n\nentity Author {\n  name String required\n  bio TextBlob\n}\n\nentity Book {\n  title String required\n  isbn String required\n  price BigDecimal required min(0)\n  publishedDate LocalDate\n}\n\nrelationship ManyToOne {\n  Book{author(name)} to Author\n}"
    }
  }
}
The response comes back as a JSON-RPC result with two parts: a human-readable summary in content, and the machine-readable object in structuredContent. This is the real payload from that call, trimmed to a handful of the file entries:
{
    "content": [
        {
            "type": "text",
            "text": "JDL is valid (generated cleanly in an isolated copy).\n\n$ jhipster jdl preview.jdl --force --skip-git --skip-install\n(exit 0)\n\n--- stdout ---\n\n [...]"

        }
    ],
    "structuredContent": {
        "command": "jhipster jdl preview.jdl --force --skip-git --skip-install",
        "exitCode": 0,
        "success": true,
        "dryRun": true,
        "entities": [
            "Author",
            "Book"
        ],
        "filesChanged": [
            {
                "action": "create",
                "path": ".prettierrc"
            },
            {
                "action": "create",
                "path": ".prettierignore"
            },
            {
                "action": "create",
                "path": "sonar-project.properties"
            },
            {
                "action": "create",
                "path": ".husky/pre-commit"
            },
            {
                "action": "create",
                "path": ".devcontainer/Dockerfile"
            },
            {
                "action": "create",
                "path": "pom.xml"
            },
            [...]
        ],
        "warnings": [
            "WARNING! docker compose command was not found in your environment. The generated Spring Boot application uses docker compose integration by default. You can disable it by setting"
        ]
    },
    "isError": false
}
Notice the shape of the result. It is not a wall of terminal output. It is a structured object with success, the resolved entities, and a filesChanged array that an agent (or you) can reason about. That machine-friendly return is a deliberate design choice, and you notice it right away when you read the result in Postman instead of a terminal scrollback.
The same request shape works for create_app_from_jdl. Add a workingDirectory and keep dryRun set to true to preview the file plan without writing anything, then set it to false when you want the project on disk. Testing the dry run first meant I could confirm the file plan looked right before committing to a real generation, which is a good habit even when an agent is driving.
6. Change a prompt, rebuild, and reconnect
The last thing worth testing is the development loop itself. Say you want to add a prompt that guides the agent to enable pagination on chosen entities. In the server code, you register a new prompt with the MCP TypeScript SDK. The snippet below is illustrative of the SDK pattern; check the docs/prompts chapter in the repo for the project’s actual registration API.
import type { McpServer } from "@modelcontextprotocol/sdk/server/mcp.js";
import { z } from "zod";

export function addPagination(server: McpServer): void {
  server.registerPrompt(
    "add_pagination",
    {
      title: "Add pagination to entities",
      description: "Guide the agent to enable pagination on the chosen entities",
      argsSchema: { entities: z.string() }
    },
    ({ entities }) => ({
      messages: [
        {
          role: "user",
          content: {
            type: "text",
            text: `Update the JDL so these entities use pagination with infinite scroll: ${entities}. Validate the JDL with validate_jdl before regenerating.`
          }
        }
      ]
    })
  );
}
Then wire it up in index.ts. Add the import:
import { addPagination } from "./prompts/paginationPrompt.js";
And register it alongside the other prompts:
addPagination(server);
Rebuild with npm run build, then reconnect the MCP request in Postman (click Disconnect, then Connect again). The Prompts tab now shows Add pagination to entities (add_pagination) alongside the built-in prompts. Select it, fill in the entities argument, and read the message the server returns. This is the tight feedback loop that makes Postman useful during development: change the server, rebuild, reconnect, and verify the capability without spinning up an agent or spending tokens on a chat session.
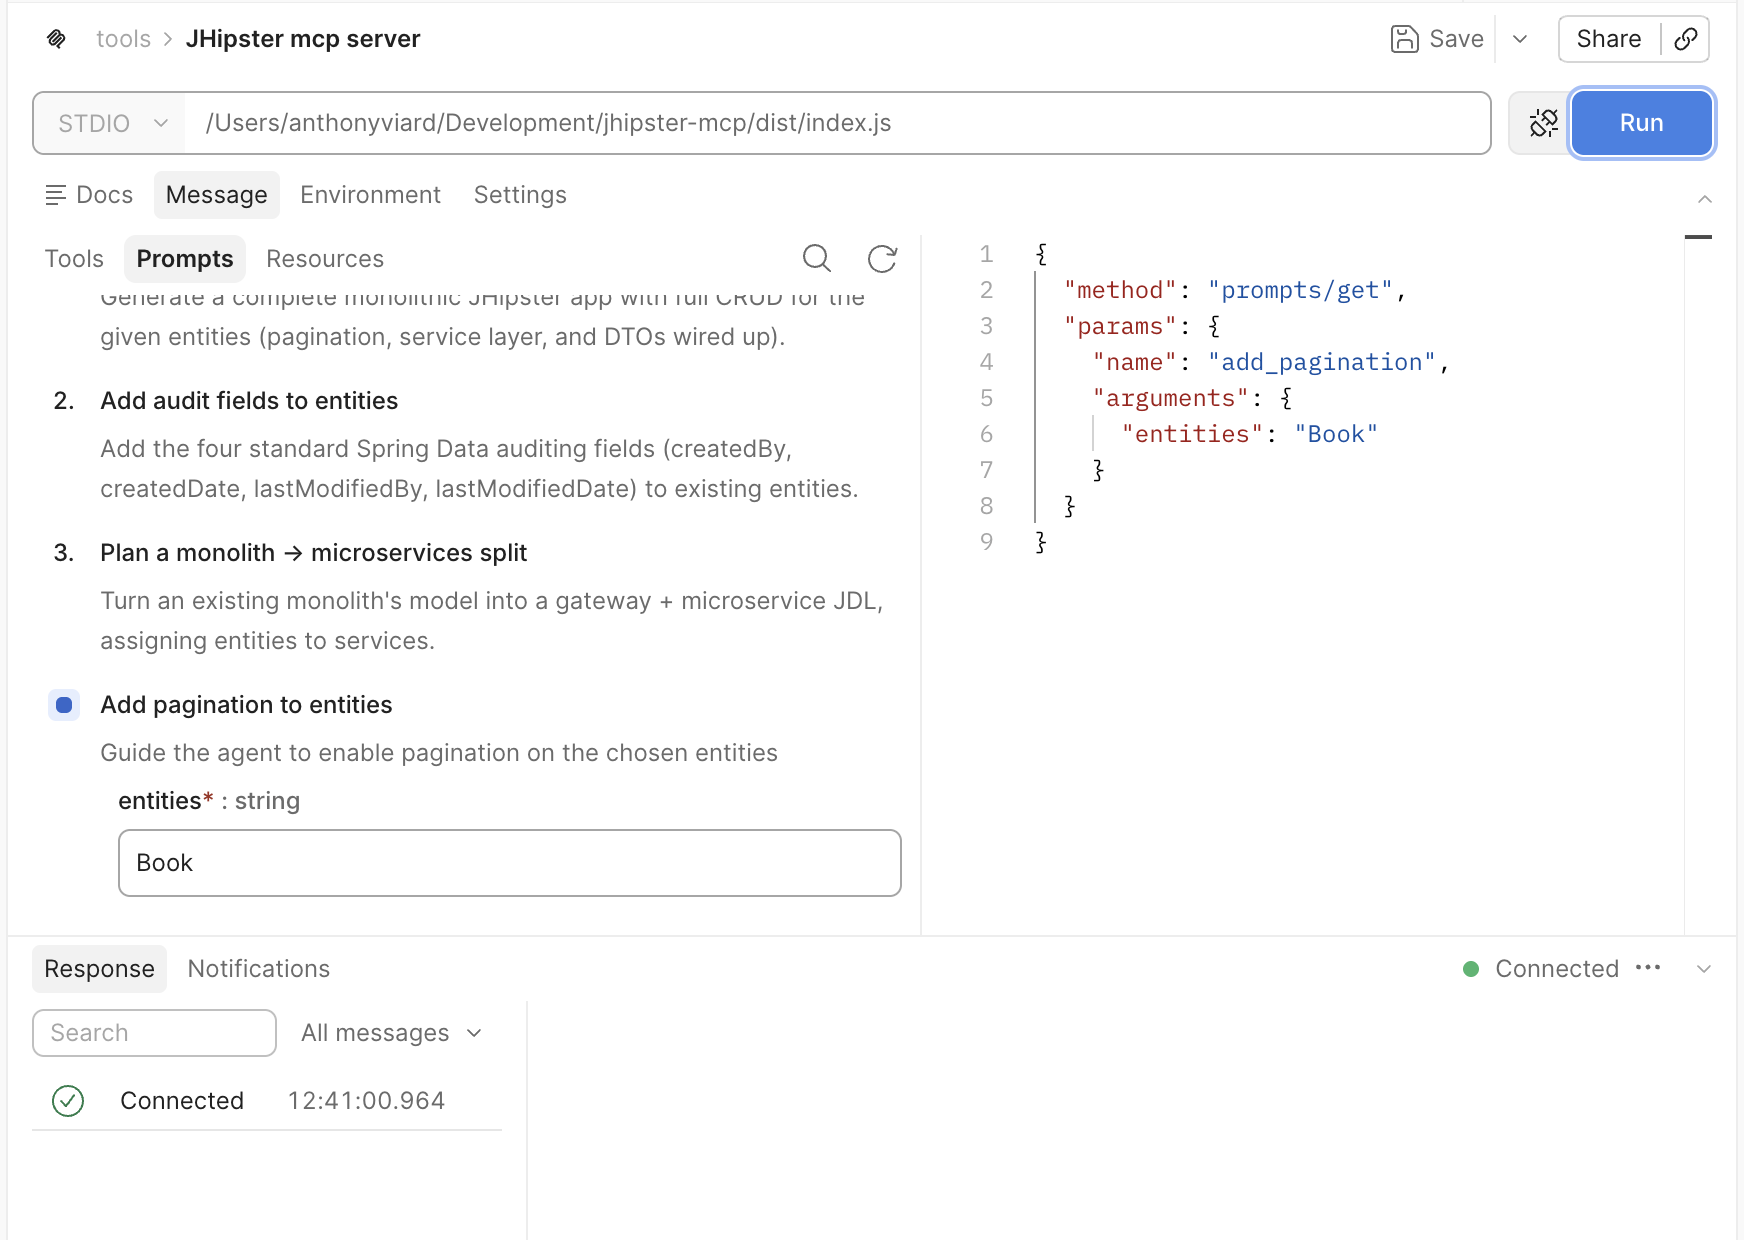
After a rebuild and reconnect, Add pagination to entities (add_pagination) shows up in the Prompts tab next to the built-in prompts.
Gotchas I hit while testing
Absolute paths for STDIO commands
I already flagged this, and it is worth repeating because it cost me a few minutes. A relative path to dist/index.js in the STDIO command fails silently and the capability tabs stay empty. Use the full path.
Rebuild before you reconnect
TypeScript changes do not take effect until npm run build finishes and you reconnect the request. If a new tool or prompt is missing after an edit, check that the build actually ran and that you selected Connect again rather than reusing the old connection.
Read the warnings array, not only the success flag
success: true means the command ran. It does not mean your environment is complete. The tool returns a warnings array that surfaces environmental gaps, like the missing docker compose command in the response above. On a machine without Java, it also warned about the missing runtime and a keystore it could not create. Reading that array in Postman told me the generation plan was fine and the warnings were environmental, not a bug in the tool.
Wrapping up
Using Postman as the MCP client gives you a few concrete things while building or evaluating an MCP server:
- Direct inspection of every tool, prompt, and resource with the real JSON-RPC on screen.
- Isolated testing of a single tool with arguments you control, no agent required.
- A fast edit loop: change the server, rebuild, reconnect, verify, without spending tokens on chat.
For jhipster-mcp specifically, this closed the biggest gap in the project’s own limitation list. The tools are young, so you should test them before trusting them with an autonomous agent, and Postman is a practical place to do that testing. What I like about the approach is that it separates two concerns: is the tool correct, and is the agent using it well. Postman answers the first question so the agent can focus on the second.
Clone the repo, build it, point a Postman MCP request at dist/index.js, and call validate_jdl against your own JDL. Then flip dryRun off and generate a real project. Change a tool description, reconnect, and watch the schema update in the Tools tab.
Contribute and keep going
jhipster-mcp is open source and welcomes contributions. The repository has open issues and pull requests that make good first-contribution entry points, and the docs/ROADMAP.md file lays out where the project is headed if you want to pick up something larger.
If you want to talk through MCP usage, compare notes, or share and fork collections, join the Postman Discord community. And if you are new to driving MCP servers from Postman, the docs on how to create and manage MCP requests are the fastest way to get comfortable.
Resources
- jhipster-mcp on GitHub
- Create an MCP request in Postman / Manage MCP requests in Postman
- JHipster Domain Language (JDL)
- Postman Discord community






What do you think about this topic? Tell us in a comment below.