Storage challenges in the evolution of database architecture
Sync service acts as the brain behind Postman Collections. It is one of Postman’s oldest monoliths that serves as an internal backend service that is backed by Sails and Waterline ORM, and it powers the full spectrum of CRUD operations for collections.
Last year, we wrote about how we are disintegrating sync service and gradually moving functionalities away from it. In this blog post, we’ll discuss a storage issue our team of Postman engineers encountered—and how we solved it.
The problem
Sync service has been running since 2014, and we started facing issues related to physical storage on the database layer.
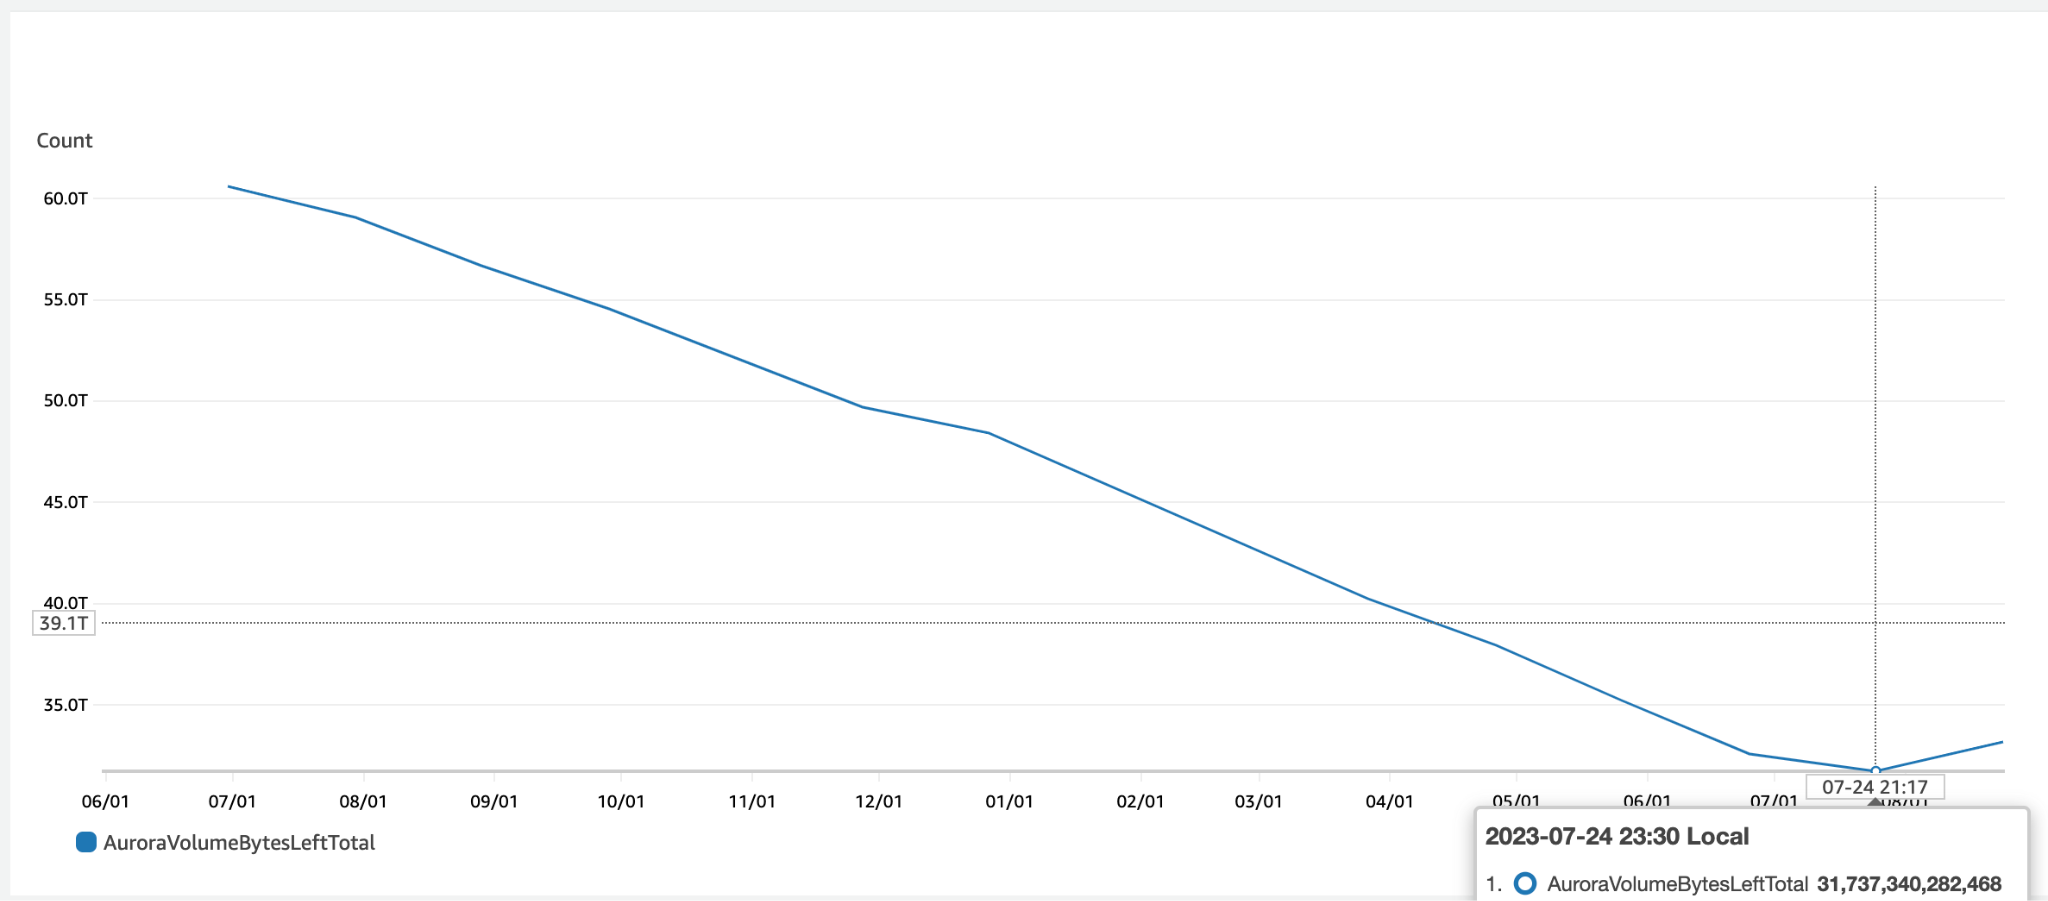
For context, sync service runs on an AWS RDS Aurora cluster that has a single primary writer node and 3-4 readers, all of which are r6g.8xlarge. AWS RDS has a physical storage size limit of 128TiB for each RDS cluster. For simplicity, we will denote all storage numbers in TB where 1TiB = 1.09951TB.
We were hovering around ~95TB, and our rate of ingestion was ~2TB per month. At this rate, we realized we would see ingestion issues in another 6-8 months, which could cause significant downtime for the entire Postman user base.

Experiments
At first, we assumed this problem would be easy to solve. We would just prune the older, not-needed records from the cluster and gradually send them to cold storage (i.e., to S3 or a secondary database cluster), which would never need to be accessed. We would then simply maintain a backup of that cluster.
That initial approach did not work out, as we realized that the space was not released by just deleting the data. On further investigation, we figured out that pruning records while sysvar_innodb_file_per_table is configured to true/ON does not free up space for the whole cluster. Instead, it only frees up fragments that can be re-used by the same table. Other tables cannot claim this space for their insertions, so our problem was not solved.
If we wanted to move forward with the approach of pruning records, then we would have had to rebuild the table in order to free up the space. That strategy would have resulted in massive, uncontrolled downtime, and we would have had no idea how much time it would take. So, this approach was a no-go for us, as we cannot put business-critical databases at risk and just hope that it will work out.
Once we identified this constraint, we realized the solution might not be so straightforward. So, we decided to list the base expectations:
- There can be no downtime, as bringing the database down would make the Postman platform unserviceable.
- The Postman platform can be in
READ ONLYmode for a period of 10-20 minutes. - We must maintain complete control over the database at all points. That means that we should be able to bring the database and platform back in less than five minutes if something goes wrong during the process. We must also ensure that there is no data loss or no data integrity issues.
- We must be sure that dependent services can tolerate the sub-system (sync) going into
READ ONLYmode. - The Postman web platform and desktop app must remain usable with minor degradation.
A three-step approach
To solve the problem, we divided it into three separate buckets.
Step 1: Remove unused tables
Over time, we had accumulated a lot of backup and unused tables. We had to identify those tables and make sure that our applications would not be affected if they no longer existed in the database.
We identified the tables by running queries on information_schema on our RDS MySQL cluster:
SELECT *
FROM information_schema.tables
WHERE table_schema IN ('DB_NAME') // note this is db name.
  AND engine IS NOT NULL
  AND ((update_time < (now() - INTERVAL 30 DAY)) OR update_time IS NULL);
This query helped us reliably figure out which tables had not been written to in the last 30 days. We also did a second round of checks through our NewRelic and VividCortex systems, which we use internally for monitoring and observability purposes.
Once we had the above data, we did a manual audit and finalized a list of tables that were safe to remove. We also made sure that the application layer was not referencing these tables anywhere.
The above process was performed on our beta and staging environments for final confirmation.
Step 2: Adjust our append-only tables strategy
We identified that the majority of space was being consumed by our append-only tables. Append-only tables are tables where records can be created or inserted, but they cannot be updated. Deletion is optional based on use cases.
We identified 2-3 tables that constituted around 35TB of storage space. One of the tables we identified was called Revisions, which we mentioned in our earlier blog post about this service, as well.
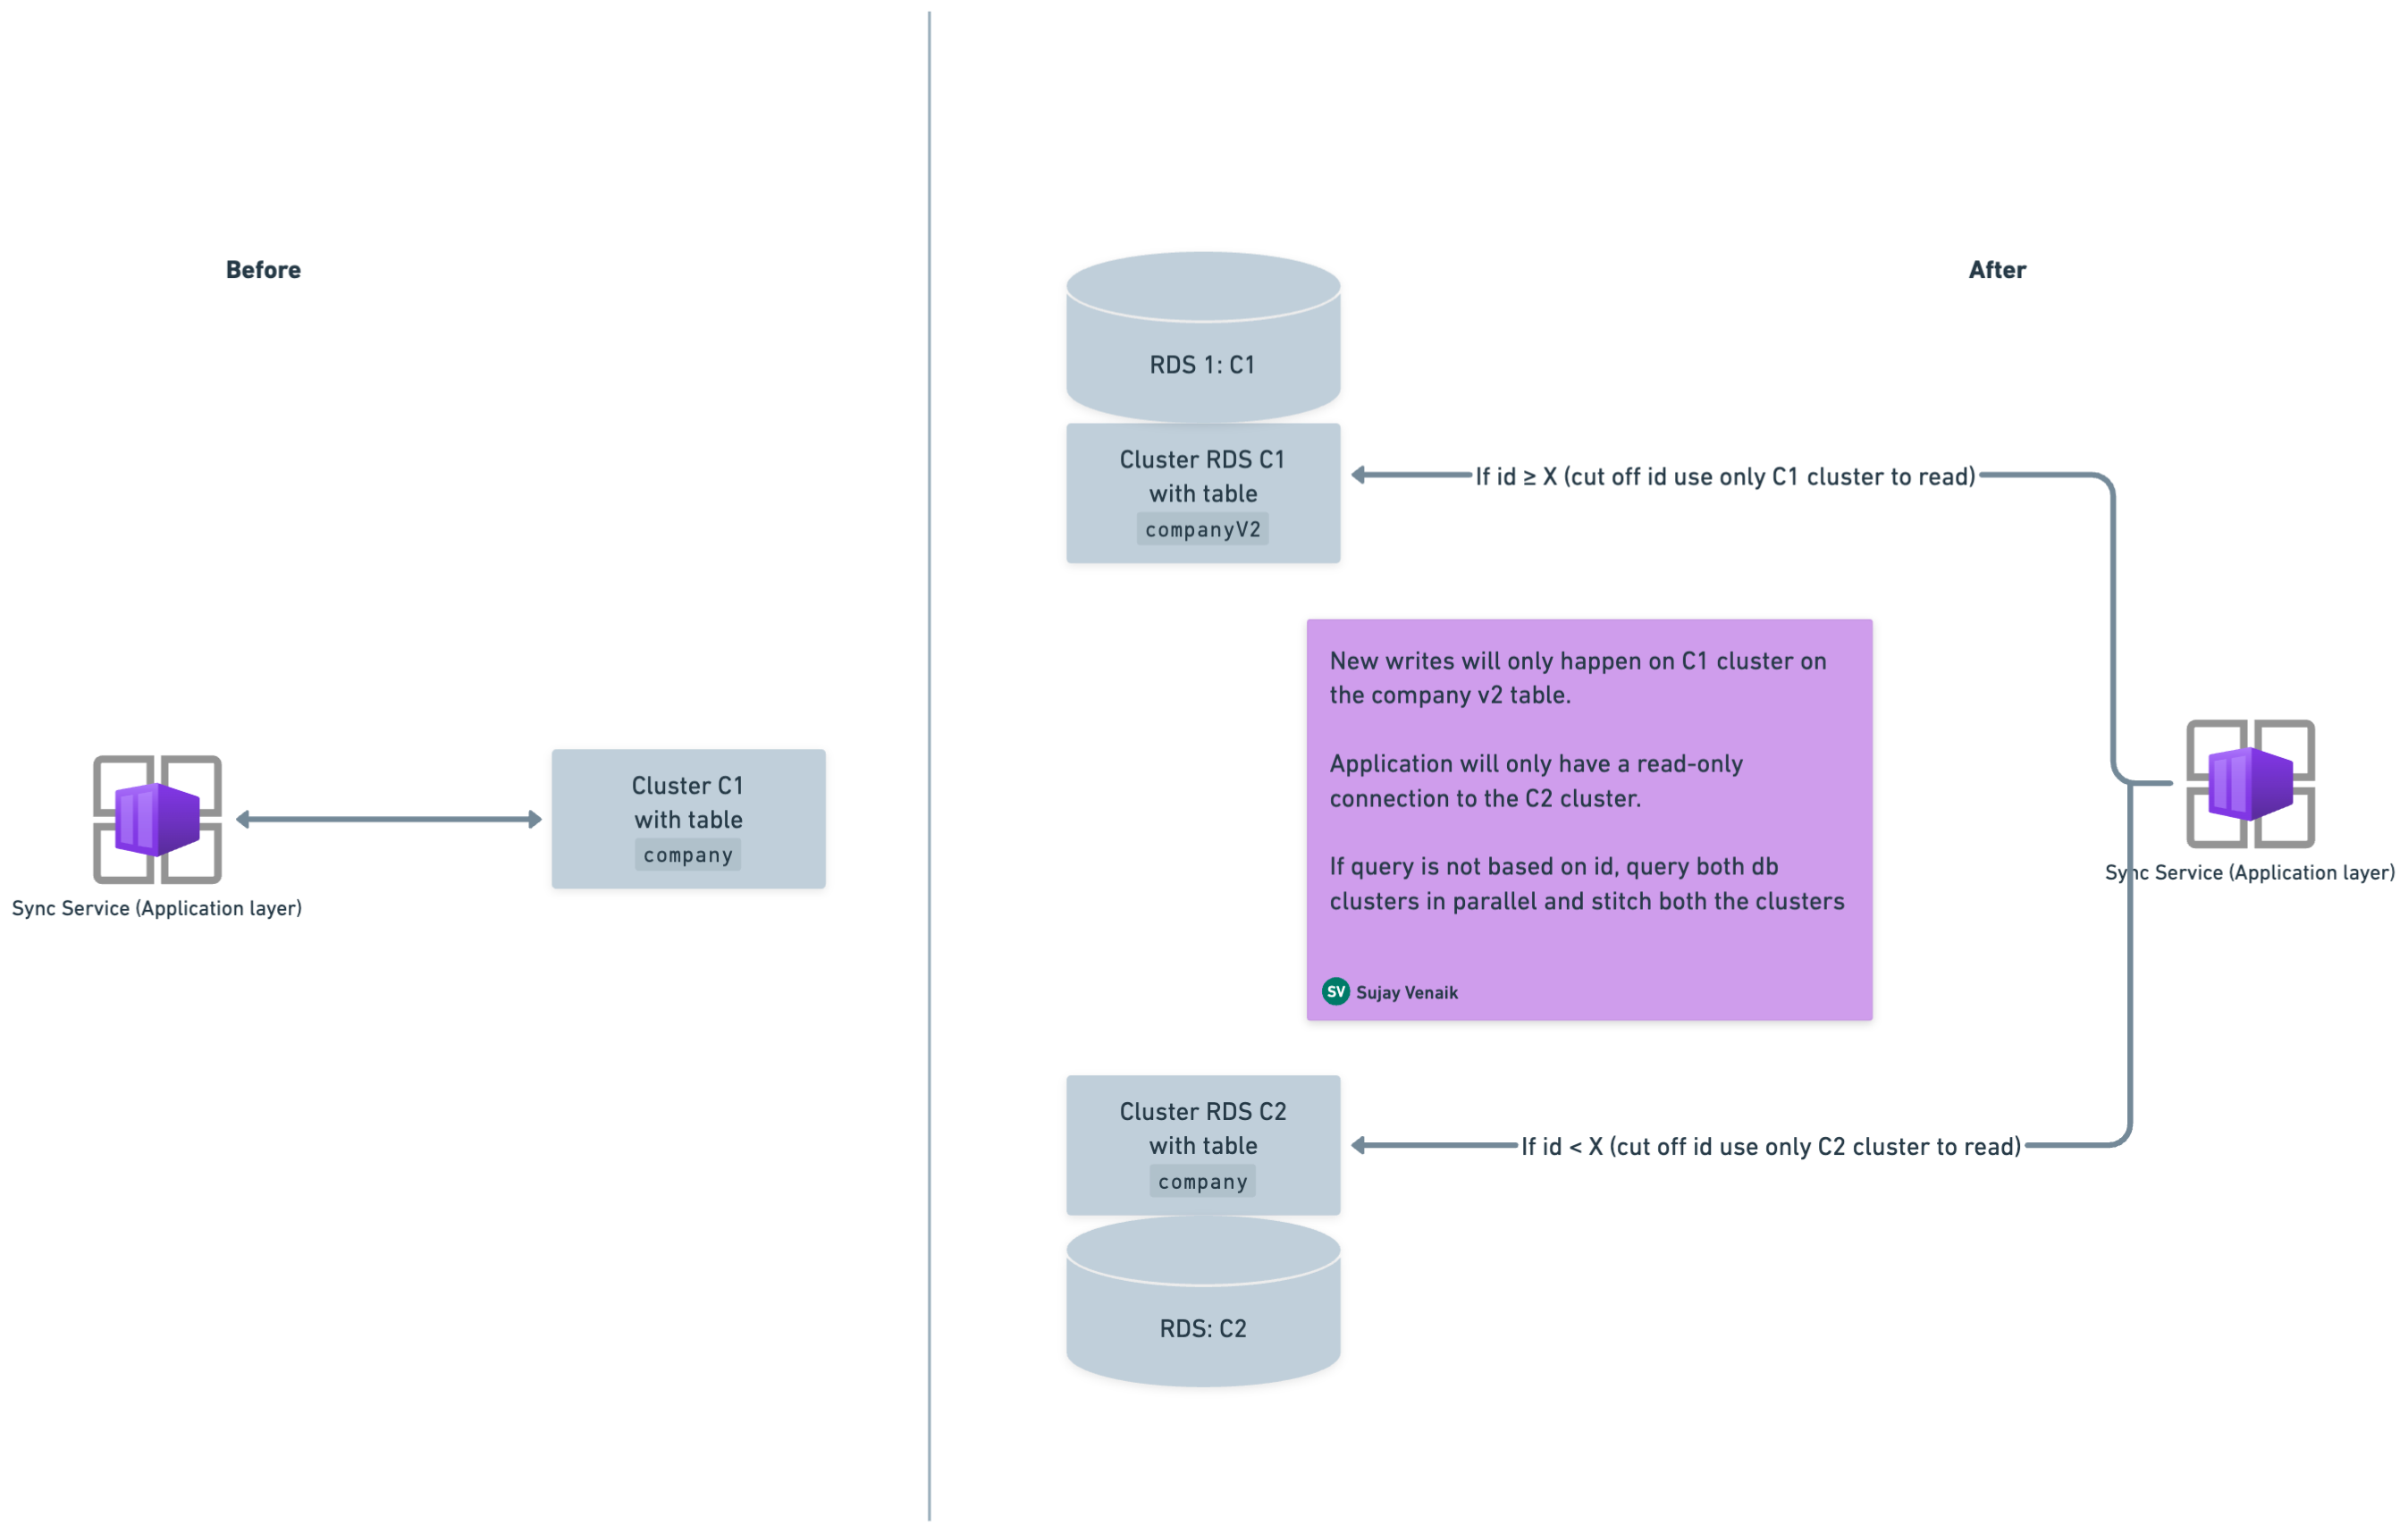
These tables were based on an auto-increment counter and most query patterns were based on auto-increment counters. So, we identified a cut-off ID (let’s say X) and created a strategy where records greater than or equal to X would be read from the C1 cluster, and the older records (i.e., those with an ID that is less than X) would be read from the C2 cluster.
Before we go into these steps, let’s clearly define these terminologies:
- C1: The main RDS cluster that is connected to the application running MySQL v5.7.
- C2: The RDS cluster that is initialized from a snapshot of C1.
These were the steps involved:
- Create a v2 version table in the C1 cluster. For instance, if you have a table called
company, create another table with the same schema calledcompanyv2. - Start dual writes on both the tables (i.e.,
companyandcompanyv2). Dual writes help to avoid any data consistency issues during rolling deployments, as data would be overlapping. - Spin up a new C2 cluster from a snapshot of C1, which will contain both tables
companyandcompanyv2up to time T. - As dual writes were on, find the common cut-off ID between both tables. Above that ID, you will read from
companyv2, and below that ID, you will read fromcompany. - Split the reads as follows, where the cut-off ID is X:
companyV2table will be read from C1 where ID >= X.companytable will be read from C2 where ID < X.
- Both
companyv2:C1andcompany:C2will make up the complete result based on queries. - The application only needs a read-only connection on C2, as data will never be written to C2.
This approach enabled us to free up the complete older data from C1 (i.e., the main cluster), which essentially helped us free up more space overall.

Step 3: Reliably free up space of tables that are greater than 2TB in size
This was the trickiest part for us, as our initial experiments with pruning records had failed.
We tried simply dropping a table that was 15TB large. However, this took a long time, the DML manipulation metrics spiked, and the complete database went into an uncontrollable state and we could do nothing but wait. So, this experiment was also a failure, as we could not proceed with an unbounded approach.
We went back to the drawing board and listed our base expectations. We knew we should not compromise on those expectations, and we needed to figure out a strategy that would obey them. Our primary expectation was that we should not perform any operation on C1 (i.e., the main RDS cluster connected to the application running MySQL v5.7). This expectation ensured that production applications could continue to operate seamlessly without any hiccups that would affect Postman users.
We started digging, and we wanted to use a similar approach to how syncing happens between a master and a replica. The important bit was that we were not syncing the master to a replica, but we wanted to sync two separate RDS clusters and ensure that the maximum lag between both clusters was just replica lag.
But how does replication even work? Binlogs record all changes made to a MySQL database, allowing you to replicate these changes or recover data in case of a disaster (read about syncing between master and replica nodes in MySQL here). We wanted to use a similar approach, but we wanted to use it to enable replication between two separate primary nodes of different RDS clusters.
We started experimenting on our beta and staging clusters, and we were able to achieve cross-cluster RDS replication. But when we reached production, our replication process was lagging a lot and we were not able to catch up due to the high number of WriteIOPs.

We needed to figure out why our replication process was lagging. In order to get to the bottom of the issue, we needed to first understand three components:
- Binary logging on the master node: The master node records all changes to its data in binary log files. These changes are in the form of SQL statements or raw binary data.
- Replication threads: There are two main threads involved in replication on the replica side:
- I/O thread: This thread connects to the master and fetches the binary log events. It writes these events into the replica’s relay log.
- SQL thread: This thread reads the events from the relay log and executes them on the replica’s data.
- Master-replica communication: The master continuously sends binary log events to the replica’s I/O thread. The replica acknowledges receipt of events and informs the master of its replication progress by sending its current relay log coordinates.
Once we understood the above, we queried our SLAVE using SHOW SLAVE STATUS. This was the output:
Waiting for the slave SQL thread to free enough relay log space
We did some more reading and discovered that it was not the I/O that was unable to catch up. Instead, it was a single SQL thread that was choking and was not able to apply all the changes at the desired speed.
We tried vertically scaling the cluster, but that did not help speed it up (which implies extra compute power did not help). One thing that could have helped us was compromising durability in the ACID properties. We would never take that approach, but we were curious to run it by tweaking the innodb_flush_log_at_trx_commit parameter of the database. This parameter controls the rate at which data is flushed to the disk, which reduces the necessary overhead.
We knew we couldn’t achieve a rate of 10-15k+ WriteIOPs with cross-cluster replication, but our experiment gave us signals that we were able to catch up with 3-4k WriteIOPs.
Next, we found a window when the rate of WriteIOPs was at its lowest. This window began at 4:00 UTC on Saturday morning, and the pattern remains the same across the weekend until the peak returns on Monday. So, this was the window we decided to target.
Our strategy:
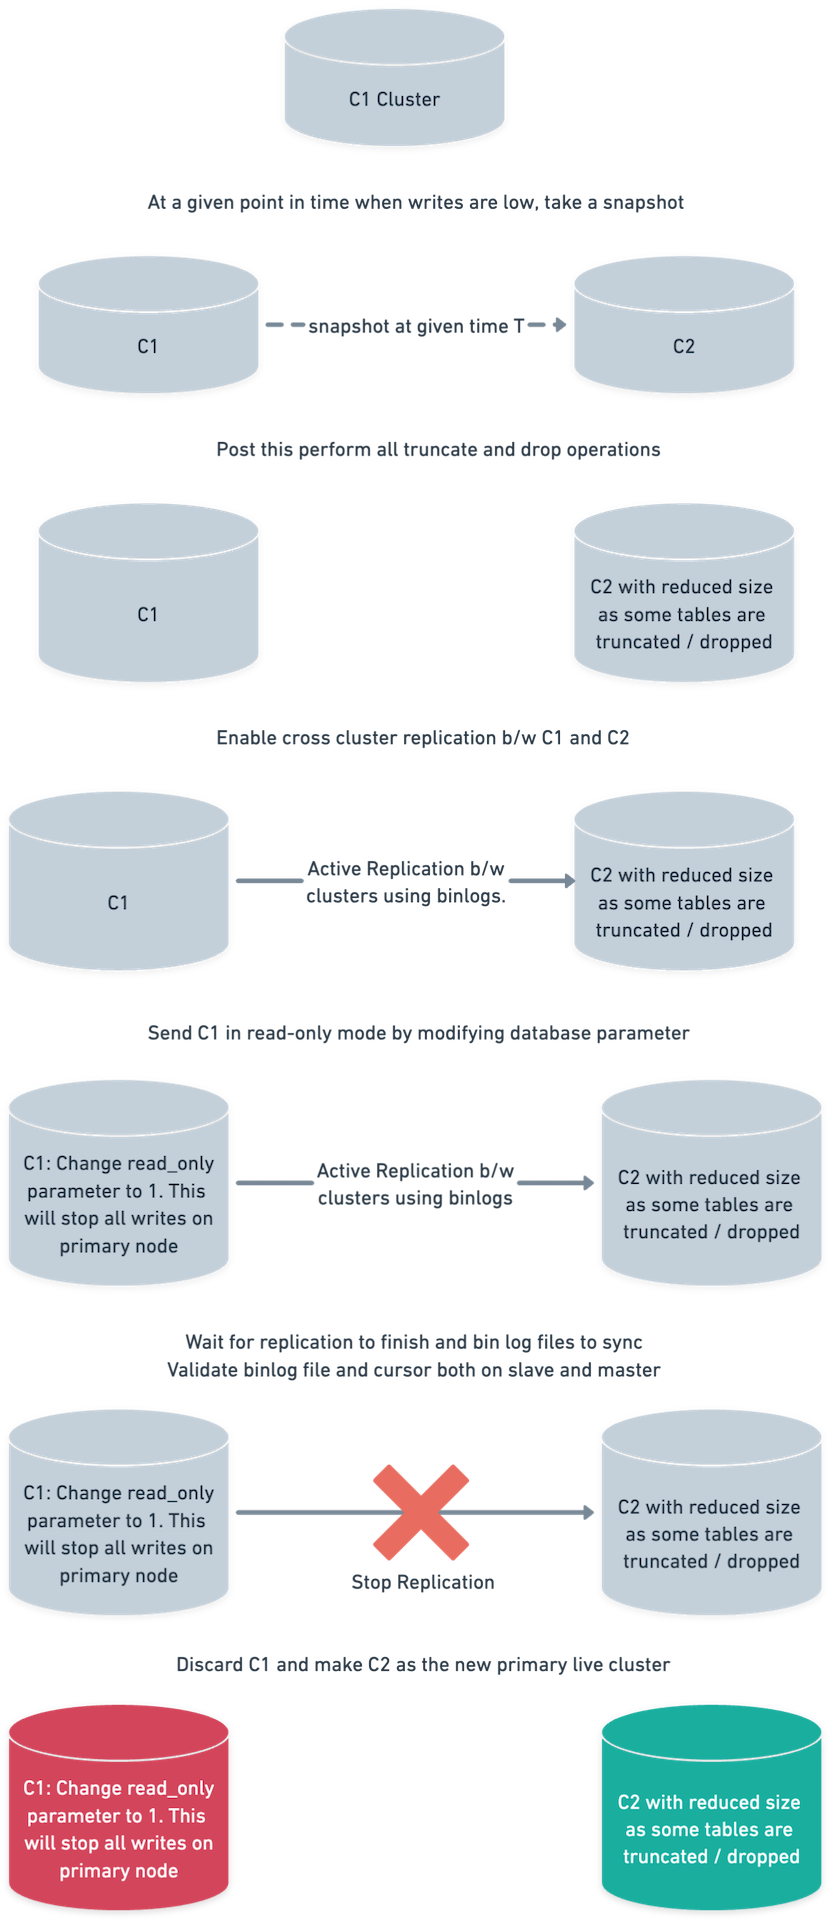
C1 and C2 are two RDS Aurora Clusters.
- Spin up a C2 cluster from the latest snapshot of C1. As discussed above, the snapshot time is 4:00 UTC.
- Perform the required
TRUNCATEoperations on the C2 cluster. We had been talking about dropping tables, but we truncated just to be safe.DROPwould have worked similarly by freeing up the space. Also, note that C2 isn’t connected to any application and should not receive any traffic. - Enable cross-cluster replication between the C1 and C2 clusters. Also, keep recording progress using
SHOW MASTER STATUSon C1 andSHOW SLAVE STATUSon C2. - At this point, C1 is currently connected to multiple consumers who are doing the writes.
- Keep observing metrics on the C2 cluster to ensure that it is stable and replication is not erroring out.
- Wait for replication to completely finish. The
binlogfile and cursor should nearly overlap between the master and slave. Also, manually check 3-4 high ingestion tables. Note that in our case, C1 is master and C2 is slave. - Send the C1 cluster in
read-onlymode. Change theread-onlyproperty to 1, which is a database parameter. To be on the safe side, revoke all write permissions from database users who are accessing the database. - Re-check replication metrics and wait for all
binlogcursors to coincide. Thebinlogcursors to check include:- The relay log file and cursor, which is the SQL thread (on C2).
- The master log file and cursor, which is the I/O thread (on C2).
- The binlog file cursor (on C1).
- Switch traffic to C2 for all applications.

The result

We were able to free up close to 60TB of space from one of the most critical databases by putting the platform in read-only mode for only five minutes. This work was performed during a publicly declared maintenance window, so the clock was ticking and we had to be well prepared.
In the process, we also refined our application layer and reduced our ingestion rate to ~1.4TB per month, which is bound to increase as we serve more than 25 million users.
What helped us?
- We had an extensive checklist, and we divided the complete operation into two days. On the first day, we got the C2 cluster up, performed all truncation operations, and enabled replication. We made the actual database switch on the second day.
- We understood that
TRUNCATEwas a safer option thanDROP. This is because if there was still some code path that was referencing this table, it would not fail and would help us to figure it out. - The C1 cluster was untouched at all points of the process. This meant that if anything went wrong, we could have gone back to that cluster and things would be up and running seamlessly.
- We had done thorough checks to ensure enabling cross-cluster replication would not cause replication errors between the C1 and C2 clusters, as C2 had already undergone a series of
TRUNCATEoperations before enabling replication.
What’s next?
We have already started working on defining the next-generation database stack at Postman. That said, we are actively working on sharding and partitioning our data stores, along with adding support for data isolation as a guarantee from the storage layer itself. This is a big and complex initiative, and we’ll need to think through the implications for the entire platform.
Interested in solving these challenges? Apply at the Postman Careers Page.
Technical review by Dakshraj Sharma and Riya Saini.

I loved how you told the story with the experiments and the results. Scalability maintaining the costs controlled is not something easy
In the step-3, you first took the snapshot and truncated the data and then started the replication. Shouldn’t that be other way round ?
First you enable replication and then truncate the data. This way it for sure ensures there’s no data loss at all.