
How to Build a Jamstack Application in Postman
Jamstack originally referenced a web architecture composed of JAM: JavaScript, APIs, and Markup. Websites could be delivered statically, such as serving HTML from static hosting, while providing dynamic content and an interactive experience through JavaScript and APIs.
“A modern web development architecture based on client-side JavaScript, reusable APIs, and prebuilt Markup”
—Mathias Biilmann, Co-Founder and CEO of Netlify
This type of architecture decouples the frontend from the backend. So instead of running on a backend web server, a Jamstack site typically deploys to a content delivery network (CDN) so web content can be delivered quickly from edge servers that are close to the end users and API endpoints can be hosted on serverless architecture.
Over the last few years, Jamstack has grown beyond just sites to serve static content, and it has led to a colorful debate about what constitutes Jamstack and even opinions about its capitalization. Regardless of your criteria, these static web apps are becoming very popular among hobbyists and global enterprises alike. And their growth is further driven by the booming API economy that can offer any variety of third-party services and turnkey solutions.
For developers who are new to Jamstack, let’s walk through a simplified example in Postman to see how each part of the JAM works.
4 steps to build a Jamstack application in Postman
The modular and decoupled nature of Jamstack architecture means there are a bunch of tools available to help you with each part of the implementation. For example, most Jamstack applications are developed using JavaScript web frameworks like Next.js and Gatsby. And then they’re deployed using services like Vercel and Netlify and hosted on a content delivery network (CDN).
Let’s build and host a simplified Jamstack application in Postman using code samples from the Postman documentation for the visualizer. And then we will take a closer look at the JAM.
1. Create a collection: In Postman, create a new collection named Jamstack. Then add a GET request to the collection named API call with the request URL {{url}}/data.
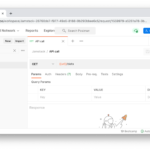
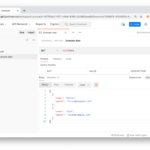
2. Add an example response: Select the overflow menu (…) of the request to add an example response (e.g.) called Example data. This example response is what will be returned from our mock server. Under the Body tab of the example response (on the bottom), select the JSON data type from the dropdown menu. Then add the following placeholder JSON. If you’re copying from the Postman documentation, make sure to remove the commented row beginning with // and preceding , character so that the JSON is valid.
[
    {
        "name": "Alice",
        "email": "[email protected]"
    },
    {
        "name": "Jack",
        "email": "[email protected]"
    }
]
Under the Headers tab of the example response (still on the bottom), add a header with a key Content-type and value application/json. Lastly, add a response status code of 200 OK.
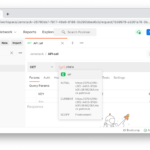
3. Add a mock server: Select the overflow menu (…) of the collection Jamstack to add a new mock server called Mock data to the collection. Once Postman finishes creating a mock server, select the new environment created by Postman called Mock data. Hover on {{url}} in the request URL to see the value being read from the actively-selected environment.
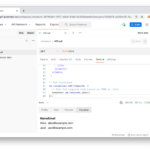
4. Visualize the data: Select the request API call, and send the request to see the example data returning from the mock server. To update the data returned from the mock server, you can edit the example response body (e.g.). We will continue using code samples from the Postman documentation for the visualizer. Under the Tests tab, add the following code for an HTML table represented as a template string.
var template = `
    <table bgcolor="#FFFFFF">
        <tr>
            <th>Name</th>
            <th>Email</th>
        </tr>
        {{#each response}}
            <tr>
                <td>{{name}}</td>
                <td>{{email}}</td>
            </tr>
        {{/each}}
    </table>
`;
And then add the following code to pass the response data to render in the template string and instantiate the visualization.
// Set visualizer
pm.visualizer.set(template, {
    // Pass the response body parsed as JSON as `data`
    response: pm.response.json()
});
Save your changes. And then send the call, and toggle over to the Visualize tab of the response to see our table.
If you want to skip ahead to the finished product, fork this example collection and environment to your own workspace.
In the next section, let’s dissect the JAM in this example, and think about ways to enhance each component.
A closer look at the JAM
JavaScript
The visualization is instantiated using the pm.visualizer.set() function invoked in a test script. The Postman sandbox provides access to other JavaScript functions and libraries that can be used in pre-request or test scripts. Furthermore, external CDN libraries can be imported using a function like pm.sendRequest() among other ways of using external libraries.
APIs
We stored our data using a mock server hosted on Postman cloud, accessing the data with a call to our mock API. This allows us to quickly edit the data and “deploy” our updates by saving our changes to Postman. If we find a third-party service we like, or create our own custom API, we can swap out the API to call. In fact, we can call as many APIs as we wish, synthesize the data and perform calculations to create our own custom services.
Markup
We visualized an HTML template string that can be styled with CSS. You can also use Handlebars templating language to generate HTML. If you don’t feel like writing your own Markup, search for other visualizations created by other members of the Postman community. And once again, external CDN libraries can be imported, this time using script tags within the template string.
Extend this to production-level applications
We did it! It is possible to develop, deploy, and host a complete Jamstack application in Postman. But this was a simplified example. At some point, you may choose to swap out your mock data with a third-party service or your own API hosted on serverless architecture. Or you may decide not to visualize the HTML in Postman, but in a web browser instead. There are a bunch of tools, technologies, and workflows to support your Jamstack applications.
The Jamstack architecture lets you get creative with your implementation. JavaScript and APIs allow you to pull data dynamically with interactivity limited only by your imagination. And the thriving API economy means your options for this dynamic behavior are growing fast.
Watch and learn
If you want to see more examples of Jamstack applications in Postman, browse other examples created by members of the Postman community. And let us know what Jamstack applications you’re building in the comments below.


What do you think about this topic? Tell us in a comment below.