Fetch Web3 data from more than 40 blockchains with Postman and Covalent

This is a guest post written by Leibing Guo, developer advocate at Covalent.
Blockchains are an emerging technological marvel, but the data stored on them is difficult to access. The Ethereum Virtual Machine (EVM) data model, while great for all the properties that help secure blockchains, does not aid visibility and transparency, especially at a high level. This is where Covalent comes in. The unified Covalent API is a data middleware that transforms unstructured JSON-RPC data emitted from blockchains like Ethereum, Polygon, and Avalanche into structured formats, which is exposed through public REST APIs. As a result, developers do not have to worry about lower-level architecture and can easily get answers to questions like:
- Which tokens, balances, and transactions are associated with any wallet address?
- Which transactions have been made against any deployed smart contract, by whom, and for what purpose?
- How much liquidity is available in any given pool of a Decentralized Exchange (DEX) like Uniswap or SushiSwap? What are the current and historical pool trends?
- Who can I trust in crypto?! (Spoiler: no one.)
In the context of app development, a simple API that provides a unified approach for all blockchain data can save a significant amount of time and money. All you have to do is change one parameter to get data from across over 40 blockchains in the same response formats. This is why over 40,000 developers—many of whom are new to Web3—leverage the Covalent API for their projects.
Recently, we’ve discovered a way to make our users love us even more: we’ve built a Covalent API Postman Collection. With our collection, developers can:
- Quickly issue any Covalent API requests from Postman to get Web3 data from more than 40 blockchains.
- Reference properly formatted requests without worrying about parameters and configuration.
- Focus on the API response and other valuable information, such as structured blockchain data.
- Avoid copying and pasting tedious values into long query strings.
In this post, we’ll explore how you can access Web3 data—including balances, transactions, log events, and crypto pricing across more than 40 blockchains—from the comfort of your Postman workspace.
And, if you are new to Web3, first check out this video:
Set up your Covalent API key
To get started, you’ll first need to fork the Covalent API collection into your workspace. Then, you’ll need to supply a Covalent API key to Postman in the Basic Auth field in order to successfully make requests. To do so, follow these steps:
Step 1. Go to https://www.covalenthq.com/platform to register and get your free Covalent API key:

Step 2. Back in Postman, click on the top-level Covalent API (Public) menu item, which will open up a config panel:
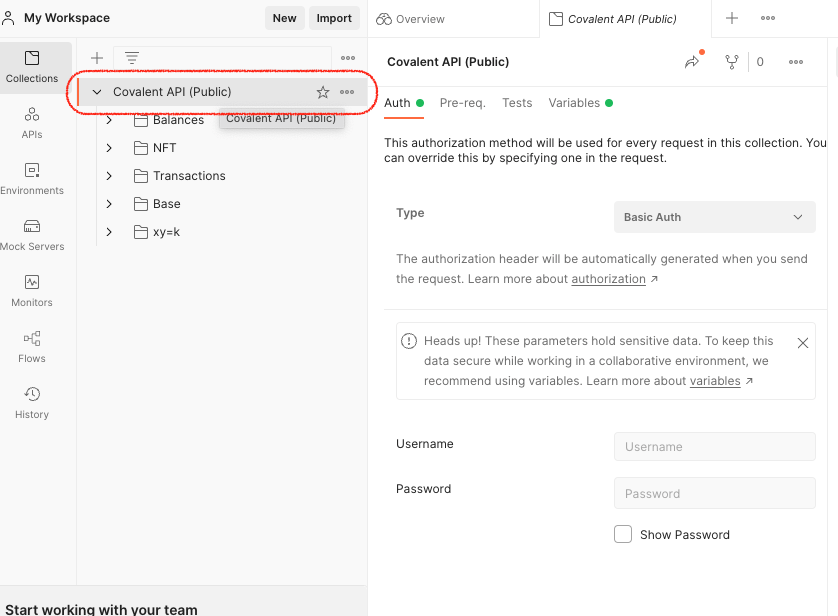
Step 3. Under the Auth tab, select Basic Auth for the Type:

Step 4. Paste your Covalent API key into the Username field:

Step 5. Be sure to click Save:

You are now set up to use all of the Covalent API endpoints.
Make your API requests
This section will walk you through using the Covalent API collection. By default, all requests within the Covalent API collection have pre-configured query values attached to the variables, so you can easily run and test the endpoints.
Fetch all the token balances for a wallet
This is perhaps the most common data request in Web3, as it can be used to build basic or complex wallet applications, collectible galleries and marketplaces, and analytic dashboards. To get this data:
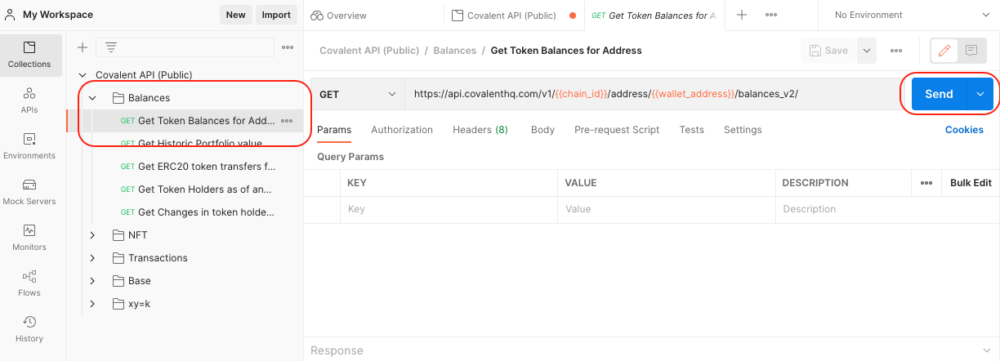
Step 1. Select the Get Token Balances for Address endpoint under the Balances folder on the left, and click Send:
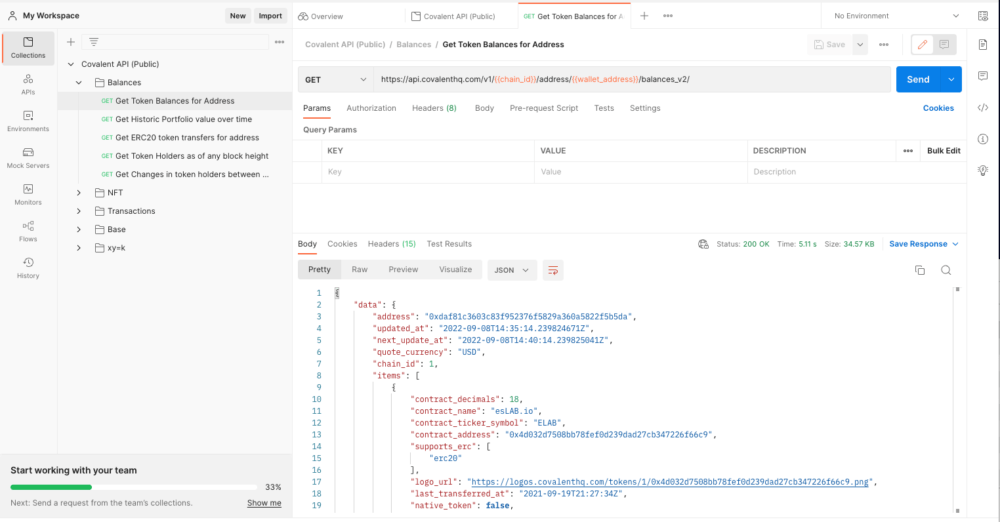
Step 2. View the API response in the bottom panel. It contains all the token holdings for the provided wallet address, including ERC20, ERC721, and ERC1155 token standards:
Change query parameters
You may have noticed that in the GET URL field, there are highlighted variables such as {{chain_id}} and {{wallet_address}}. These are environment variables that you can configure with Postman. We recommend that you change these environment variables instead of hardcoding values, as variables can be reused across all the endpoints in the collection. To change an environment variable, follow these steps:
Step 1. Click on the top-level Covalent API (Public) menu item again to open up the config panel:

Step 2. This time, click on the Variables tab. This will open up a panel containing all the pre-configured variables that are referenced in query strings throughout this collection:
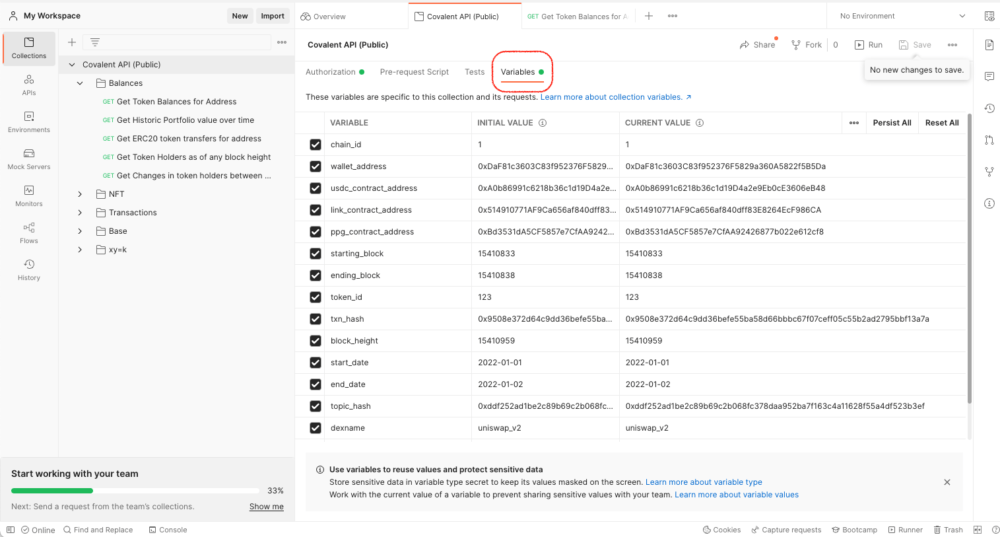
Step 3. Then, to change a variable such as wallet address, paste the new value into the Initial Value and Current Value fields and select Persist All. Then, click Save:
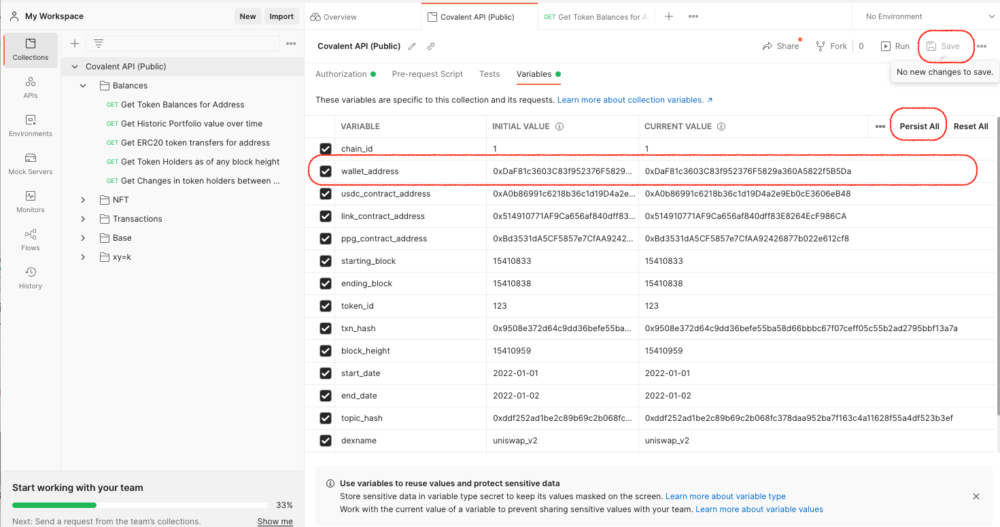
Step 4. Now, when you resend the request, the response will include the balances of the new wallet address you supplied. You can also change the {{chain_id}} variable if you want to check out address balances on other blockchains. To get a list of all supported blockchains, along with their unique chain ID, use the Get all chains endpoint under Base folder.
Have fun exploring Web3!
You now have access to all on-chain data at your fingertips. If you are unfamiliar with any of the key Web3 primitives, check out the following developer resources:
- Web3 Resources: Get an intro to Web3 with our Code Alongs, or build off our ready-to-ship Web3 use case templates for wallets, NFT collections, DEXs, and price trackers.
- Knowledge Base: Check out our developer support resources, including information on every supported blockchain network.
What do you think about this topic? Tell us in a comment below.