4 ways to enhance exploratory testing with Postman
 This is a guest post written by Mark Winteringham, tester, teacher, and author of Testing Web APIs as well as the COO/OpsBoss at Ministry of Testing.
There’s nothing I love more than coming up with innovative ways to use tools to help support my exploratory testing. That’s why when I am testing APIs, I like to use the Postman API Platform to supercharge my exploratory testing. Typically, when thinking about Postman and automation, we think of how it is used to run automated API tests as part of a pipeline. But I want to show you four creative ways in which you can use Postman to help support your testing activities to test faster and learn more.
To do this, we’re going to use my “testing playground” application, restful-booker-platform. Designed to be an API platform with various APIs that make up a bed-and-breakfast booking site, it gives individuals an opportunity to try out different testing activities. You can find a deployed instance of the application at automationintesting.online, and we’ll be using the Restful-Booker-Platform collection to help us get started in Postman.
1. Fuzzing your APIs to learn
A lot of people rely on Postman’s Collection Runner to execute automated API tests, but I like to use it to quickly learn how an API might behave with certain data. To better understand how this is useful, let’s look at an example using the Restful-Booker-Platform collection:
1. Fork the collection
Fork the Restful-Booker-Platform collection and the RestfulBookerPlatform – Deployed environment. We’ll use these to fuzz the booking API.
2. Add variables to the request
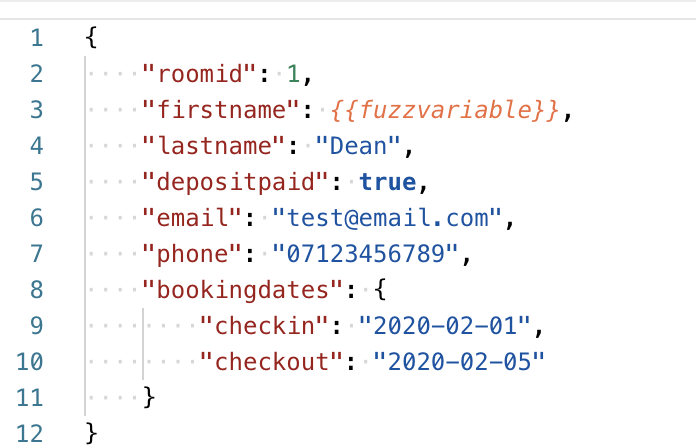
Next, take the /booking/ - CreateBooking request and replace the value of firstname in the body with {{fuzzvariable}} as shown in the screenshot below:
3. Create some sample fuzz data
Our plan is to run the request multiple times, each time trying out a different piece of data. To do this, we need to create a CSV file with a row entitled fuzzvariable and different entries on each line to iterate over, like the one shown below:
fuzzvariable
undefined
"""Mark"""
null
This is just a small example. A normal CSV file would contain many more entries.
Pro tip: Fuzzing lists such as Naughty Strings are a great option when running an activity like this.
4. Trigger a test run
Finally, set up the Collection Runner to use our /booking/ - CreateBooking request and our test data CSV file like so:

Once the run is complete, we analyze the results and see what we can learn. For example, from our basic run we received two 400 Bad Requests:

Based on this observation, we may find that the 400 errors are offering vague error messages so we might want to explore that further. A wider fuzzing run might highlight other errors such as 500s that we want to explore. (Basically, if it doesn’t return an expected status code, it’s an opportunity to explore further.) The fuzzing run has highlighted places to explore, nothing more.
However, doing a large fuzzing run might be tricky to analyze when there are multiple results to look over. We can expand our fuzzing to pass/fail depending on what status code is returned. By adding the following snippet into the Tests tab and running it, any fuzzed request that returns an expected status code is marked as green, and any others are marked as red.
pm.test("Status code is 200", function () {
    pm.expect(pm.response.code).to.be.oneOf([201, 200, 409]);
});
Once the fuzzing is complete, we can quickly review the failing requests in the Collection Runner to determine my next actions.
One final thing to note is that the goal of this exercise isn’t to turn our fuzzing list into an automated test as part of a pipeline—that has the potential to create too much noise. Instead, the goal is to quickly see what we should focus on and what to ignore when exploratory testing.
2. Using Postman Flows to create data
When I’m testing, I want to be in a headspace where the test ideas are flowing. So it can be frustrating when I find my flow disrupted when I have to stop and create test data manually. That’s why I like to use Postman to help me build test data rapidly, so my testing flow doesn’t get interrupted.
In the past, I have created collections that I can then run to rapidly create data, however, in a recent livestream with Postman Senior Developer Advocate Arlemi Turpault, I discovered how Postman Flows can be used to create data in a rapid and efficient manner. For example, let’s say we want to create a series of rooms for RBP:
1. Create a new flow
Fork the Restful-Booker-Platform collection and the RestfulBookerPlatform – Deployed environment. Then create a new flow in your workspace and give it a name.
2. Add a login request to create a valid token
To create a room, we need to be logged in, so our first request to add to our flow is the /auth/login - CreateToken request, as shown in the screenshot below:
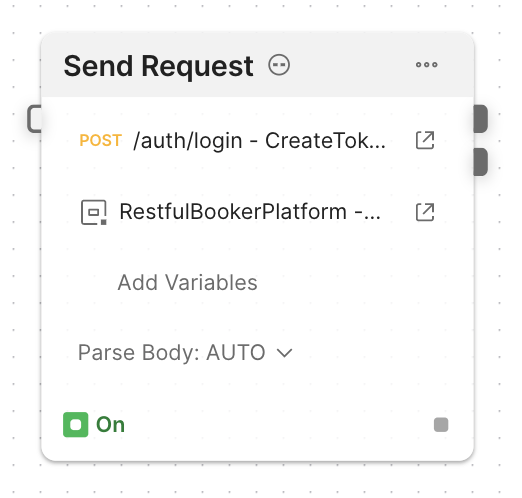
Notice how we’ve also added the RestfulBookerPlatform - Deployed instance as an environment to the flow.
3. Add a POST room request
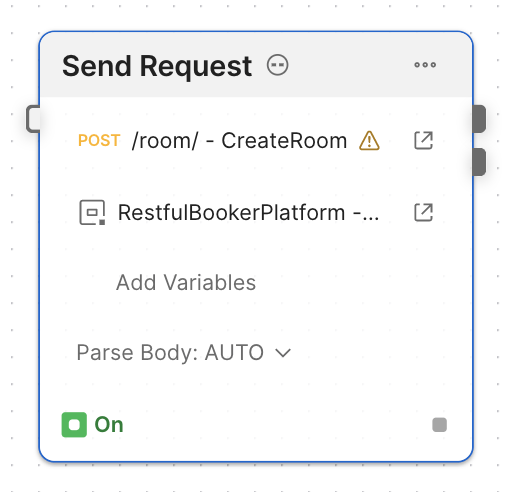
Next, we add our /room/ - CreateRoom request to the flow as shown below:
 4. Add a loop to the flow
Finally, as we want to loop our requests, we add a Loop N Times and then finally a Number element to complete the flow, captured in the following screenshot:

With the flow set up, we now have the means to quickly create as many rooms as we might need for our testing purposes. All that is required when we need new data is to load up the flow, hit Start, and within a few seconds, we have everything we need to continue testing.
You can find an example in the Restful-Booker-Platform collection of the Create Rooms Flow.
3. Use monitors to learn more
There are times, however, when I do want my flow to be disrupted. Especially when a potential issue has appeared. Due to inattentional blindness, it can be tricky sometimes to spot issues whilst carrying out exploratory testing. That’s why creating feedback loops that interrupt you when an error occurs can be invaluable. There are many ways to create feedback loops. Let’s look at one way which takes advantage of Postman’s Monitor feature:
1. Set up our request
Create a new collection and add a request that sends a GET request: https://automationintesting.online/booking/actuator/logfile
In the T section, add the following code:
pm.test("Check to see if an error appears in the log file", () => {
    // Split each line of the log file into an array
    let entries = pm.response.text().split(/\r?\n|\r|\n/g);

    for(let i = 1; i <= 50; i++){
        pm.expect(entries[entries.length - i]).to.not.contain("ERROR");
    }
});
The idea is that each time Postman’s monitoring kicks in, the Tests tab will read the last 50 lines of the file and check to see if the term ERROR appears in the log file.
2. Set up a monitor
Create a new monitor in Postman and configure it similarly to my setup shown below:
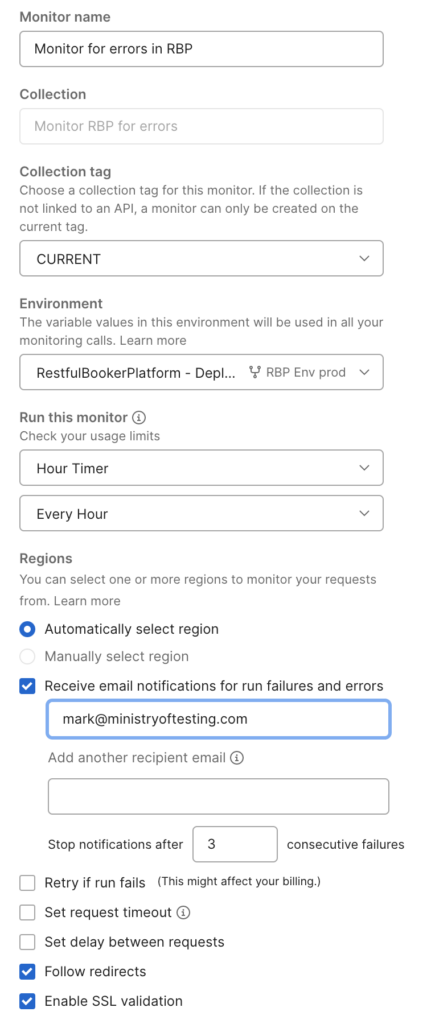
Note: This technique works better if you can set your monitor to trigger on a minute basis. Check out our Postman plans for this helpful feature.
With our monitor configured, we can begin our testing. If we trigger an error, the monitor will alert us that something of interest appeared in the log file, allowing us to reflect on what testing we’ve just completed and how it might be reproduced.
4. Using mocks for test ideas
For our final example, we’re going to look at how we can use Postman’s mocking service. Mocks are typically used as means to fill in as temporary APIs until development is complete or as a means to manage API dependencies and make automation more reliable. But we can also use mocks to experiment with different states an API might be in so that we can observe how consumers of said API behave. Let’s look at an example in which the Room API of restful-booker-platform depends upon the Auth API to validate if a request can go ahead.
1. Create a Message API request
Fork the Restful-Booker-Platform collection and the RestfulBookerPlatform – Local environment and locate the /auth/validate/ - ValidateToken request in the collection.
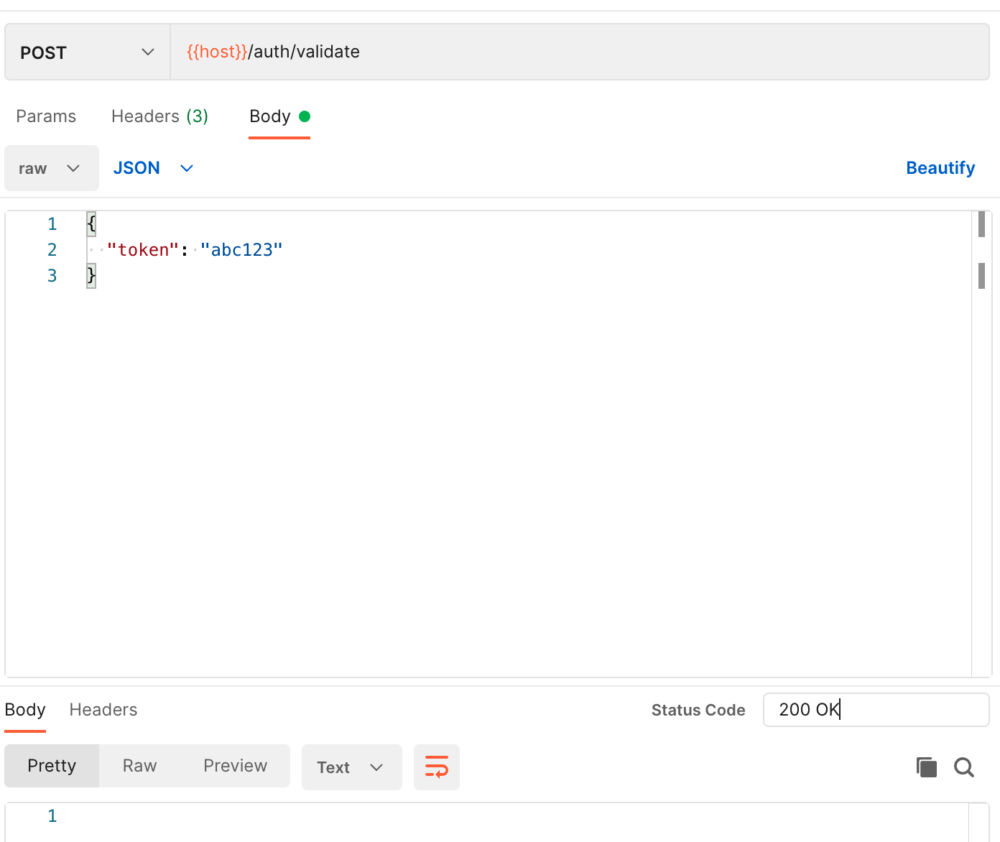
2. Add an example to the Message request
Postman Mocks are based on examples added to a request, so we need to add an example of a message being sent to the Auth API like the one captured below:
 3. Create a mock
Next, we create the mock using the collection that contains our /auth/validate/ - ValidateToken request and its example:
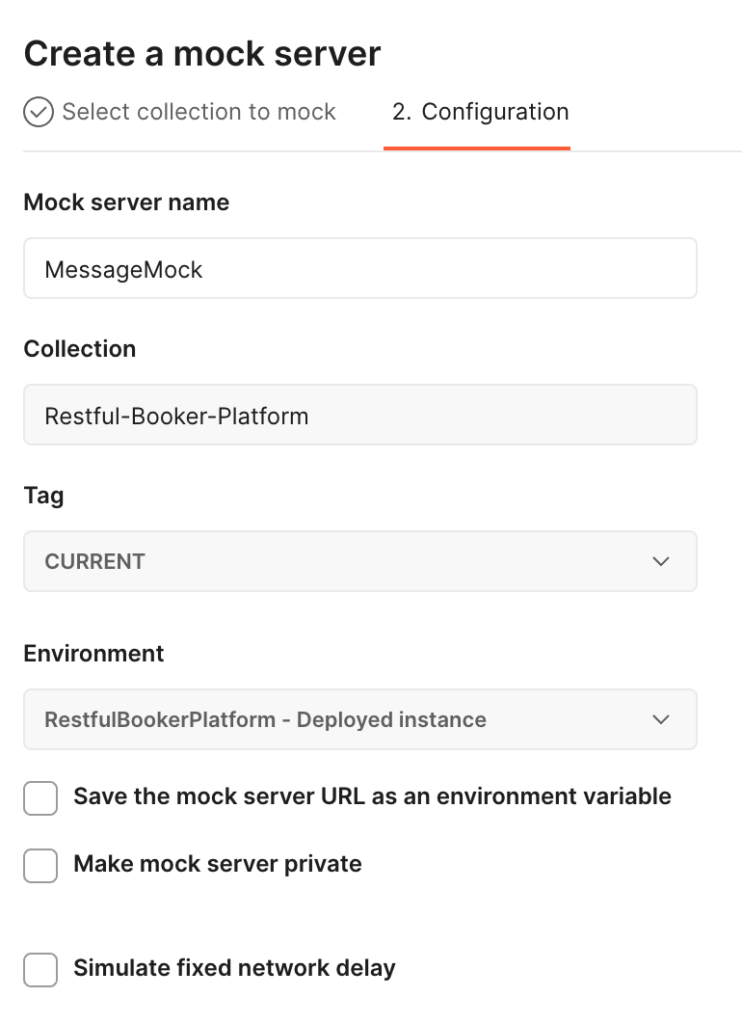
With our mock created, we are given a mock URL that we will configure the Booking API to point to.
4. Point the Booking API to our mock
To do this, we will need to download the restful-booker-platform source code. Once downloaded, open up the AuthRequests class that can be found in the room/src/main/java/com/automationintesting/requests folder.
Update the value in this line of code to point to the mock we’ve created:
host = "http://localhost:3006";
For example:
host = "https://example.mock.pstmn.io"
With our host configured, we can rebuild the booking API with mvn clean install and start up the API with java -jar target/restful-booker-platform-room-1.5.SNAPSHOT-exec.jar (or similar if the version has changed).
5. Begin our testing
With our mock set up and our API under test, we can begin our testing. Load up the /room/ - CreateRoom request in Postman and click Send. Everything works great, we have a room!
What happens when we update the example in /auth/validate/ - ValidateToken so that it returns a 500 status code? Like in this screenshot:
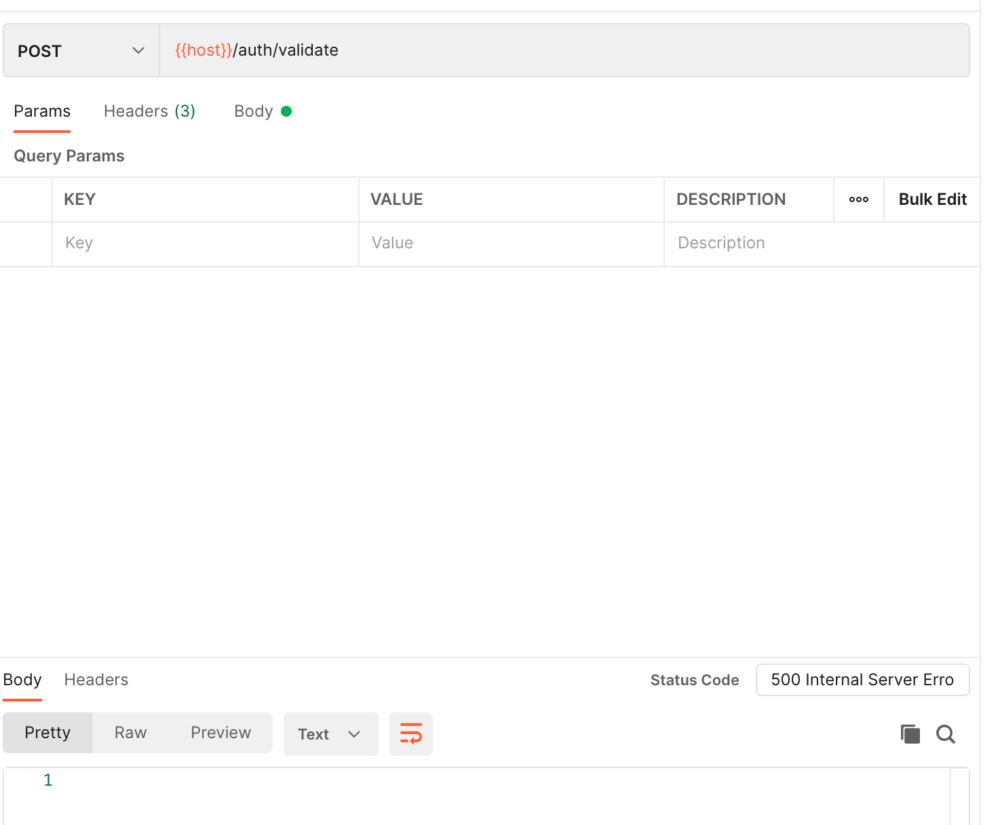
Now when we attempt to create a room, we get a 500 server error. Not great! Hopefully, what this demonstrates is how our test ideas manifest in how we modify the room API’s dependent APIs. By changing response details, we can observe how the room API behaves when other APIs misbehave.
Conclusion
So, those are four examples of ways in which you can use Postman to enhance exploratory testing. I hope this blog post has given you not only a series of neat tricks to use in your testing with Postman, but that it also demonstrated how automation can be just as powerful when you use it in conjunction with other testing activities.
Technical review by Arlemi Turpault.

What do you think about this topic? Tell us in a comment below.