What is OpenID Connect?
OpenID Connect (OIDC) is an authentication protocol that adds an identity layer on top of OAuth 2.0. It helps securely authenticate users and enables applications to obtain user information from identity providers. OIDC is often used for Single Sign-On (SSO) scenarios, where a user only has to log in once in order to access multiple applications.
In this blog post, we’ll begin by explaining how OpenID Connect addresses a limitation of OAuth 2.0. We’ll then explore how OpenID Connect works and review its benefits. We’ll also discuss some challenges of working with OpenID Connect and walk through some best practices that can help ensure a successful implementation.
Related: What is OAuth 2.0?
What is the history of OpenID Connect?
Before we dive into the history of OpenID Connect, it’s important to distinguish between authentication and authorization. Both workflows are fundamental to any secure software system, but they are often confused with one another.
Authentication is the process of verifying the identity of a user or application that is trying to access a particular resource. The purpose of authentication is to verify that the user is who they claim to be. After authentication is done, authorization helps a system determine which actions the authenticated user is allowed to perform, or which specific resources the user has access to. Authentication and authorization are therefore interdependent workflows.
OAuth 2.0 is an authorization framework that defines a token-based authorization process for how third-party applications can get consented access to users’ data. OAuth 2.0 is a very powerful protocol for user authorization, but it does not define a clear and secure way to handle user authentication.
The OpenID protocol was introduced in 2005 as an open standard for single sign-on (SSO) and decentralized user authentication. It allowed users to log in to multiple websites using a single digital identity. An example of this type of flow is logging in to multiple websites using a Google account. OpenID defines how user authentication can be simplified, but it does not specify how user information should be securely exchanged between the client application and the identity provider.
The OpenID Foundation realized the need to integrate authentication into OAuth 2.0, and in 2014, they released the OpenID Connect protocol. OIDC builds on top of OAuth 2.0 and adds authentication and user information features. This solves the two problems highlighted earlier.
How does OpenID Connect work?
OpenID Connect introduces several key terminologies and concepts that are essential to understand. These new terminologies include:
- Identity Provider (IdP) or OpenID Provider (OP): An Identity Provider is a service that authenticates users and provides identity information to relying parties (RPs) or client applications. The IdP is responsible for verifying the user’s identity.
- Relying Party (RP): A Relying Party, also known as a client application, is a web or mobile application that relies on the Identity Provider for user authentication and identity information. The RP requests authentication and user information from the IdP.
- End-User: The End-User is the person who interacts with the Relying Party and the Identity Provider. In OIDC, the End-User is the entity whose identity is being authenticated and whose information is being accessed.
- Identity Token (ID Token): The ID Token is a JSON Web Token (JWT) issued by the Identity Provider after a successful user authentication. It contains information about the authenticated user, such as their user ID and name. The ID Token is the primary extension that OIDC makes to OAuth 2.0 to make authentication possible.
- Claims: Claims are user attributes or data points related to the authenticated End-User.
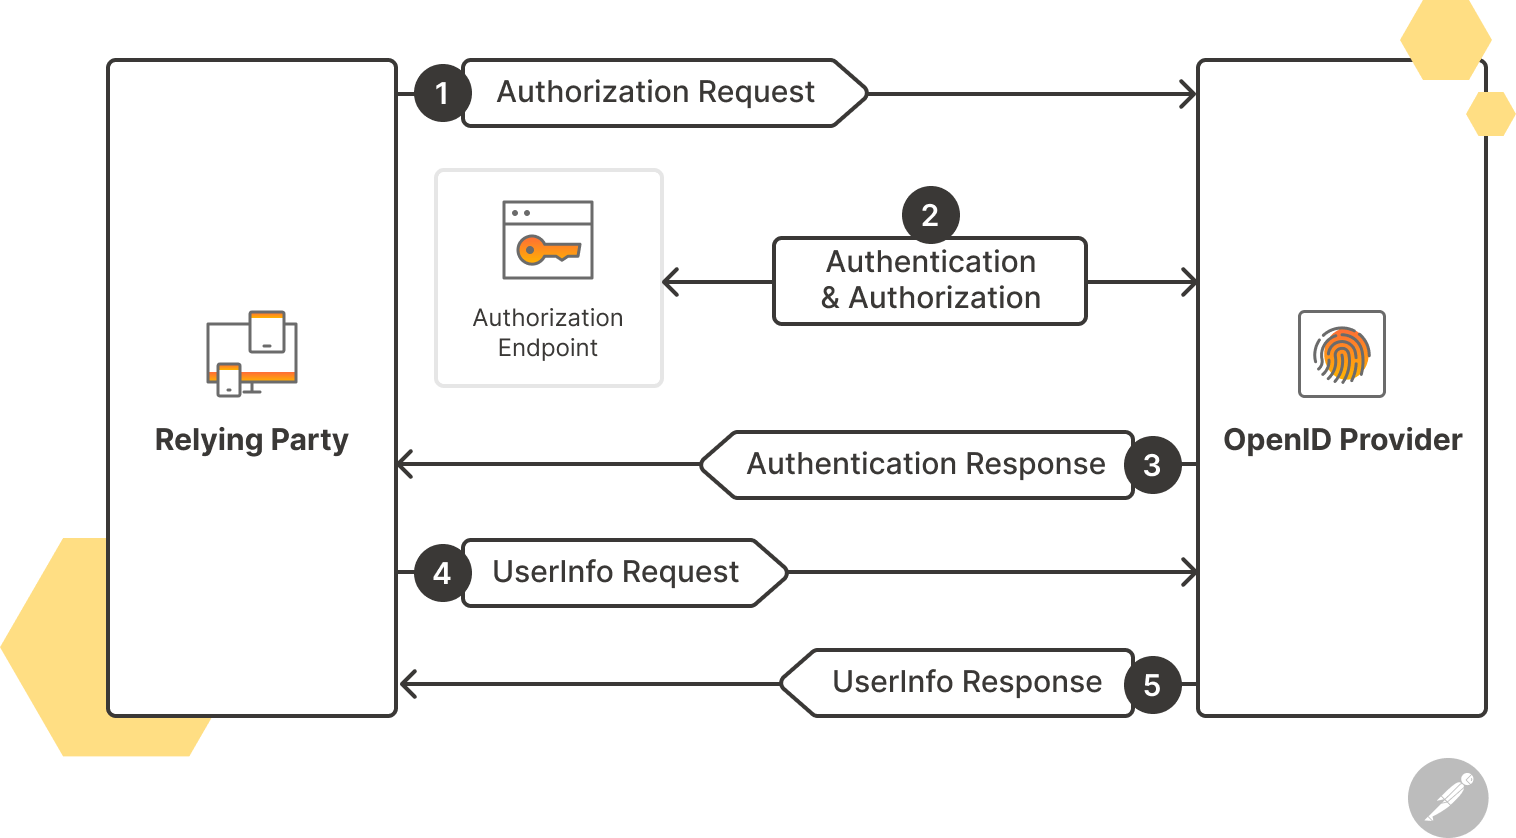
OIDC may appear straightforward, but there’s a lot going on behind the scenes. It isn’t just about authenticating users; it’s also about doing so securely. Let’s take a step-by-step look at the OIDC workflow:
Step 1: Client registration
Before any OIDC interaction takes place, the Relying Party (RP) must be registered with the Identity Provider (IdP). During registration, the IdP provides the client with a client_id (a public identifier) and, optionally, a client_secret (a private key). The latter is often used for confidential clients (like web applications) to authenticate themselves to the IdP.
Step 2: Authentication request
Authentication begins when the End-User decides to log in using a third-party provider, such as Google or Facebook. OIDC makes an authentication request by relying on the authorization server as specified in the OAuth 2.0 specification, but it uses extension parameters and scopes defined by OIDC to request that the End-User be authenticated by the resource server. In this case, the resource server is an OIDC provider to the client. Some of these extension parameters are:
- Scopes: The client specifies scopes, which determine the type of information (“claims” in OIDC terms) the client wants.
openidis a mandatory scope for OIDC, but others—such asprofile,email, oraddress—can also be requested. - Response Type: This parameter indicates what kind of authorization the client is seeking. For OIDC, the value is typically
code, which implies the client wants an authorization code that can later be exchanged for an ID Token and possibly an access token. - State: This parameter holds a random value generated by the client to prevent cross-site request forgery (CSRF) attacks. The IdP will send this value back in the response, allowing the client to ensure the validity of the response.
- Nonce: This random string is another security measure that will be included in the subsequent ID Token. The client can then verify the token’s authenticity and confirm that it wasn’t reused.
Step 3: User authentication and consent
User authentication happens via the Identity Provider. The End-User is redirected to the IdP, which then authenticates the user, checks the requested scopes, and presents a consent screen if these scopes are not already granted to the client by the user.
Step 4: Authorization response
Upon successful authentication, the IdP redirects the user back to the client with an authorization code (if the response type was code in the authentication request) and a state. The state should match the one sent in the original request to ensure the integrity of the flow.
Step 5: Token request and response
The client is able to use the client_id and client_secret (optional) to authenticate itself with the IdP and exchange the obtained authorization code for tokens.
The IdP validates the provided authorization code and returns an ID Token, as well as an access/refresh token pair.
Step 6: UserInfo endpoint
The client uses the UserInfo endpoint when it needs more information (i.e., claims) about the End-User. The client sends the access token as a bearer token to the resource server, and the requested information within the granted scopes is returned to the client.

What are some benefits of working with OpenID Connect?
OpenID Connect makes it possible to authenticate users using OAuth 2.0—while also providing a mechanism for outsourcing this authentication process to a third-party provider (i.e., an Identity Provider). Let’s take a look at some of the benefits of working with OIDC.
- Single Sign-On (SSO): This is the “one key fits all doors” idea. With OIDC, you can use one set of credentials to log in to many applications, which simplifies the user experience—especially when integrating with popular IdPs.
- Security: Users don’t have to share their credentials directly with every application, which reduces the risk of password-related breaches.
- Reduced friction: OIDC eases the onboarding process for developers and businesses. Users are more likely to sign up for a service if they can use existing login credentials, which significantly reduces the time to value.
- Up-to-date information: The user’s information (like their email or profile picture) is sourced from the trusted platform, so it remains current. For instance, If the user updates your profile picture on Google, all platforms using OIDC through Google will have the updated profile picture.
What are some best practices for working with OpenID Connect?
OIDC has many moving parts, which can make it challenging to implement. It is therefore imperative to follow the recommended industry best practices, such as:
- Use authorization code flow or PKCE: It is recommended to always use the authorization code flow for authentication requests, especially when working with web applications. When working with native and single page applications (SPAs), always use the authorization code flow with PKCE (Proof of Key Code Exchange) to prevent authorization code hijacking attacks.
- Validate ID Tokens: ID Tokens should always be validated before usage. This involves ensuring the signature is valid and that the audience claim matches your application. You should also check that the token has not expired—and refresh it if it has.
- Allow users to revoke client authentication: Identity Providers should provide an interface that allows End-Users to revoke client authorizations or access to their data.
- Implement logging and monitoring: Always log and monitor authentication and authorization requests in order to surface suspicious activity (such as a change in device or location during an authentication process or multiple failed authentication attempts). Monitoring also makes it easier to analyze and understand End-User behavior.
- Request limited scopes: Clients are encouraged to follow the principle of least privilege, which involves requesting as few scopes as possible and ensuring that all requested scopes are needed.
What are some challenges of implementing OpenID Connect?
OIDC is a complex authentication protocol, and developers who work with it should be aware of the following challenges:
- Dependency: Relying on third-party identity providers means that if they face any issues, it could affect the login process for users on your platform.
- Privacy concerns: Not everyone is comfortable with one platform having access to their login information across multiple applications, leading to potential trust issues. It’s therefore important to integrate with an IdP that your users already trust.
- Implementation complexities: While OIDC streamlines the user experience, it can be difficult for developers to integrate, especially without proper understanding or resources. For instance, it requires knowledge of OAuth 2.0 and, occasionally, PKCE.

Enlightening