Building and testing APIs with LoopBack and Postman
LoopBack is a popular open source tool for rapidly generating NodeJS REST APIs. I walked through this tutorial to create a Jeopardy API using LoopBack, MongoDB, and IBM Cloud. Whether you like quizzing yourself with Jeopardy questions, or you’re terrible at trivia, like me, here’s how you can test this Jeopardy API using Postman.
With LoopBack, you can export your API definition and generate a Swagger file directly from your terminal. This makes it easy to import the file into Postman to begin writing our API tests.
Picking up where the LoopBack tutorial leaves off . . .

Automatically convert file format to Postman collection
This is an easy way to use Postman along with your existing tools and workflows. In this example, we’ll start with downloading a Swagger file containing the API definition, but you could start with another format as well.
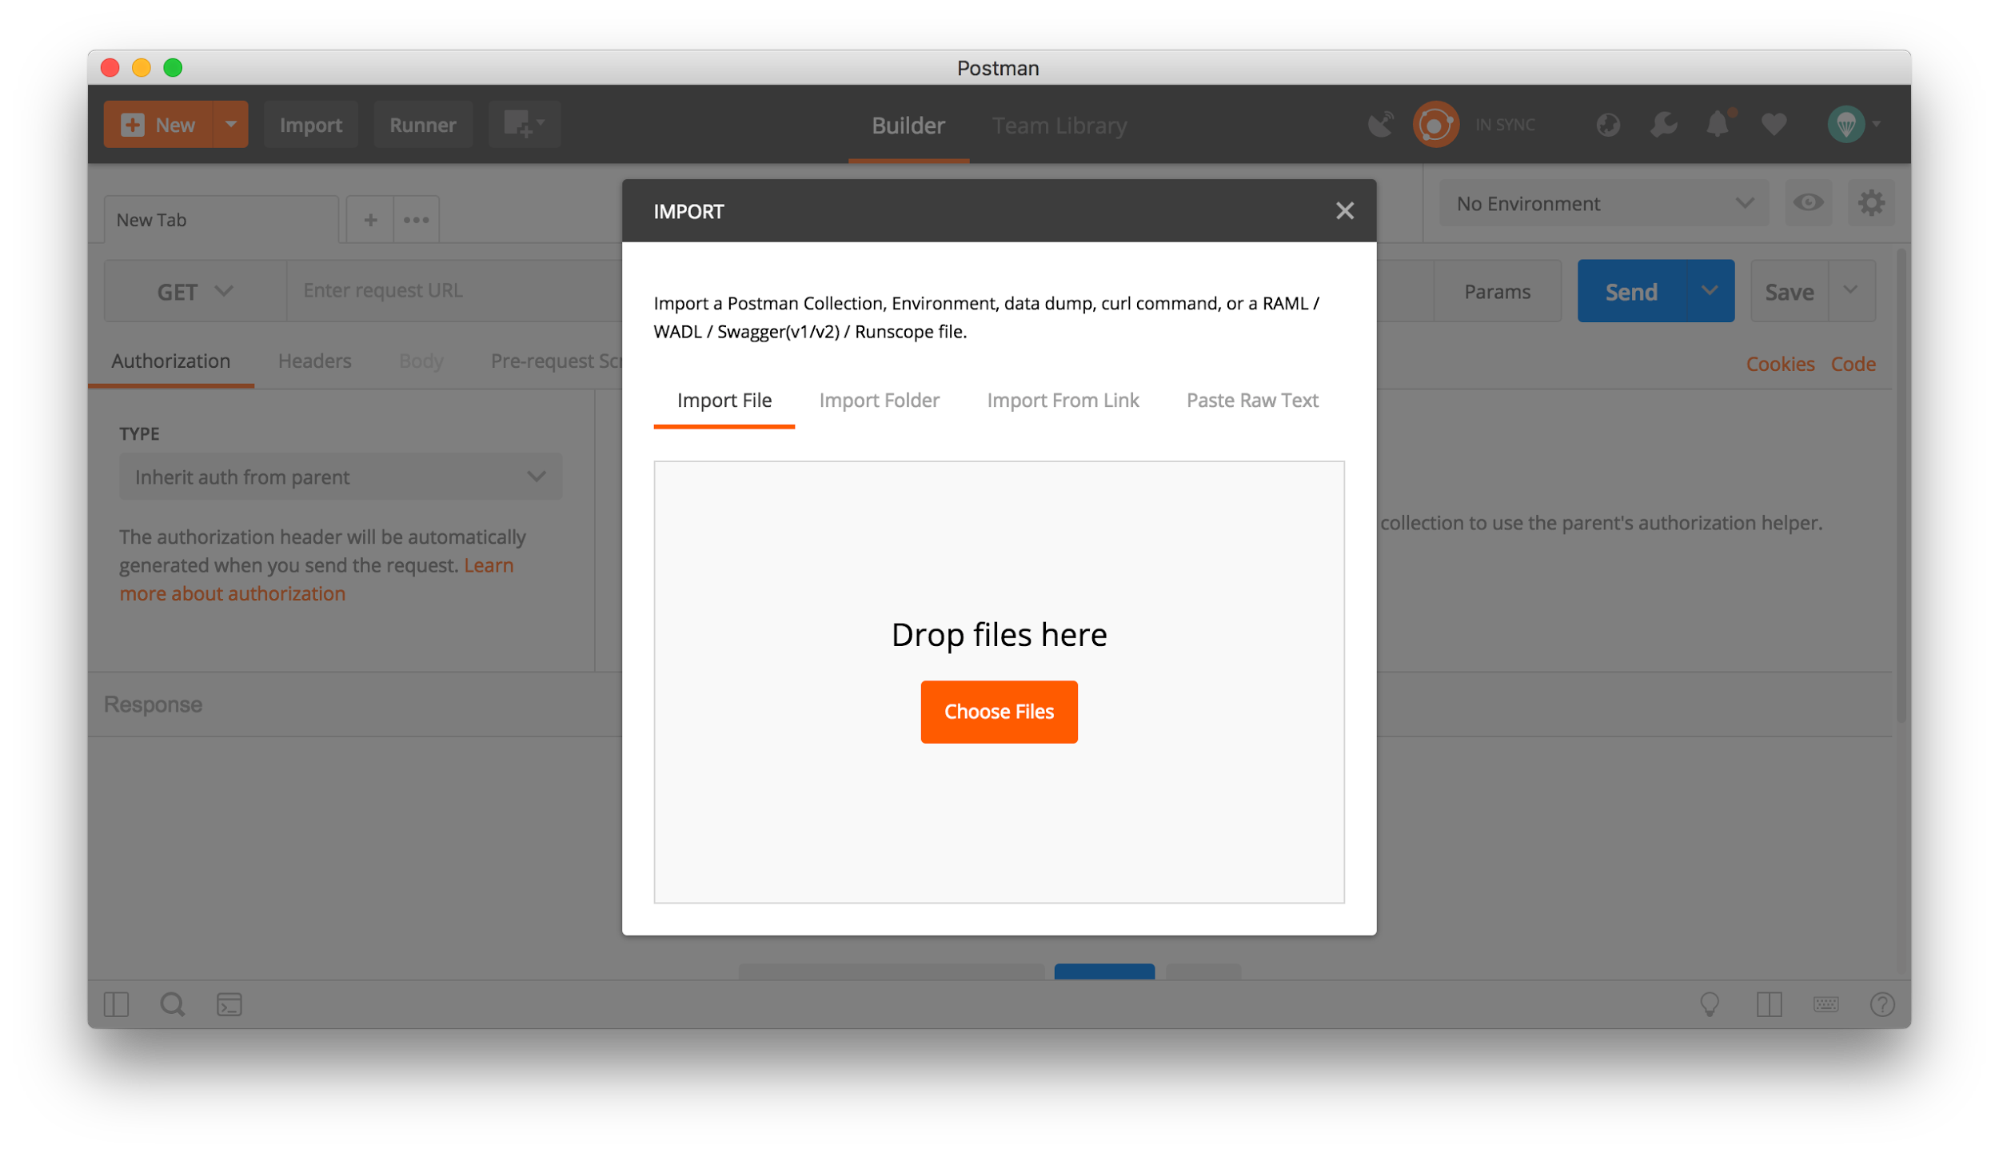
In the Postman app, click the Import button in the top left corner to open the IMPORT modal. Under the Import File tab, select the Swagger file to import.
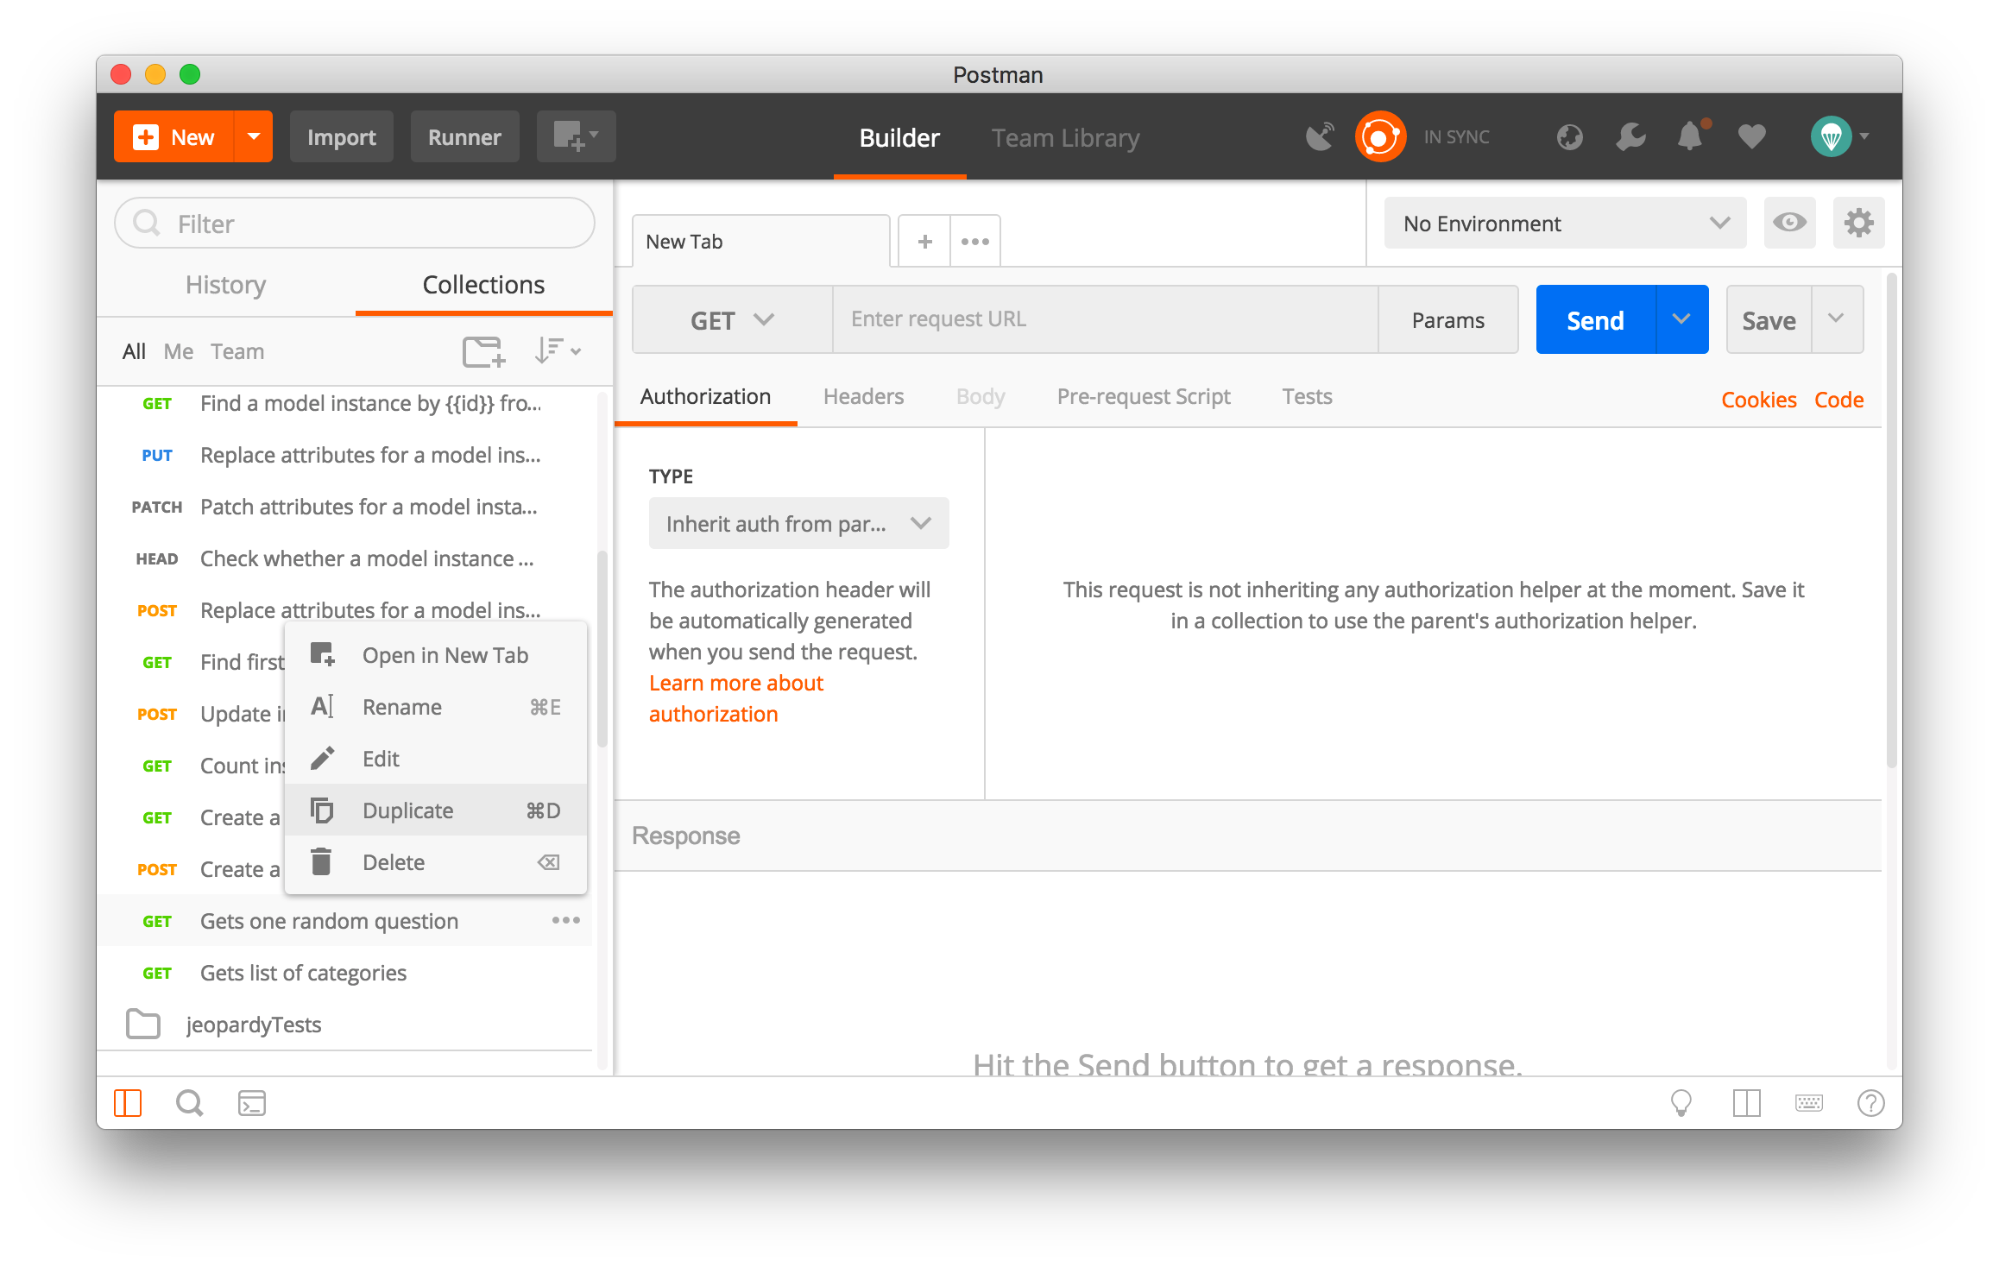
You should now see the collection in your sidebar on the left. Inside this new collection, a folder called jeopardyQuestions contains all the endpoints created in the LoopBack tutorial.
So far, so good!
Use a Postman environment
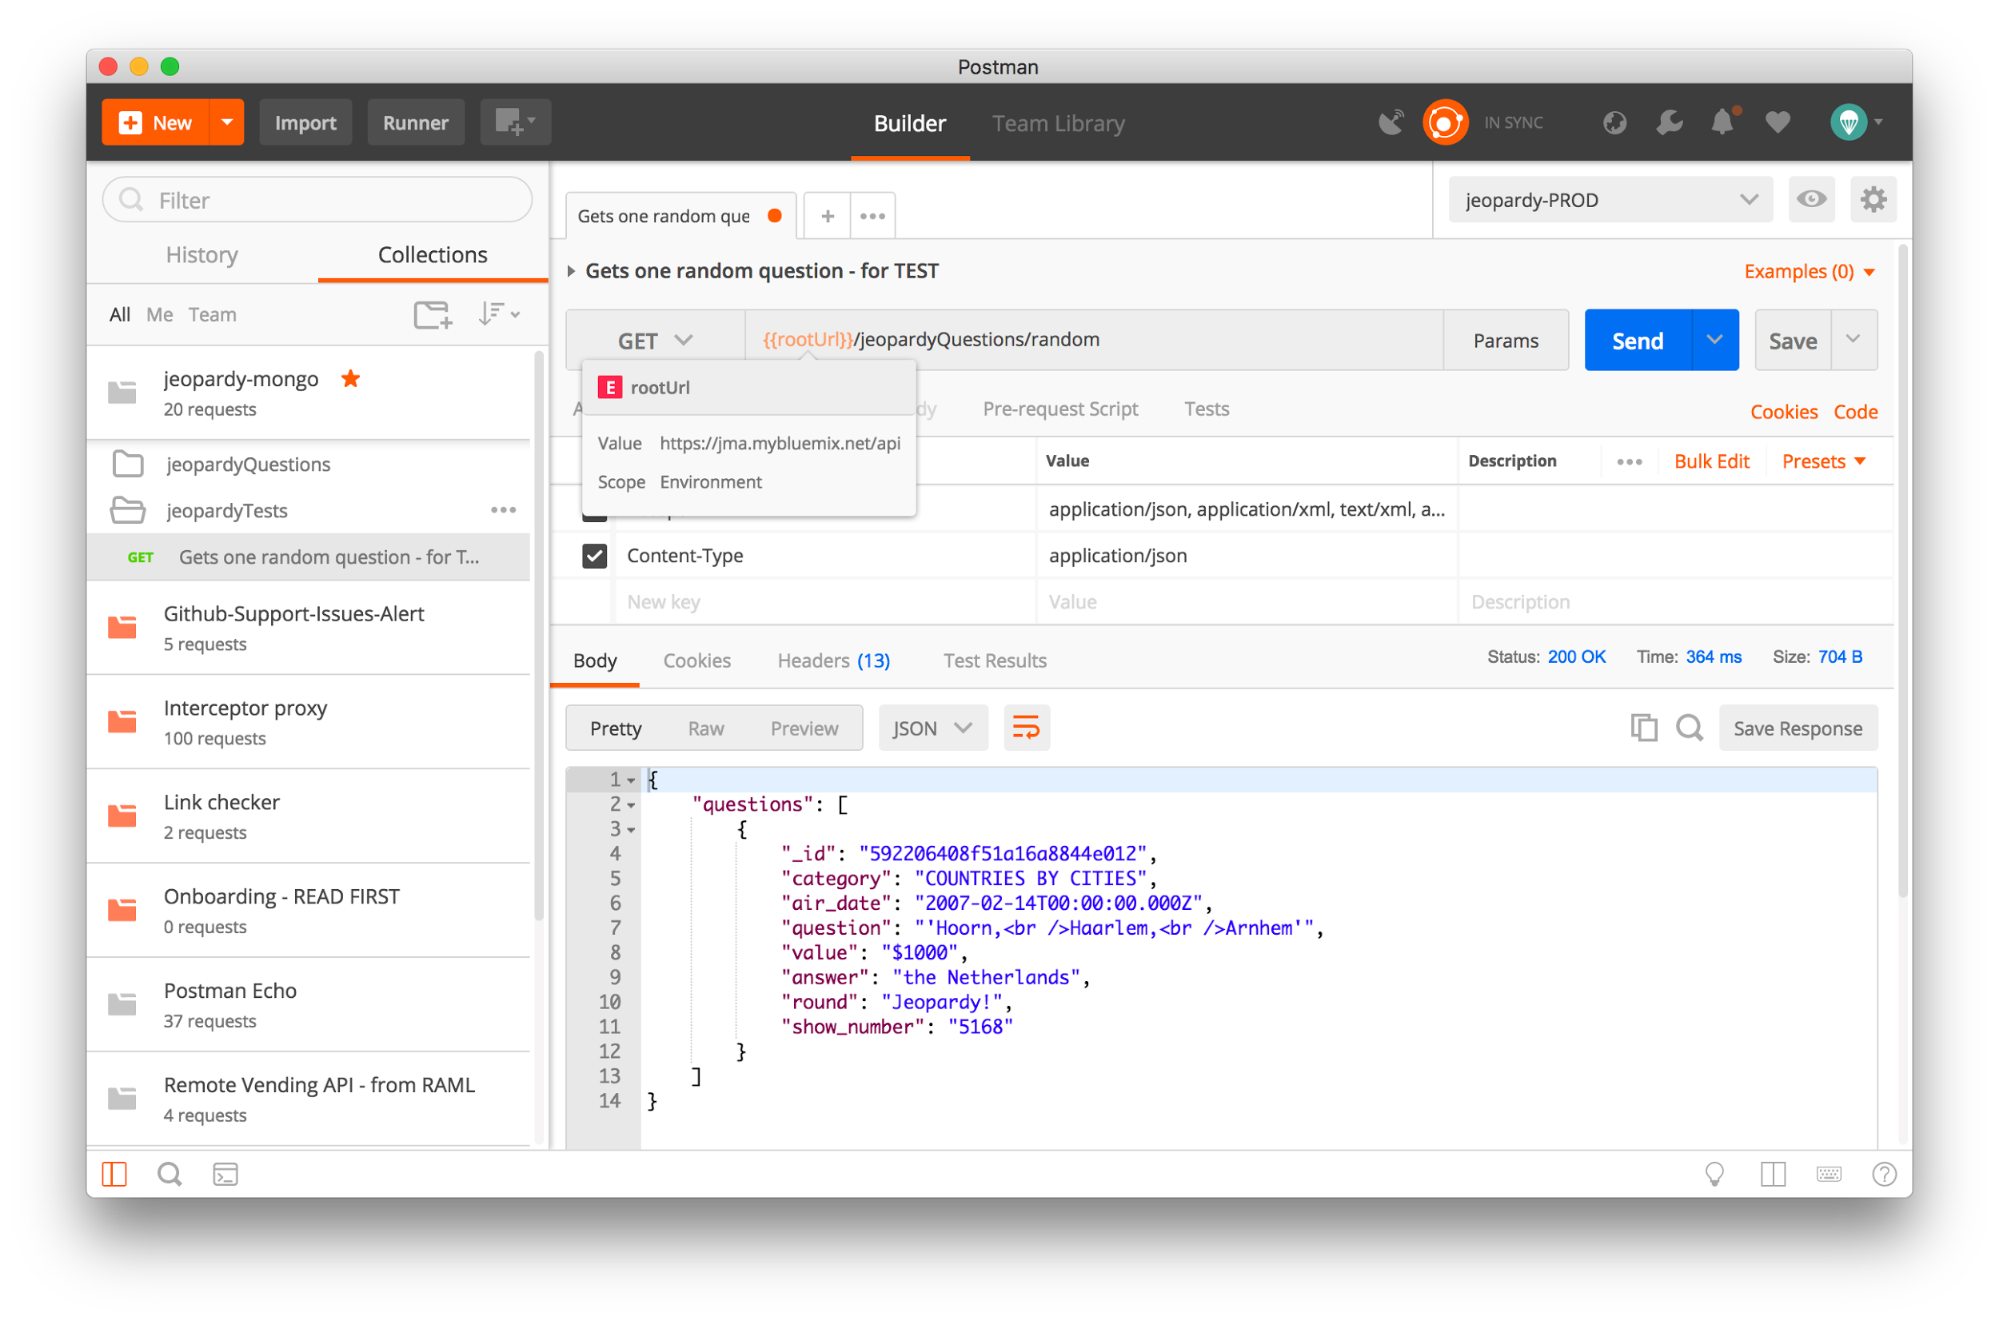
Add a new folder called jeopardyTests in our collection. Let’s start by finding the request GET Gets one random question, duplicating it, and adding it to our new folder by dragging it over.
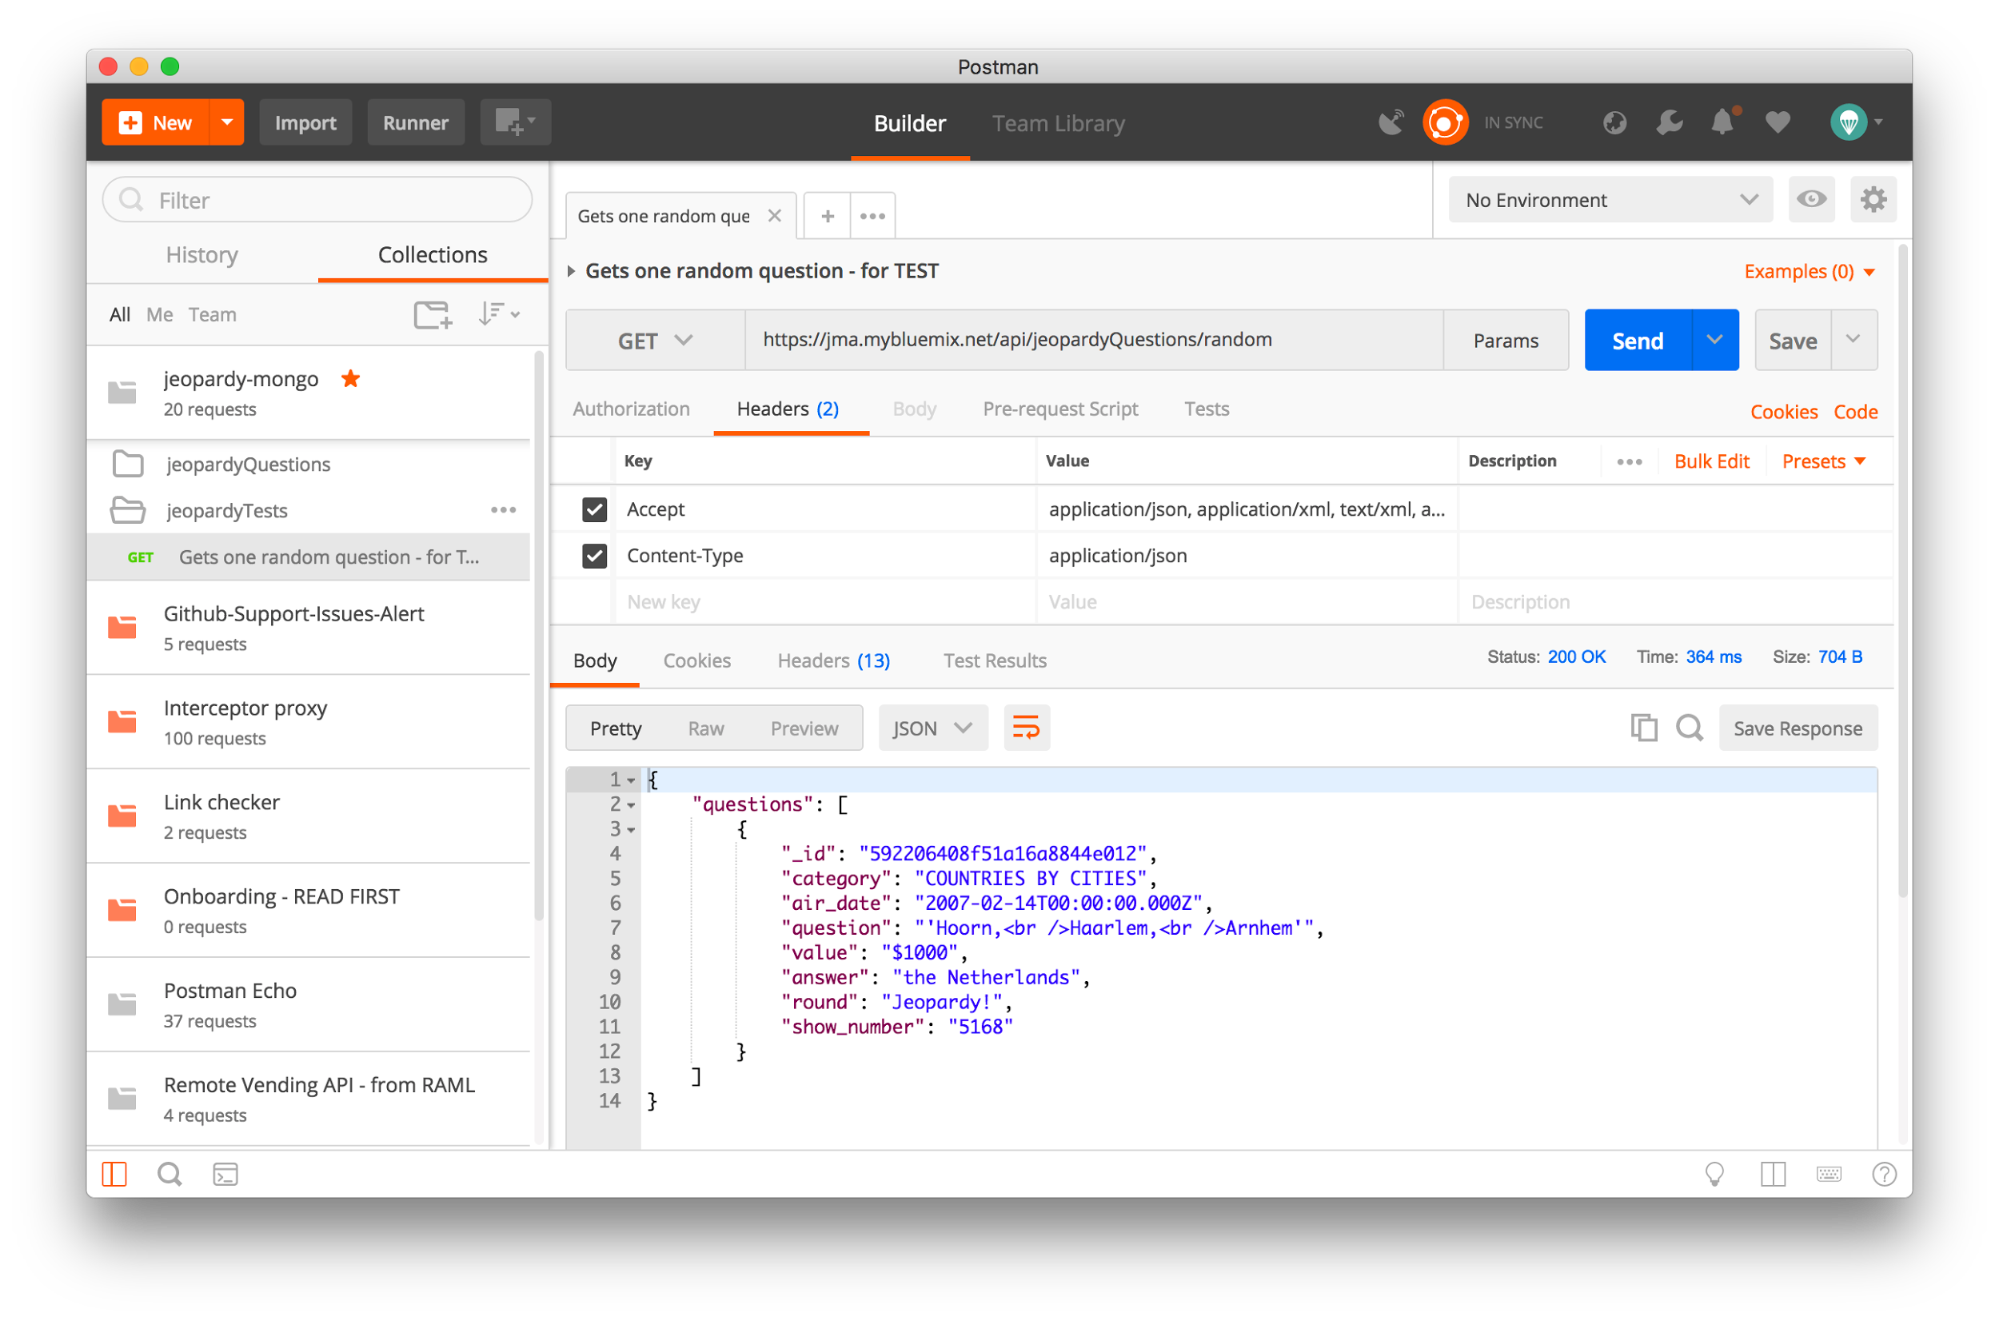
Hit the blue Send button and inspect the response. Yours will look something like this, although it’s likely a different question is randomly selected.
Let’s create a Postman environment. It’s a good way to maintain any sensitive information about users or access credentials, but also a good way to switch back and forth between different server environments.
Click the gear icon in the top right, and select “Manage Environments” to open the modal. Click Add to add a new environment. Let’s call this one jeopardy-PROD because it will contain the setup for our endpoints deployed to production. Enter a value of rootUrl along with a corresponding value of https://jma.mybluemix.net/api. Hit Add to confirm your updates, and then make sure you select your new environment from the dropdown in the top right.

When we return to our request, we can swap out the root of our URL with our newly created environment variable. Do this in the request builder by using the double curly braces syntax – {{rootUrl}}. You can do this anywhere in the request builder where text is used. Postman will evaluate the input using string substitution.
This step is optional. However, using variables in this manner makes your code more readable, allows you to update a value in a single spot with the changes cascading throughout the code, and lets you easily switch between a local development environment and production environment (as we’re doing in this step).
Write a Postman test
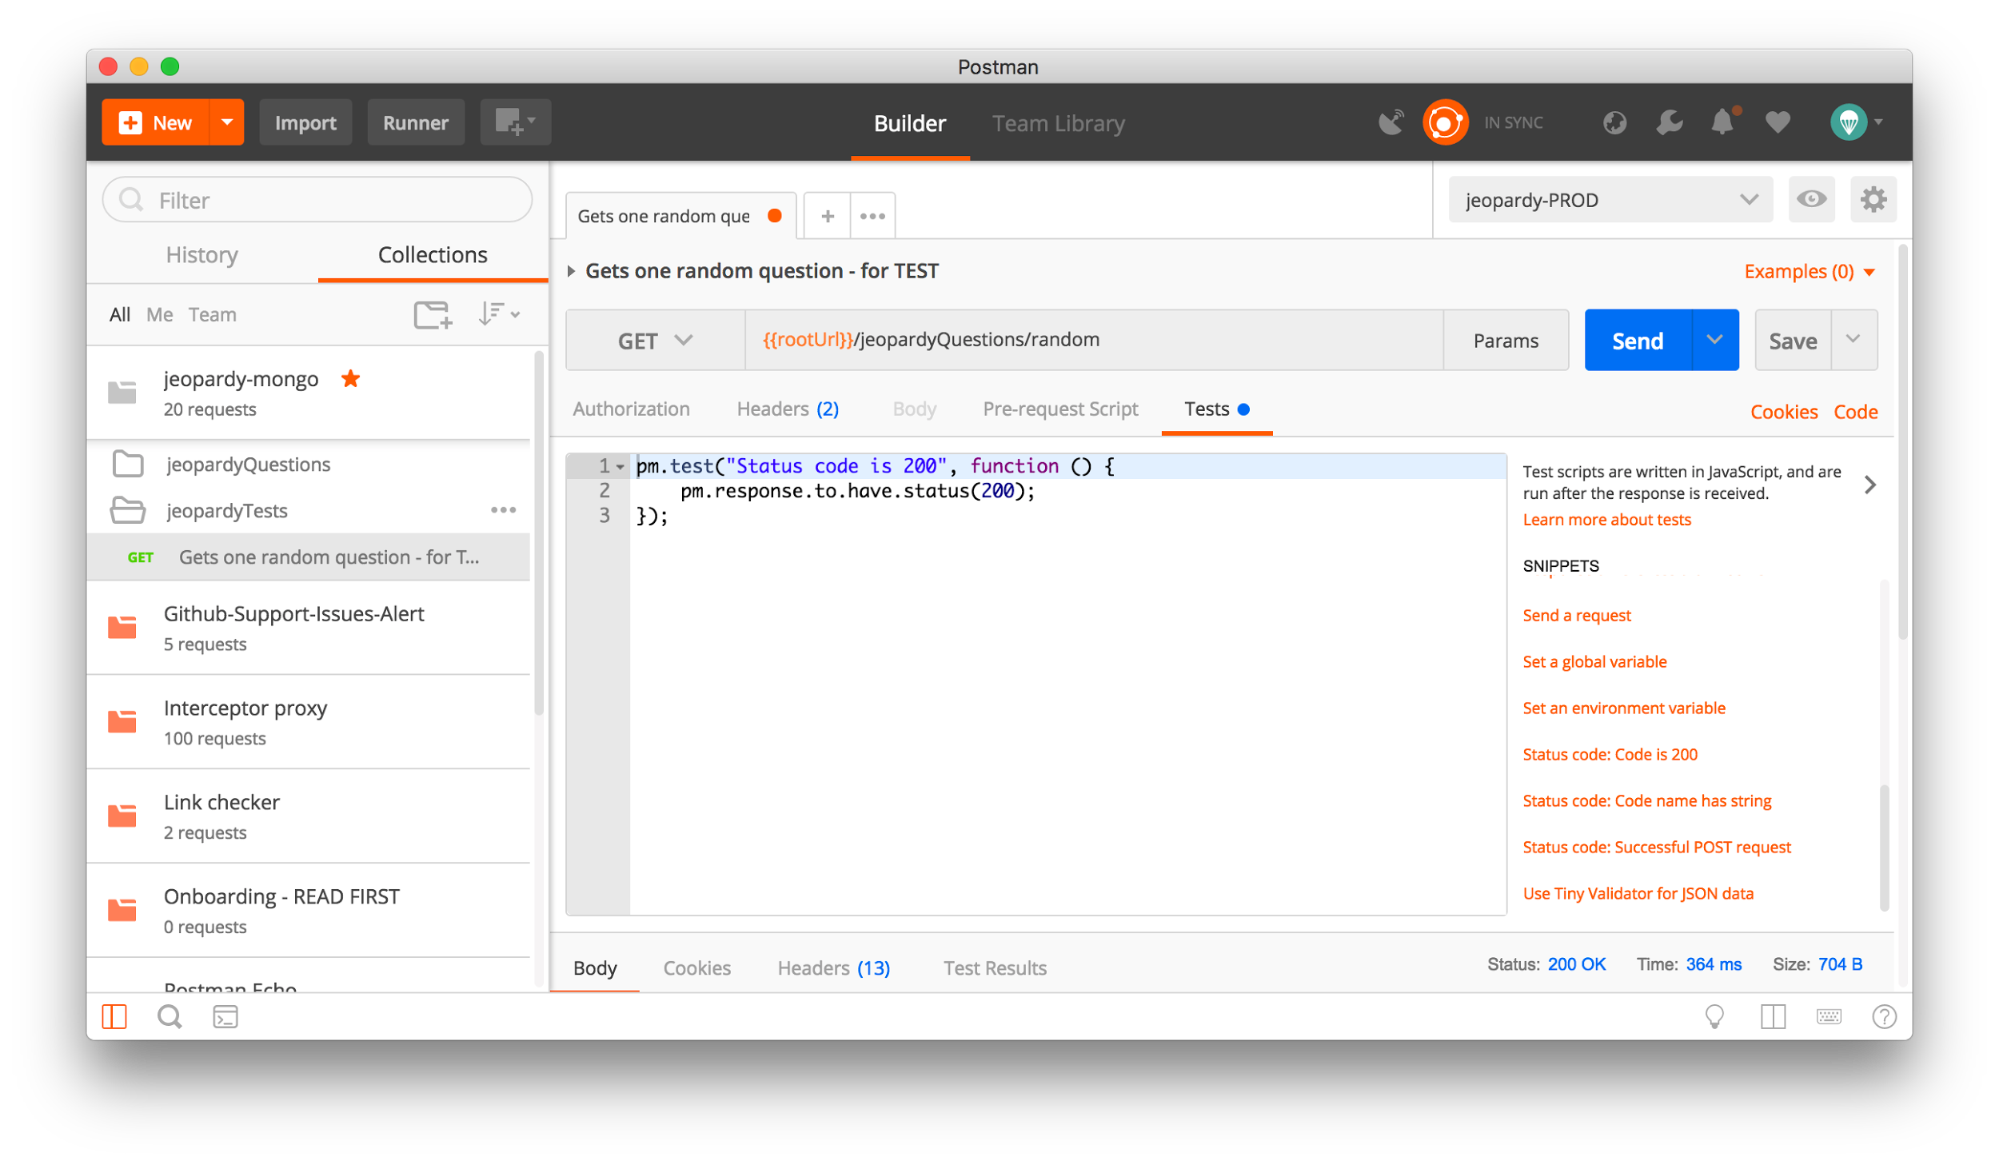
The pre-request and test tabs are places where you can write JavaScript to execute either before or after your request is sent, respectively. Under the Tests tab, let’s write our first Postman test that will execute after our response is received. We’re going to take a shortcut.
On the right side of the script window, there’s a list of popular SNIPPETS to get us started. Scroll down, and find the one called “Status code: Code is 200”. Clicking the link will append the code snippet to our Tests tab. This test called “Status code is 200” asserts the response has a status code of 200. If the response returns a 200 status code, the test will pass. If not, the test will fail.
 Now, when we hit Send, we can see the result of this test under the Tests tab in the response viewer at the bottom.
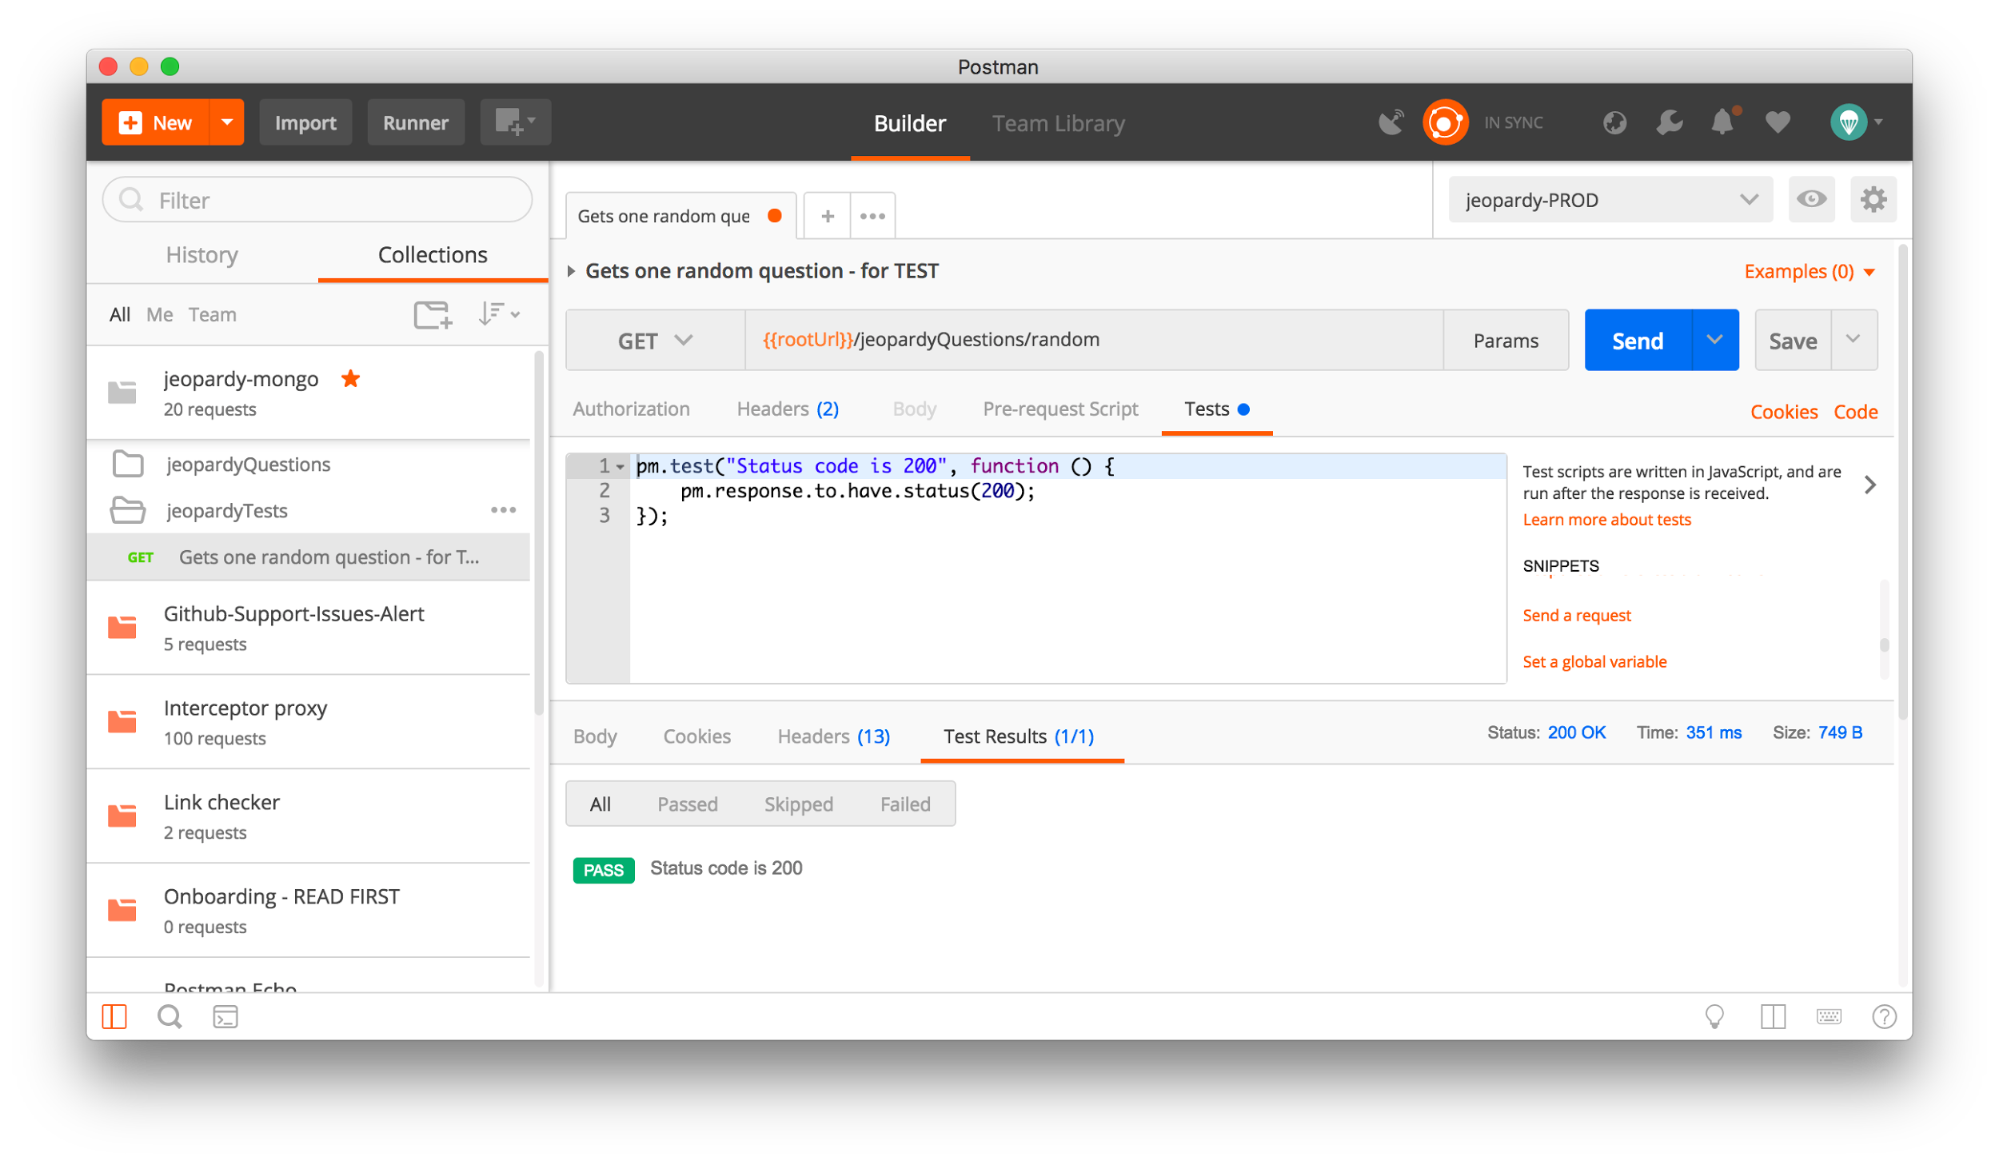 Huzzah – our test passed! This is lovely, and I think we should run this test on every request that we send.
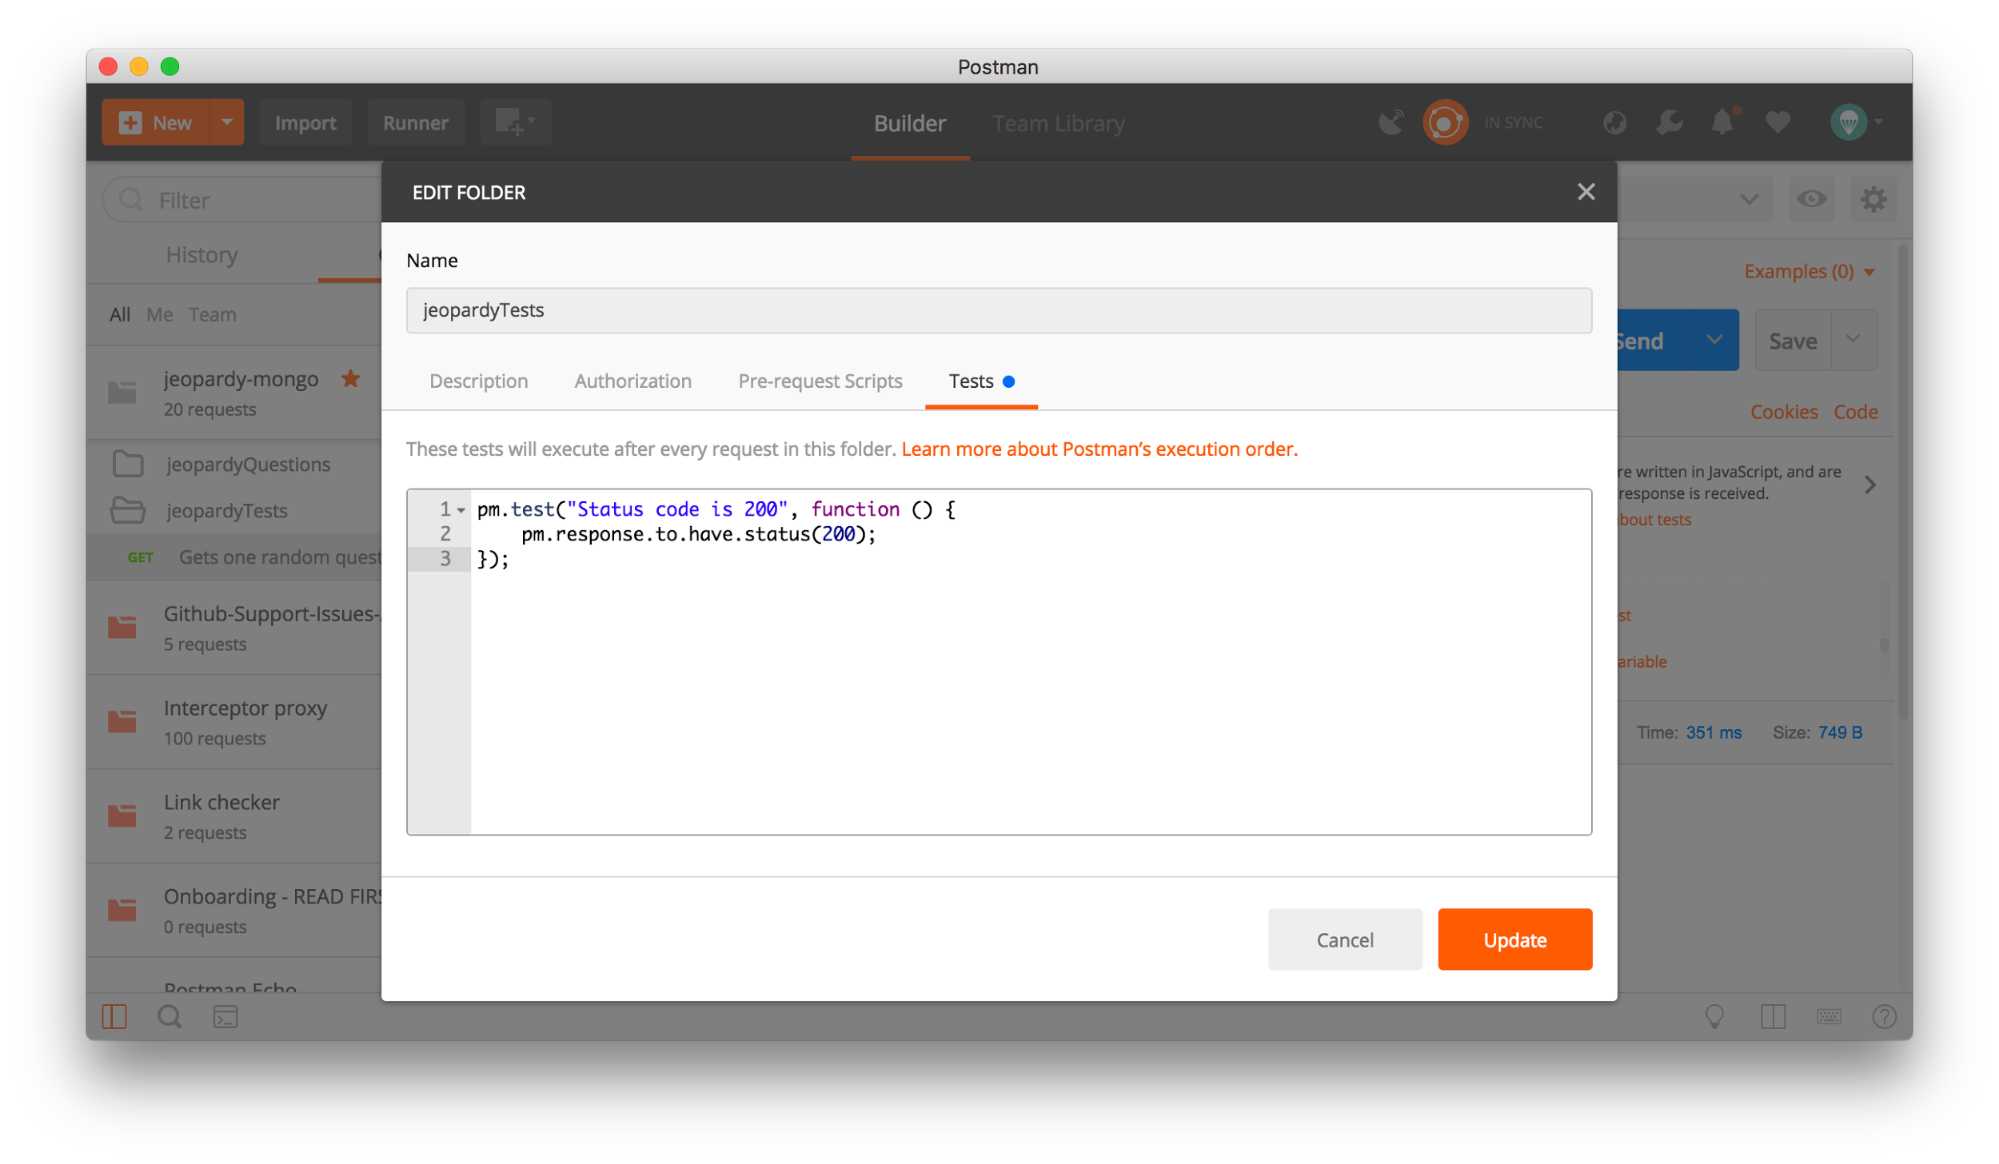
Copy this code snippet, and add it as a folder test script. This means this same test will run after every request in this folder. You could also add this test as a collection test script so it will run after every request in this collection.
Click the ellipses (…) next to the folder that contains our request, and select “Edit” to open the folder details. Under the folder’s Tests tab, paste the test that we used previously in the single request, and hit Update.
 Now this test will run after every request in this folder. How about we add another request to this folder and create a simple workflow?
Creating a workflow
Let’s continue and find the request GET Check whether a model instance exists, duplicate it, and add it to our jeopardyTests folder by dragging it over, like we did earlier.

This request requires an id to verify whether the question exists in our data model. The previous question we were working with returned a question id. Let’s extract the data from the first question, and then use that data in the second question.
Under the Tests tab of our first question, write the following code.

Hit Send, and when we peek at our environment in the Quick Look, we can see that we set an environment variable called randomID with the value extracted from the response of this first request.

Now to use this information in our second request. On the second request, click the Params button to expand the editor. We can see an undefined variable called {{id}}. Replace that with our new environment variable name {{randomID}}.
Hit Send, and you’ll see that it’s true the randomly selected question DOES EXIST in our data model!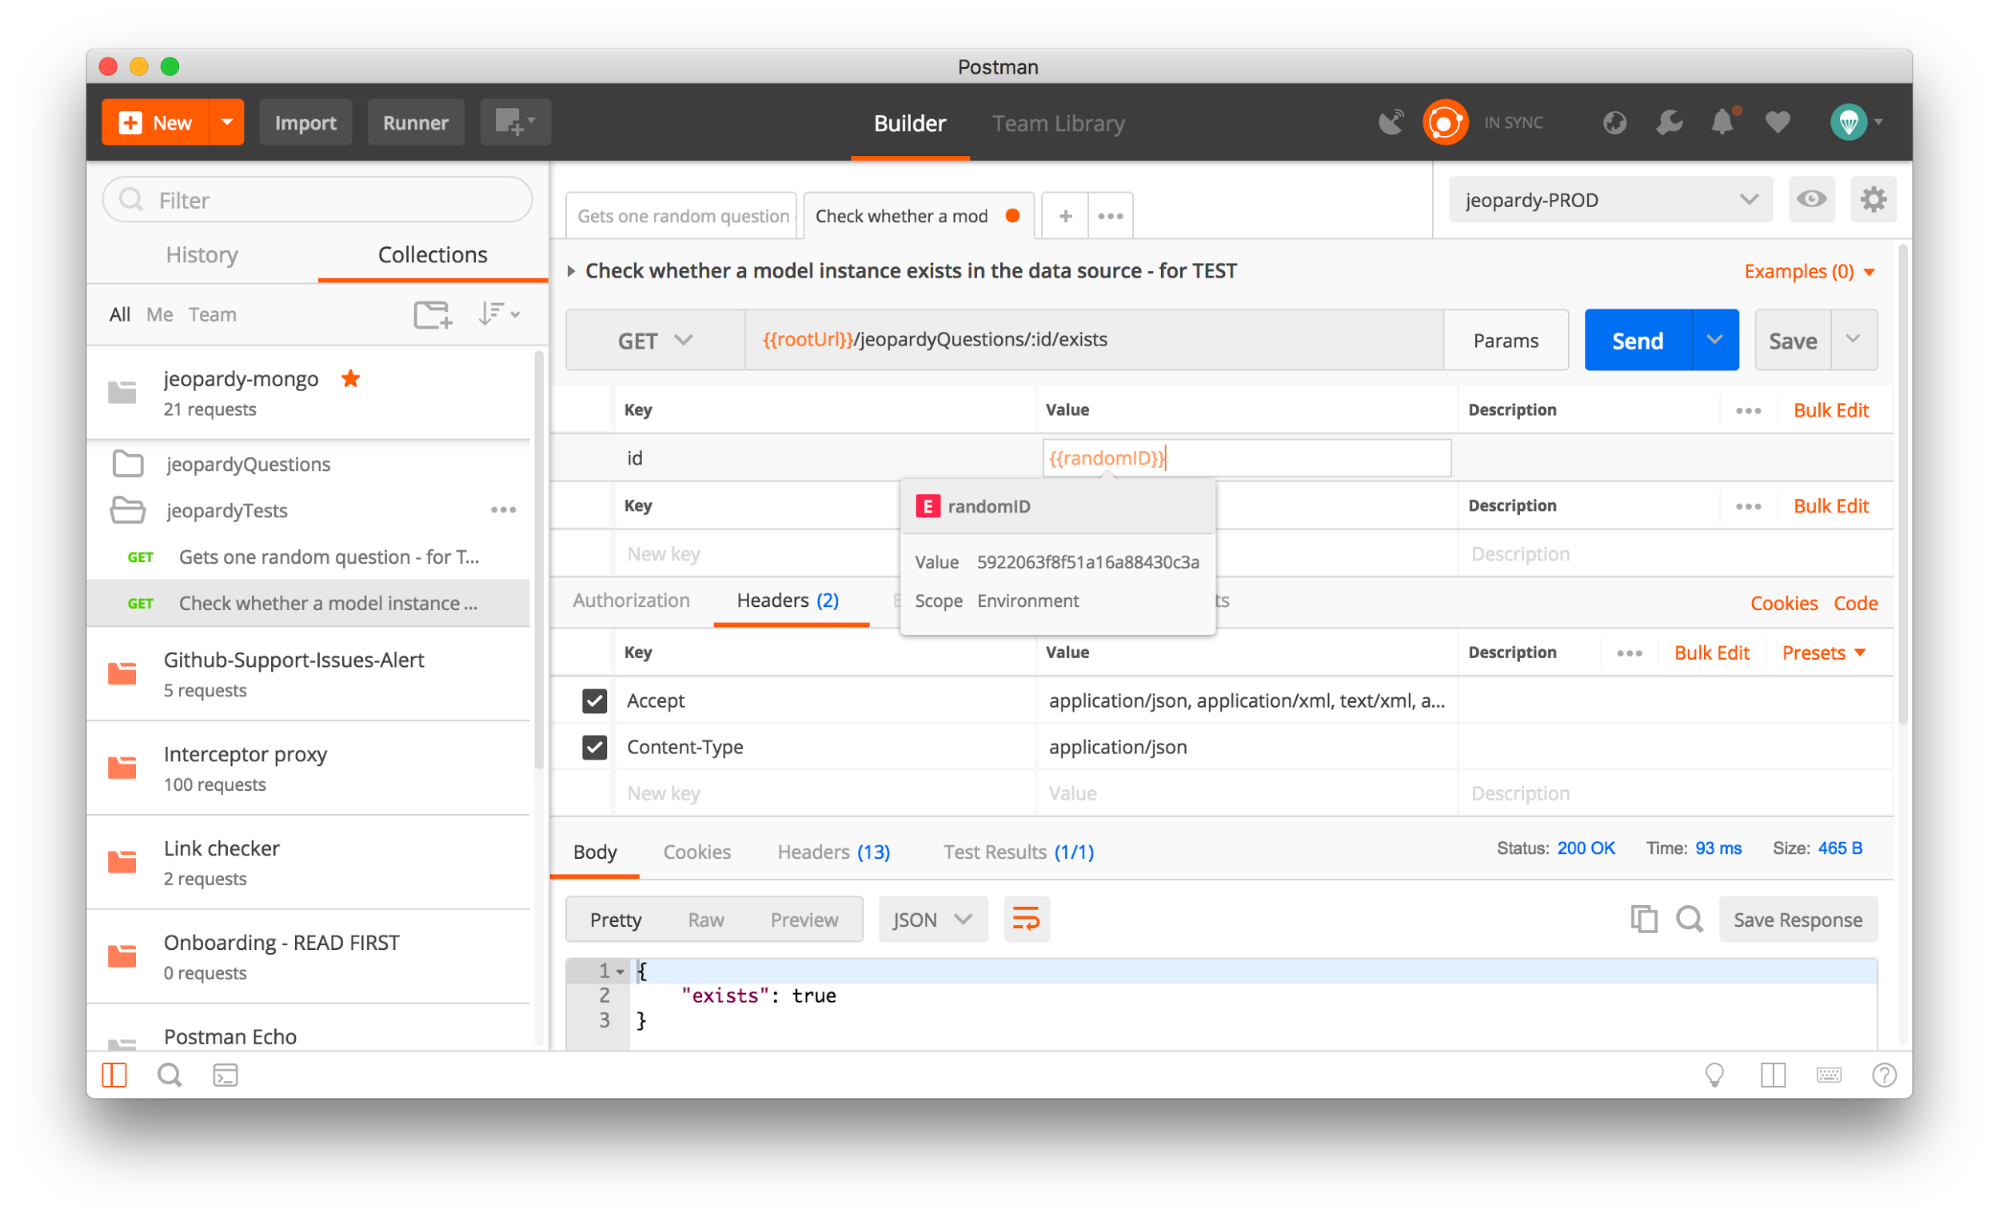
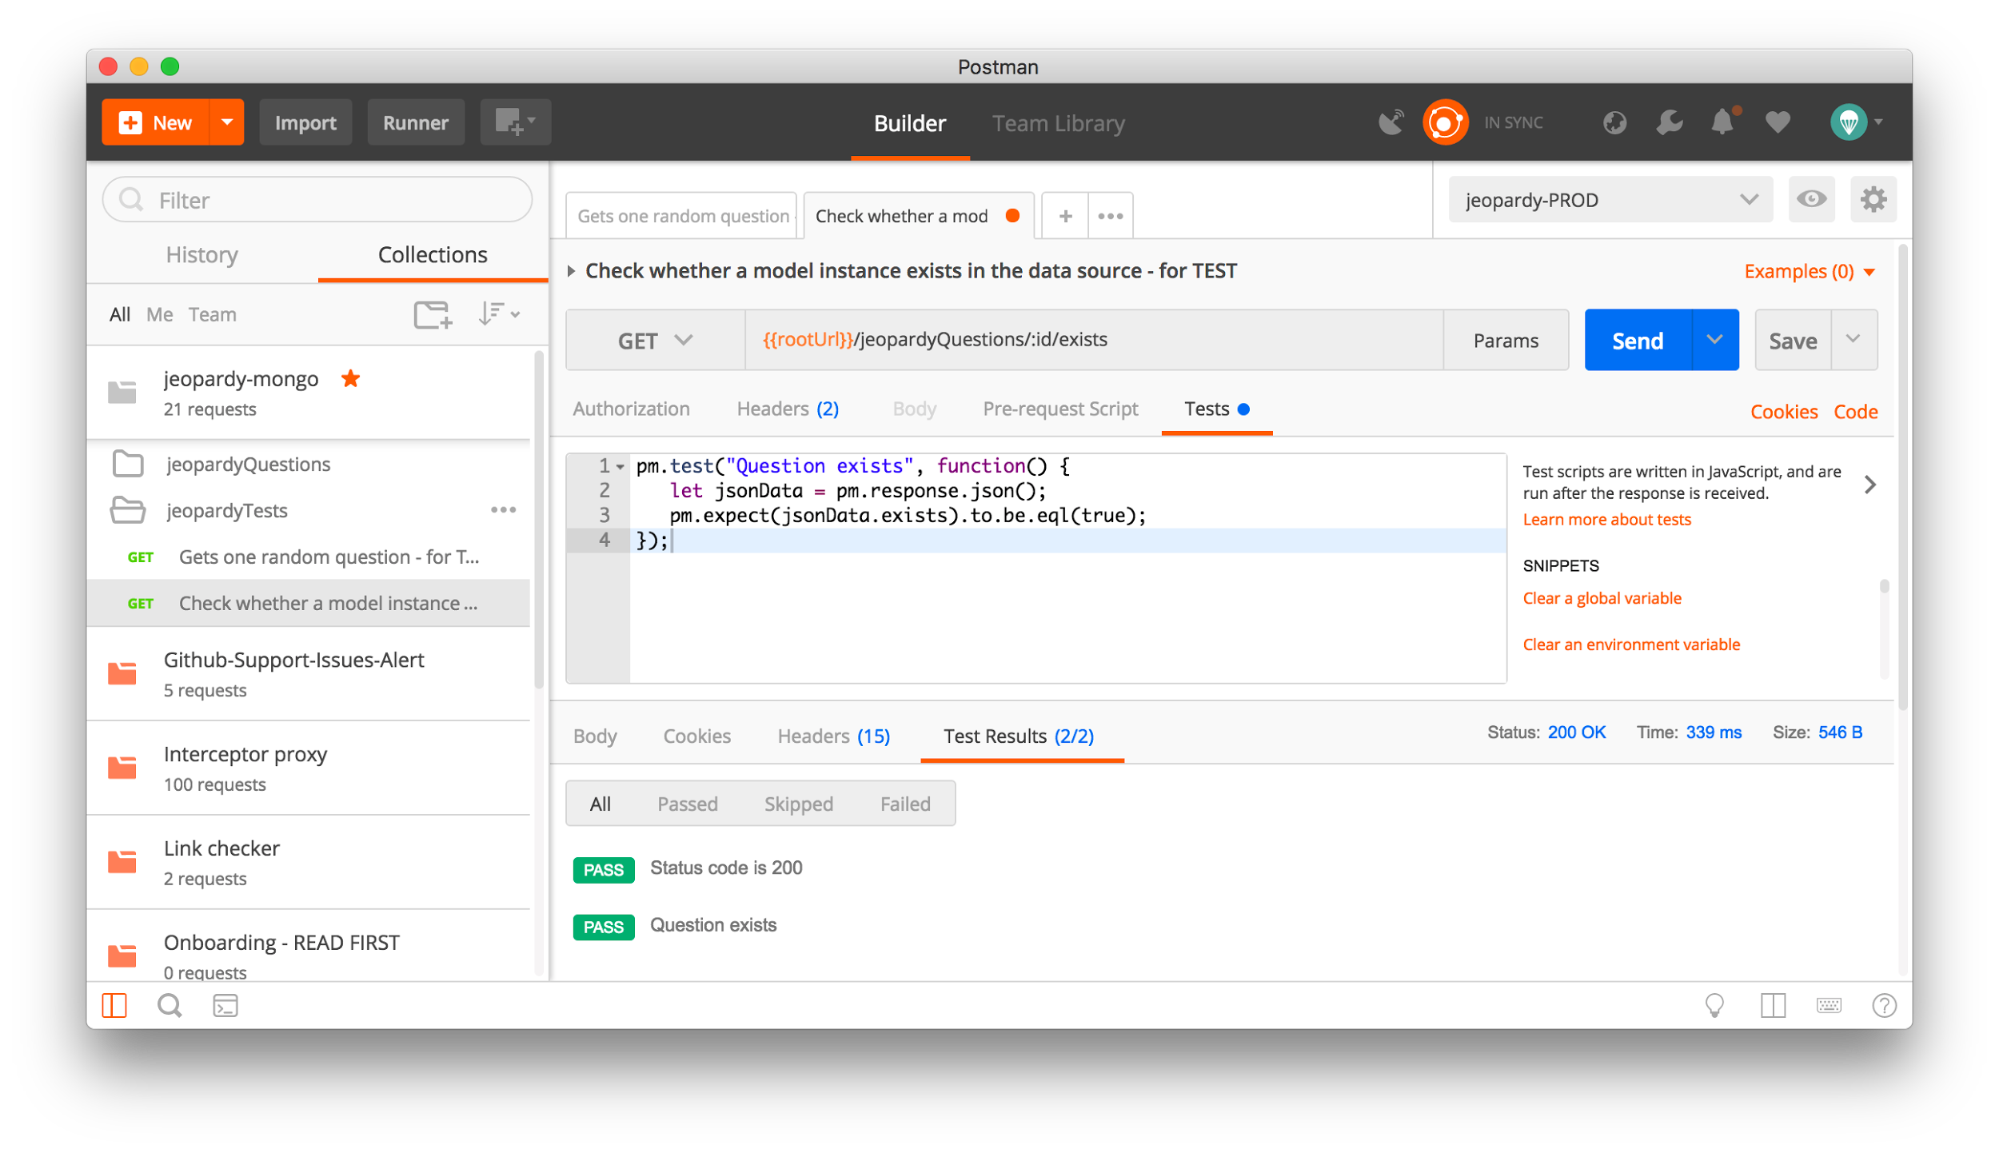
Nothing unexpected here, but let’s write another test to be double dog sure. Under the Tests tab of our second request, add the following test called “Question exists”, parse our response again, and assert that the response includes a key called exists with a value that is equal to true.
And that’s the first step towards writing tests in Postman! Working with your own data set, with your own workflows, the world is your oyster when it comes to testing in Postman. For further study, learn how to build more advanced workflows using postman.setNextRequest(“request name”).
Running a collection or folder
We’ve seen how to manually run requests in a folder by hitting the Send button, but we’re not animals! What about running all the requests in a folder or a collection? Here’s 3 ways to do less work.
Collection runner
Click the Runner button in the top left to open the collection runner window. Search for our collection jeopardy-mongo and select our folder jeopardyTests. In the dropdown, select our environment jeopardy-PROD.
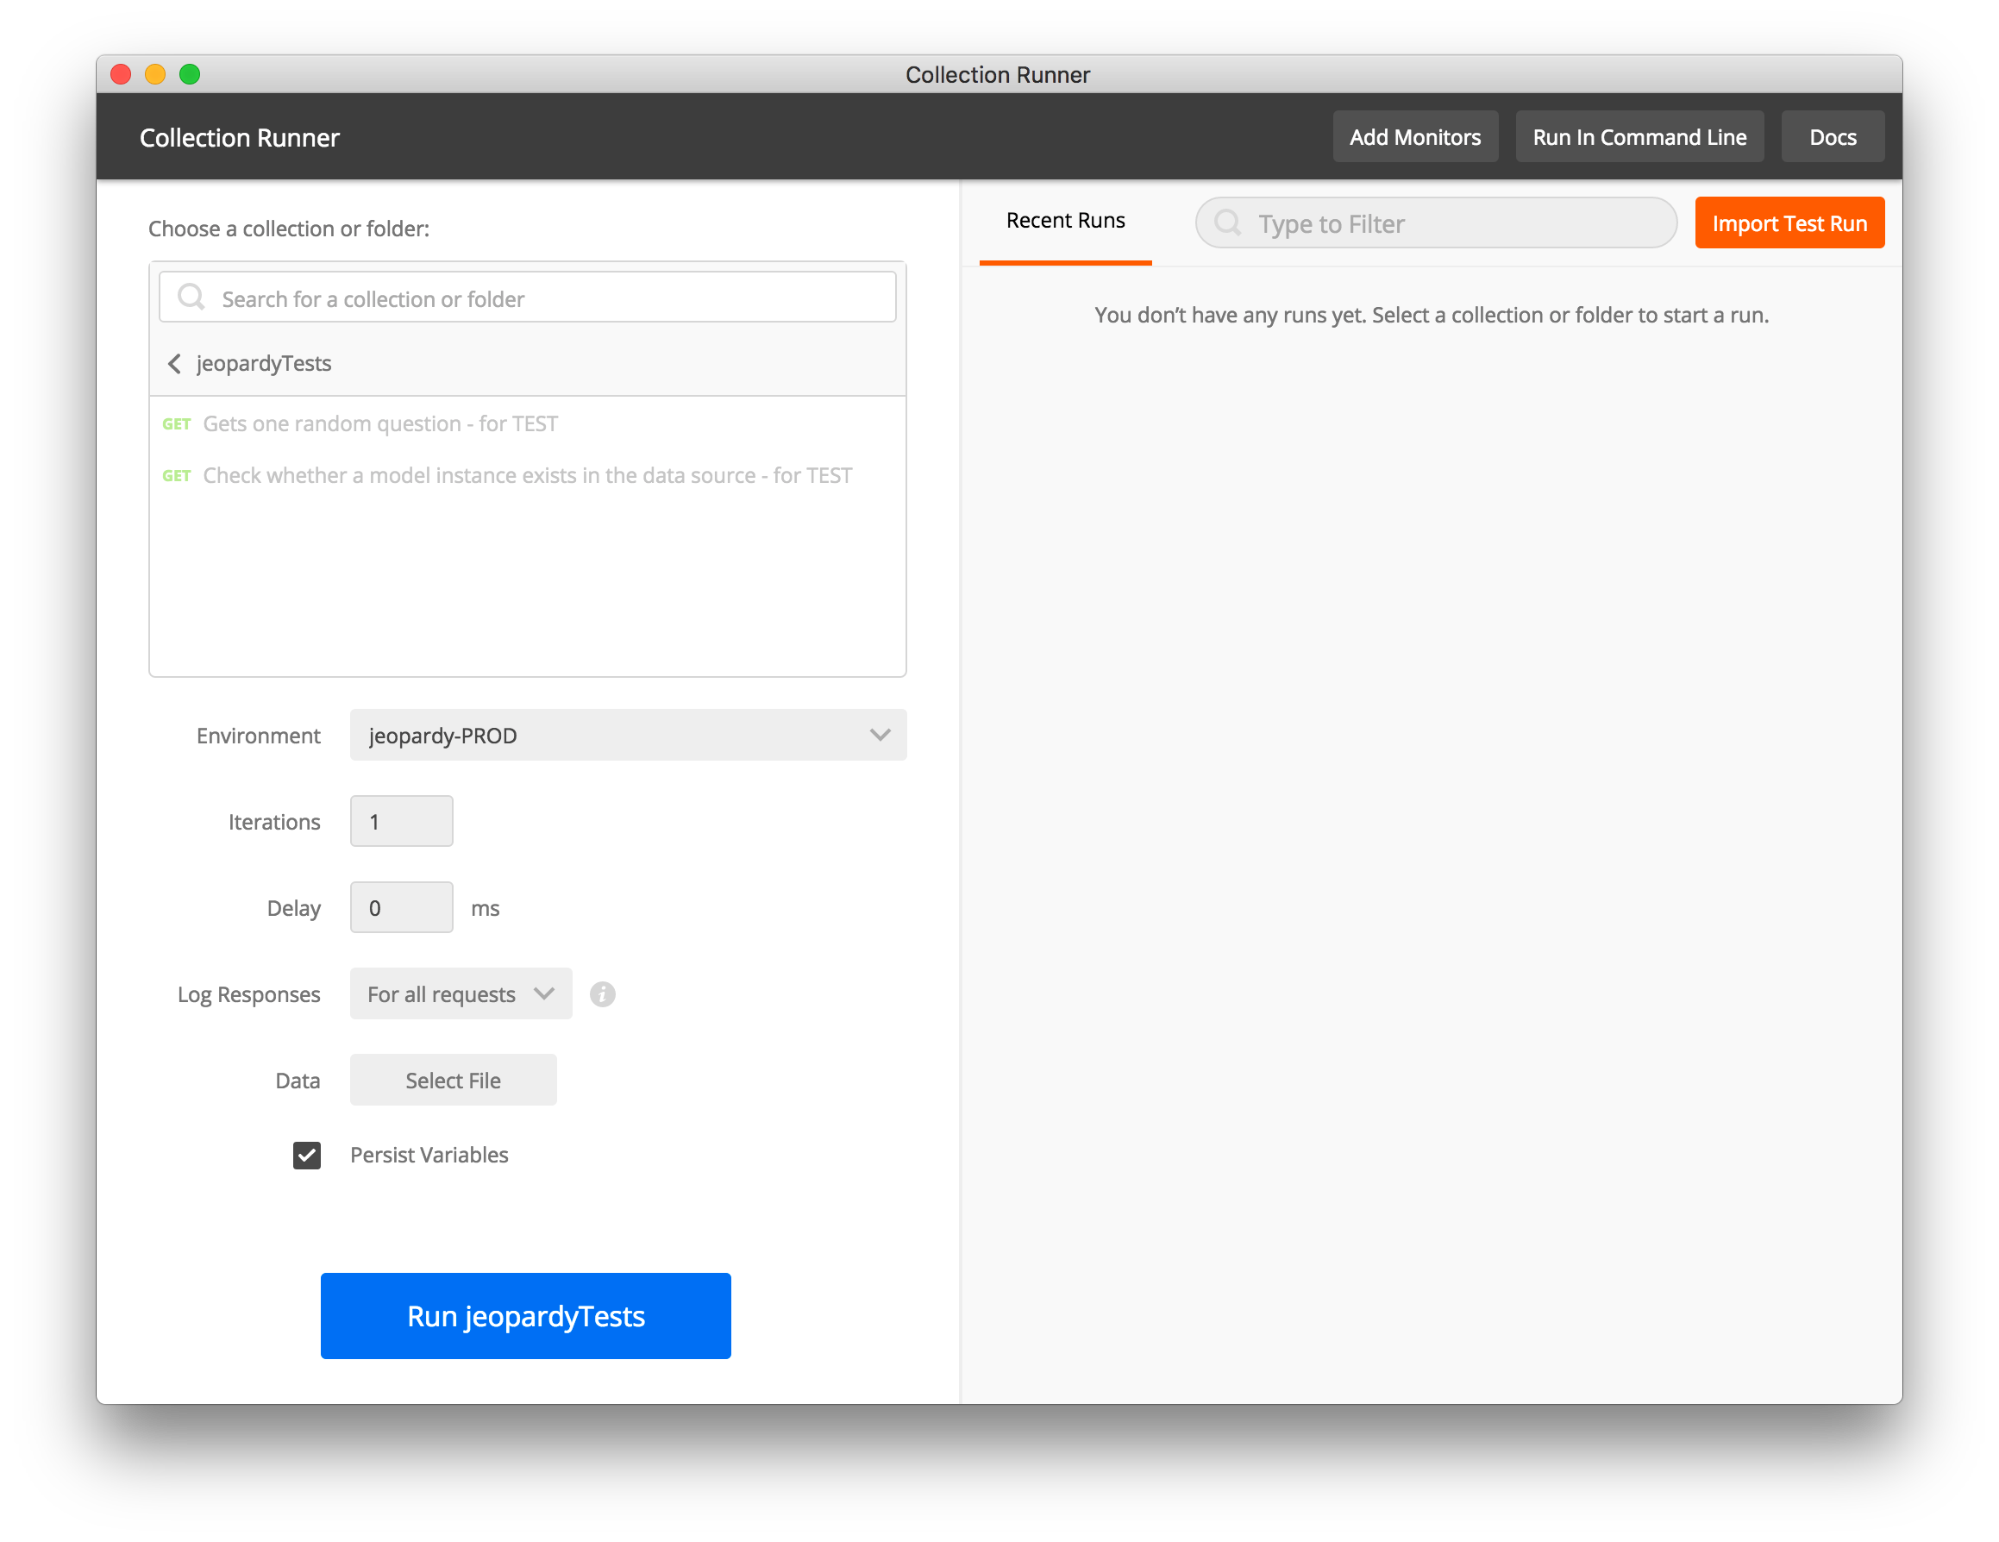
Click Run jeopardyTests, and watch all of our tests running (and passing!). If any of your tests fail, drill down deeper into the request that failed in the collection runner or the Postman console.
Newman
Newman is a command line collection runner for Postman. Export the collection and export the environment as separate JSON files.
Make sure you have Node on your machine. Download the Newman NPM package and run it using the --folder option to run only the folder.
$ npm install -g newman
$ newman run ./jeopardy-collection.json --folder jeopardyTests -e ./jeopardy-environment.json
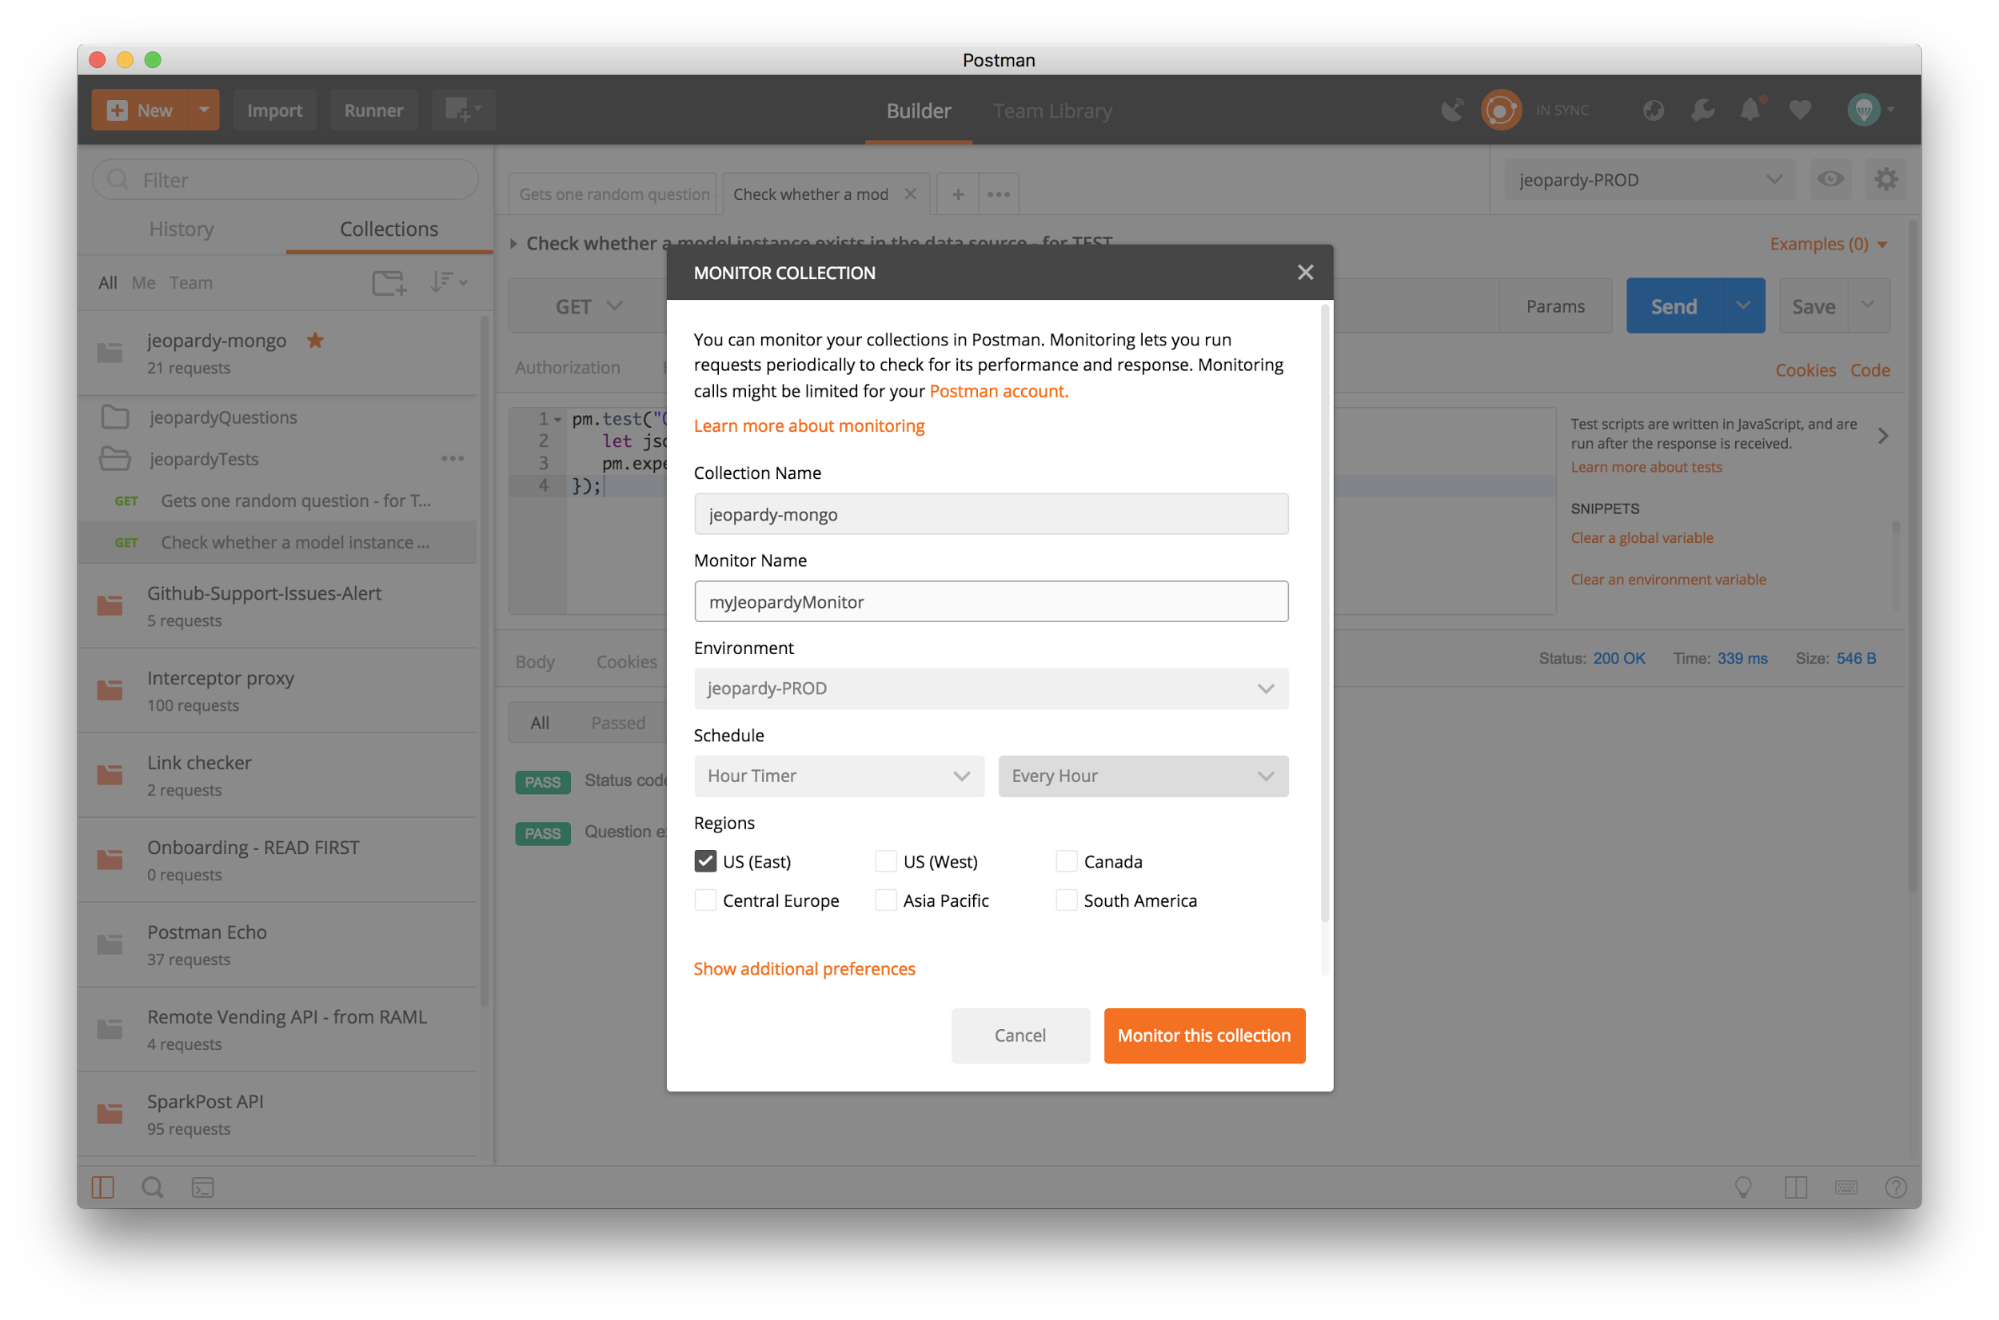
Postman monitorING
You can also run your collections at scheduled intervals on Postman’s servers using monitoring. Click the ellipses (…) next to your jeopardy-mongo collection and select “Monitor Collection”. Configure the frequency that you want to run the collection, and hit Monitor this collection.
View the results of these runs on the monitors page of the Postman dashboard.

What do you think about this topic? Tell us in a comment below.