How to build a gRPC API in Node.js
gRPC is one of the most popular API architectural patterns for building service-to-service communication systems in distributed environments. It is a highly performant, open source, and universal RPC framework that was released by Google in 2015. It is based on HTTP/2 and is often used for efficient bi-directional client-to-server communication, as well as duplex data streaming.
Node.js is an open source cross-platform JavaScript runtime that is built on Chrome’s v8 JavaScript engine that is capable of executing JavaScript code outside of a web browser.
In this tutorial, you will learn how to build a simple gRPC service in Node.js that performs CRUD operations on products. You will start by using Protobuf to write a service definition that describes the methods the service exposes. Then, you will write the implementation logic for these service methods on the server. You will also use the Postman gRPC client to confirm that your methods are working as expected.
Before we start writing code, we’ll review the components of a gRPC service and how they work together.
What is a gRPC service?
A gRPC service facilitates communication between a client and a server using the gRPC protocol. A gRPC service typically has three key components:
- The service definition
- The client
- The server
The service definition
In gRPC, the service keyword is used to define a service. This service definition includes one or more Remote Procedure Call (RPC) methods that the client can remotely invoke on the server, as well as each method’s request and response messages. The service definition is typically written in a .proto file in a language-agnostic format called Protocol Buffers (Protobuf). Protobuf serializes data into binary form, making it more compact and therefore faster to transport over a network.
Related: What is Protobuf?
The server
In gRPC, the server listens and responds to RPC calls from clients. The server implements the service defined in the .proto files and contains the actual implementation logic. This logic might handle mutating existing data, creating new data, or fetching data from a database.
The client
A client in gRPC is an application that connects to and communicates with a gRPC server using the RPC framework. Similar to the server, the client uses Protobuf for data serialization and deserialization.
Prerequisites
In order to follow along with this tutorial, you will need:
- A good understanding of JavaScript.
- Basic experience working with Node.js and npm/yarn. Download Node.js here.
- The Postman app, or access to the web version.
- Some familiarity with Protobuf (not required, but helpful).
- The vscode-proto extension (if you’re using VS Code as your text editor).
Step 1: setting up your project
First, create a new directory for this project and initialize a Node.js application:
mkdir node-gRPC-service

cd node-gRPC-service

npm init -y
Now, you will need to install the necessary dependencies for building a gRPC service. Those dependencies are:
- @gRPC/gRPC-js: This library makes it possible to create a gRPC service in Node.js.
- @gRPC/proto-loader: This package is used to load a
.protofile in a gRPC service.
Install these dependencies using the code below:
npm install @gRPC/gRPC-js @gRPC/proto-loader
Create the two files you will primarily work on within this project, which are product.proto and server.js:
touch product.proto server.js
Step 2: defining the service
Next, you will write your service definition in the product.proto file. As discussed above, gRPC uses Protobuf as its interface definition language.
First, specify the Protobuf syntax you’ll be using—and use the package keyword to declare a namespace for your service:
syntax = "proto3";

package product;
Next, declare the RPC methods that a client can remotely invoke in your service. In this tutorial, you’ll declare five different methods for performing different actions on a product: createProduct, readProduct, readProducts, updateProduct, and deleteProduct. These methods can be declared with the following code:
service Product {
  rpc CreateProduct (ProductItem) returns (ProductItem);
  rpc ReadProduct (ProductId) returns (ProductItem);
  rpc ReadProducts (VoidParam) returns (ProductItems);
  rpc UpdateProduct(ProductItem) returns (ProductItem);
  rpc DeleteProduct (ProductId) returns (DeleteProductResponse);
}
In this service, we’re using several message types as the input and output parameters of these methods:
- VoidParam: This is an empty message we’re passing to an RPC, and it doesn’t require client inputs.
- ProductID: This is the ID of a specific product. It is an integer.
- ProductItem: This contains information about an individual product.
- ProductItems: This is an array of individual products.
- DeleteProductResponse: This is a boolean value that indicates if a product deletion succeeded or failed.
These messages can be defined with the following code:
message VoidParam {}

message ProductId {
  int32 id = 1;
}

enum  Category {
  SMARTPHONE = 1;
  CAMERA = 2;
  LAPTOPS = 3;
  HEADPHONES = 4;
  CHARGERS = 5;
  SPEAKERS = 6;
  TELEVISIONS = 7;
  MODEMS = 8;
  KEYBOARDs = 9;
  MICROPHONES = 10;
}
message ProductItem {
  int32 id = 1;
  string name = 2;
  string description = 3;
  float price = 4;
  Category category = 5;
}

message ProductItems {
  repeated ProductItem products = 1;
}

message DeleteProductResponse {
  bool deleted = 1;
}
Step 3: setting up the server
Now, you’ll set up the gRPC server using the gRPC-js and proto-loader packages. Navigate to server.js and paste the following code:
const gRPC = require('@gRPC/gRPC-js');
const protoLoader = require("@gRPC/proto-loader");

const packageDef = protoLoader.loadSync("product.proto", {});
const gRPCObject = gRPC.loadPackageDefinition(packageDef);

const productPackage = gRPCObject.product;

const products = [];

function createProduct(call, callback) {}
function readProduct(call, callback) {}
function readProducts(call, callback) {}
function updateProduct(call, callback) {}
function deleteProduct(call, callback) {}

const server = new gRPC.Server();
server.addService(productPackage.Product.service, {
  createProduct,
  readProduct,
  readProducts,
  updateProduct,
  deleteProduct,
});

server.bindAsync("0.0.0.0:4000", gRPC.ServerCredentials.createInsecure(), () => {
  server.start();
});
This code first loads the .proto service definition file using the loadSync method and converts it into a gRPC object. The product package is then referenced from this gRPC object.
The empty products array will serve as your database. You will add, delete, update, and query objects from this array.
Right below the empty array are service functions, where we will add the implementation logic for the service methods we declared in product.proto. These functions take two parameters: call and callback.
The call parameter references the incoming request object, which includes all of the parameters sent with that request. The callback is a function that the server handler calls when it is done processing the request. It is used to send a response back to the client or to communicate an error if one occurs. The first parameter of the callback function takes in an error object (or null if there are no errors). The second argument is the response object, which is used to return data to the client.
Next, the gRPC server is created using the gRPC module, and the service methods are added to this service using the addService method. Finally, the server is bound to a port and started.
Step 4: working with the Postman gRPC client
Now, we will write the service method logic—and use the Postman gRPC client to confirm that our methods are working as expected.
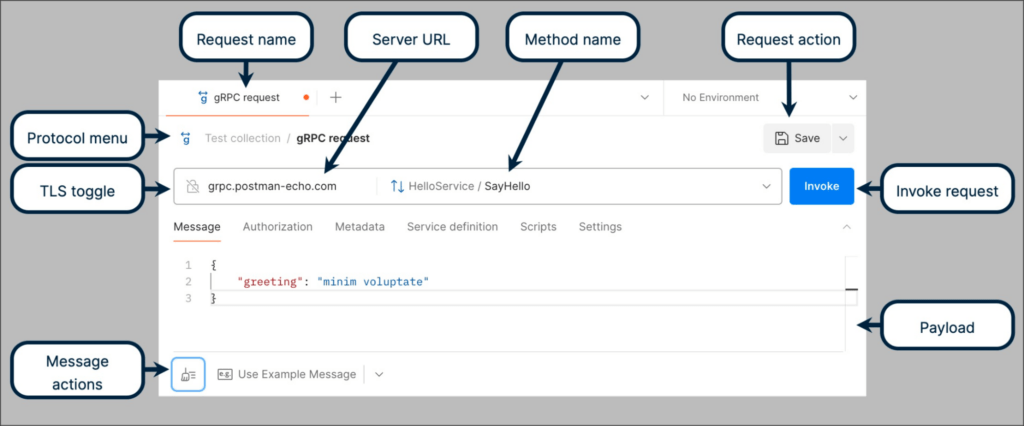
The Postman gRPC client enables you to easily test, collaborate on, and work with gRPC APIs. You can upload your Protobuf definition, and Postman will automatically understand all of its services and available methods. It can generate an example payload for each method, as well as a mock server for the entire service. It supports server reflection, as well as all four types of data streaming.
Related: Manage gRPC APIs using Postman
Navigate to the APIs tab on the left sidebar of your workbench and click the + icon to create a new API. Select Continue without a repository, click Add a new definition file, and select Protobuf 3. Create the definition, copy and paste your entire Protobuf file, and click Save:
Note: You can also author your Protobuf files directly within Postman using our editor—or import it from a remote repository.
Next, create a new gRPC request and save this request in a new collection, as shown below:
Step 5: write the service method logic
The functions for the service methods are already defined in the server,js file. We will now write the logic for these different methods.
CreateProduct
The createProduct method takes in a product object and pushes it to the database array. The product object is obtained from request.data. This data is destructured into a new object that includes a product ID. Then, the new object is pushed into the products array and sent back to the client:
function createProduct(call, callback) {
  const data = call.request;

  const newProductData = { ...data, id: products.length + 1};

  products.push(newProductData);

  return callback(null, newProductData);
}
Once you’ve added this code, start your server with the following command:
node server.js
Navigate to your Postman Collection and create a new gRPC request called “Create Product.”
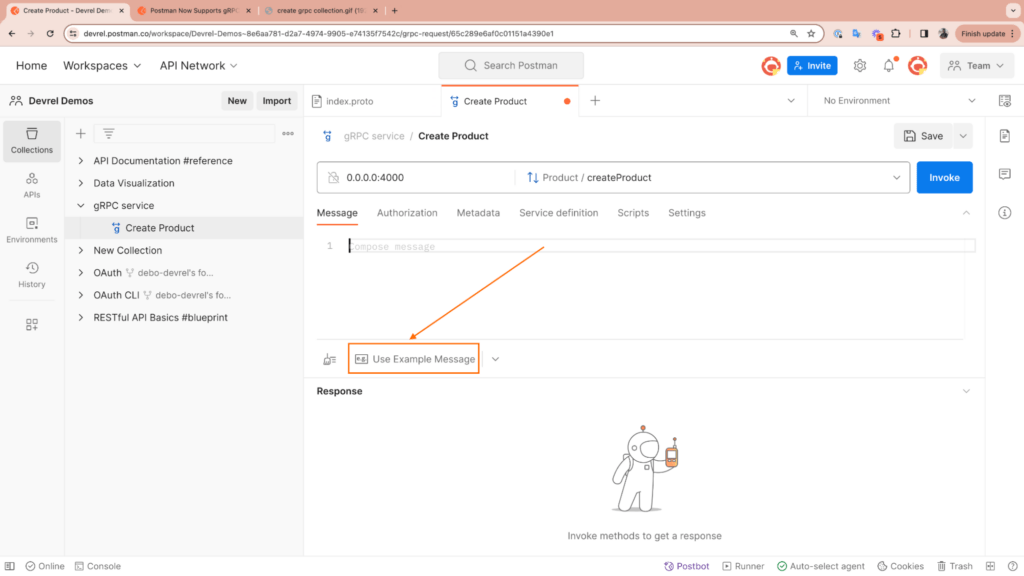
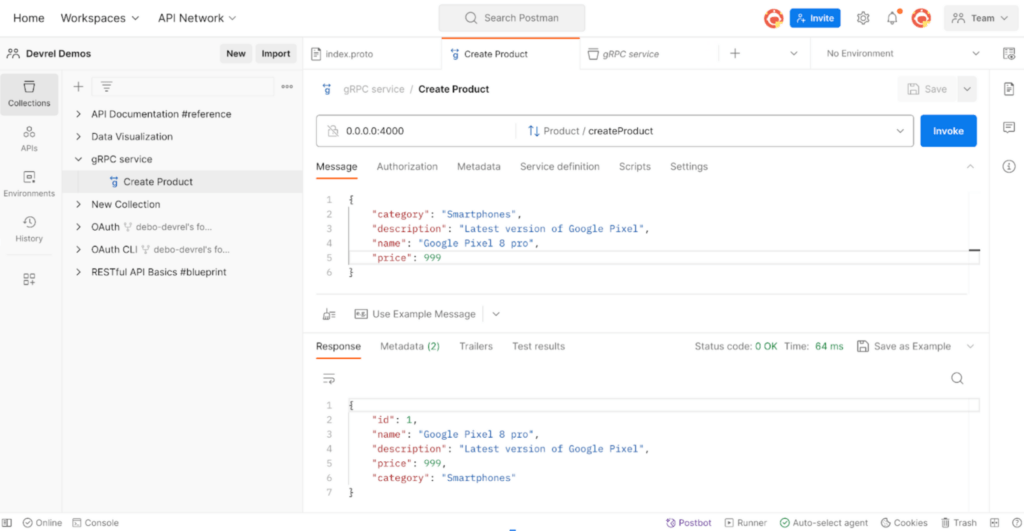
Copy and paste the server URL (0.0.0.0:4000) into the server URL input box and click Select a method. Select the name of the API you created in the previous step. This should load all of your service methods. Select the createProduct method. Then, in the message tab, click Use Example Message or add a Product message manually. Modify the example message to suit your needs and click Invoke:
You’ll get a response that includes the newly-created product’s data, which can be saved as an example response for this request:
ReadProduct and ReadProducts
To read a single product, you’ll use its ID to search for it in the product array. If a product with the specified ID does not exist in the array, the function will return a gRPC error with one of the predefined status codes:
function readProduct(call, callback){
  const productId = call.request.id;
  const selectedProduct = products.find(product => product.id === productId);

  if(selectedProduct){
    return callback(null, selectedProduct);
  } else {
    callback({
      code: gRPC.status.NOT_FOUND,
      details: "Could not find a product with the specified ID"
    });
  }
}
To read all products, you simply return the product array to the client:
function readProducts(call, callback){
  return callback(null, { products });
}
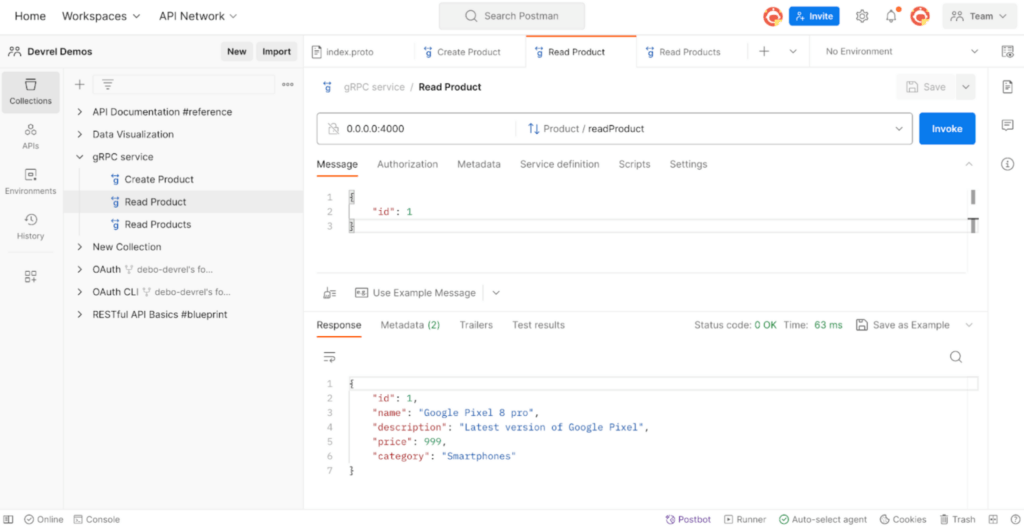
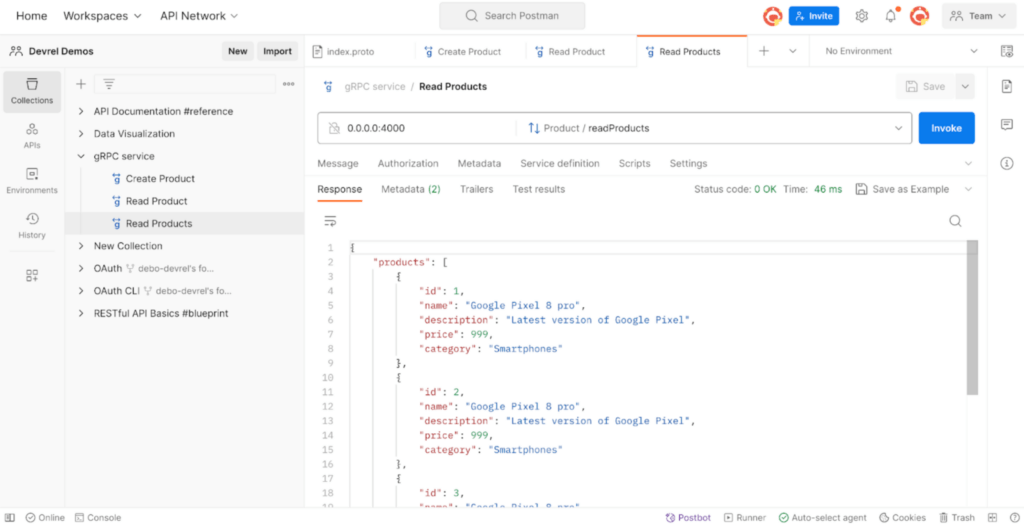
Restart the server, navigate to your collection, and create two new gRPC requests with the methods readProduct and readProducts, respectively. As we explained, the readProduct method takes in an id as its message and returns only the specified product (or an error if that product does not exist), while the readProducts message returns an array of all products:
UpdateProduct
To update a product, we first use its ID to find it in the product array. Then, we create a new object that includes the updated product information from the request. Any fields not included in the request will maintain their current values. This new object then replaces the existing object in the product array:
function updateProduct(call, callback){
  const productInfo = call.request;

  const productIndex = products.findIndex(product => product.id === productInfo.id);


  if(!productIndex){
    return callback({
      code: gRPC.status.NOT_FOUND,
      details: "Could not find a product with the specified ID to update"
    });
  }

  const selectedProduct = products[productIndex];

  const updatedProduct = {
    id: selectedProduct.id,
    name: productInfo.name ?? selectedProduct.name,
    description: productInfo.description ?? selectedProduct.description,
    price: productInfo.price ?? selectedProduct.price,
    category: productInfo.category ?? selectedProduct.category,
  }

  products.splice(productIndex, 1, updatedProduct);

return callback(null, updatedProduct);
}
Restart the server, navigate to your collection, and add an UpdateProduct request. Provide the ID of the product you want to update, as well as the properties you want to update:
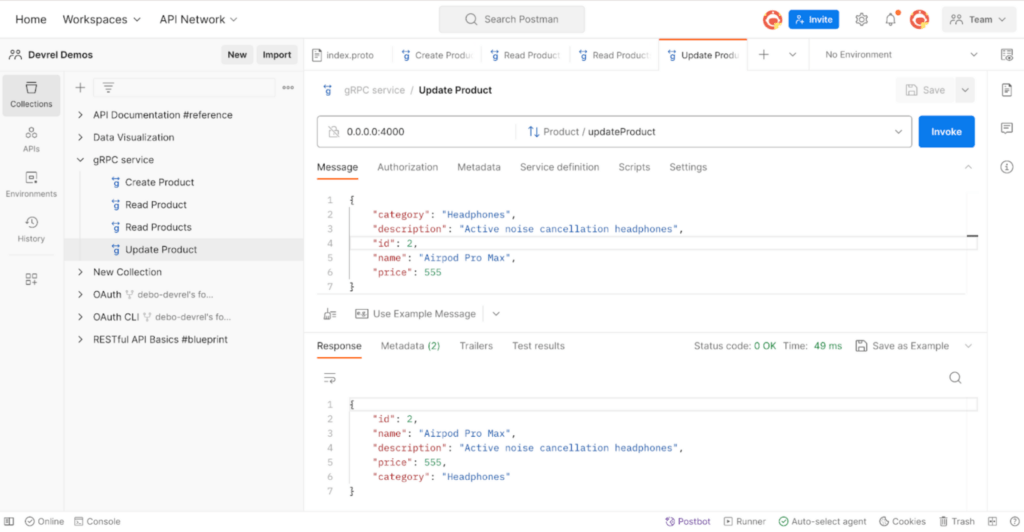
Click Invoke. Then, navigate to the viewProducts method and invoke it to confirm that the product with the specified ID was, indeed, updated.
DeleteProduct
To delete a product, we’ll use the product ID in the request to find the product’s index in the product array. We’ll then use this index to remove the product object from the array:
function deleteProduct(call, callback){
  const productId = call.request.id;
  const productIndex = products.findIndex(product => product.id === productId);
  if(!productIndex){
    return callback({
      code: gRPC.status.NOT_FOUND,
      details: "Could not find a product with the specified ID to delete"
    });
  }

  products.splice(productIndex, 1);

  return callback(null, { deleted: true });
}
Restart the server, create a new request in your collection, and invoke the deleteProduct method on a specific ID:
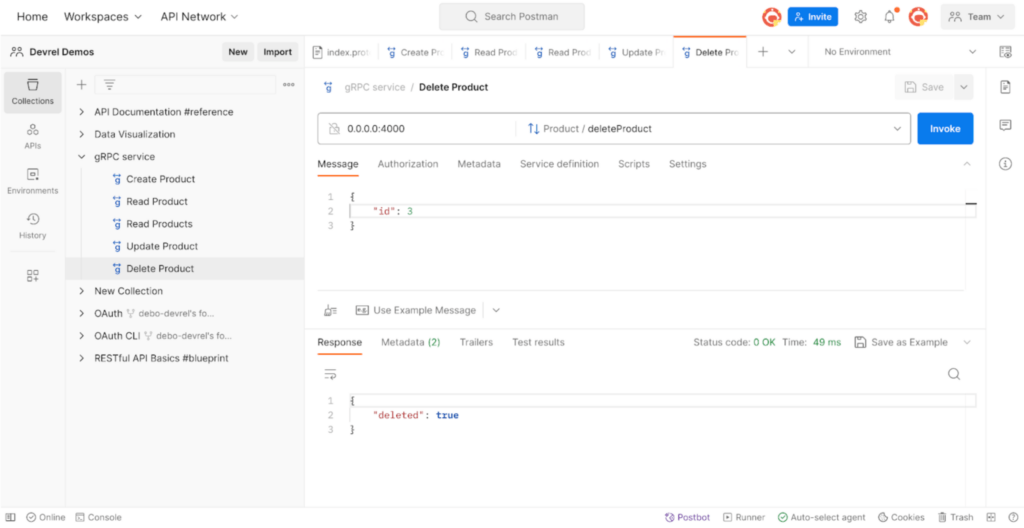
To wrap up, invoke the ReadProducts method to confirm that the product with the specified ID was, indeed, deleted.
Additional resources
We’ve covered a lot in this tutorial. We set up a Node.js project, created a gRPC service using Protobuf, and set up a basic server. We then wrote the service functions for our gRPC service—and learned how the Postman gRPC client can help you work more efficiently with gRPC APIs. The source code for this tutorial can be found here, and the collection used to test the gRPC API on the client side can be found here. You can fork this collection to your workspace to easily get started.
To learn more about working with a gRPC API, check out this step-by-step tutorial video:
What do you think about this topic? Tell us in a comment below.